Let's talk tuna, but not just any tuna – let's talk about perfectly seared tuna. The kind that melts in your mouth, with a beautiful crust on the outside and a tender, juicy center. You know, the kind you usually find at a fancy restaurant. I've been obsessed with perfecting this dish for a while now. It’s become my go-to for a quick and impressive meal, and I'm always looking for ways to elevate it.
Don’t get me wrong, I've had my share of tuna mishaps. There was that time I overcooked it, leaving me with a dry, rubbery texture. Then there was that other time when I completely lost my nerve, ending up with a tuna steak raw in the middle. But through trial and error, I've finally cracked the code, uncovering the secret to achieving that perfect sear, that delicate balance of crispy exterior and succulent center. It's a real game changer, turning a simple ingredient into something truly special. It's the kind of dish that makes you feel like a culinary rockstar, even if you're just whipping it up on a Tuesday night.
So, I figured, why not share the love? Why not let you in on all the secrets I've learned along the way? Because, honestly, everyone deserves to experience the joy of a perfectly seared tuna steak. So, buckle up, because this is going to be a journey. We'll start with the basics, then we'll delve into the nitty-gritty details, and by the end of this, you'll be a seared tuna pro, trust me.
(Part 1) Choosing the Right Tuna

The Perfect Cut: It's All About the Thickness
First things first, we need to talk about the tuna itself. You know, I've learned the hard way that not all tuna is created equal. For that perfect sear, you want to go for a nice, thick cut of tuna. Think yellowfin tuna or bigeye tuna, and look for a steak that's about an inch and a half thick. You want something substantial, something that will hold its shape during the cooking process and not turn into a mushy mess.
Imagine trying to sear a thin piece of tuna. It's almost impossible to get that perfect crust without overcooking the center. A thicker cut allows you to sear the outside quickly while keeping the inside juicy. It's a game changer, trust me.
Freshness is Key: The Difference Between Fresh and Frozen
And then there's the matter of freshness. This is where you really have to pay attention. I've always been a big believer in buying fresh, and when it comes to tuna, it's even more crucial. Look for a piece of tuna that's bright red, with a slight sheen. Avoid any tuna that has a dull color, a fishy smell, or a slimy texture. You want tuna that's firm to the touch, not mushy.
You know, I used to think that frozen tuna was just as good as fresh. But trust me, there's a difference. Fresh tuna has a delicate flavor that's simply unmatched. Plus, it's much more likely to hold its shape during cooking. So, if you can, always opt for fresh tuna.
(Part 2) Prepping the Tuna: A Few Simple Steps for Success
Pat It Dry: The Key to a Perfect Sear
Now, once you've got your hands on that perfect piece of tuna, it's time for the prep work. The first step, and this is crucial, is to pat the tuna dry with paper towels. This might sound like a trivial step, but it's actually really important. Why? Because moisture is the enemy of a good sear. A wet surface will steam the tuna instead of searing it, and that's not what we want. We want a nice, crisp crust.
Imagine putting a wet steak on a hot pan. It will sizzle and steam, preventing that beautiful sear from forming. The same principle applies to tuna. By patting it dry, you're allowing the heat to penetrate the surface evenly, creating that irresistible crust.
Seasoning It Up: Enhance the Flavor of Your Tuna
Next comes seasoning. This is where you can get creative. You can keep it simple with just salt and pepper, or you can go wild with a mix of herbs and spices. Personally, I'm a big fan of a simple combination of salt, pepper, and a touch of garlic powder. But really, the sky's the limit. You can add paprika, cumin, cayenne pepper, chili flakes, or whatever your heart desires.
One thing I've learned over the years is that a little bit of salt goes a long way. Don't be afraid to season liberally, but don't overdo it. You want to enhance the flavor of the tuna, not drown it out.
(Part 3) Searing the Tuna: The Magic Happens Here
The Hot Pan: The Secret to a Crispy Crust
Here's where the real magic happens. You'll need a heavy-bottomed skillet, preferably one made of cast iron. Cast iron heats up evenly and retains heat really well, which is key for getting a perfect sear. And it should be screaming hot. Like, seriously hot. We're talking high heat, the kind that makes your eyebrows singe.
You see, the key to a perfect sear is to get the pan super hot. This sears the outside of the tuna quickly, creating a beautiful crust. It's a delicate balance, though. Too little heat, and the tuna will steam instead of sear. Too much heat, and you'll end up with a burnt outside and a raw inside.
Oil It Up: The Foundation for a Delicious Crust
Now, before you go throwing your tuna onto the pan, you need to add some oil. I prefer using a neutral oil with a high smoke point, like grapeseed oil or avocado oil. But you can also use olive oil if you like. Just make sure it's not extra virgin olive oil, because that has a low smoke point and will start to burn before the tuna is cooked through.
The oil acts as a lubricant, preventing the tuna from sticking to the pan and ensuring even cooking. A high smoke point oil is important because it won't break down at high temperatures, ensuring that your tuna cooks evenly without burning.
The Sear: The Moment of Truth
Right, with your pan screaming hot and the oil shimmering, it's time for the grand finale. Carefully lay the tuna in the pan and let it cook undisturbed for about 2 minutes per side. Don't touch it! Let it form a beautiful crust. After 2 minutes, you can flip it over and cook for another 2 minutes on the other side.
I know it can be tempting to poke at it and peek at it, but trust me, it's better to just let it do its thing. The longer you cook it, the more likely it is to dry out. Remember, we're aiming for a juicy center, not a dry, rubbery piece of tuna.
(Part 4) Checking for Doneness: Making Sure Your Tuna is Perfect
The Touch Test: A Simple Way to Gauge Doneness
Okay, so you've got your tuna seared to perfection. But how do you know if it's cooked through? Well, there's a little trick I've learned over the years. You can check the doneness by using the touch test. Gently press the tuna with your finger. If it feels firm and springy, it's cooked through. If it feels soft and jiggly, it needs more time.
The internal temperature: For Accuracy and Peace of Mind
If you're still unsure, you can always use a meat thermometer. The ideal internal temperature for tuna is about 125-130 degrees Fahrenheit. Anything less than that, and you're risking food poisoning. Anything more than that, and you're going to have dry tuna.
(Part 5) Resting the Tuna: The Secret to Tenderness and Juiciness
Let It Rest: Allowing the Juices to Redistribute
Once the tuna is cooked to your liking, it's time to let it rest. This is a crucial step that's often overlooked. Resting the tuna allows the juices to redistribute, resulting in a more tender and flavorful piece of tuna. So, let it rest for about 5 minutes before slicing and serving.
You know, I've made this mistake a few times, slicing the tuna right out of the pan, and I always regret it. The tuna ends up dry and the juices all run out. So, be patient and let it rest. It'll be worth it, I promise.
(Part 6) Serving the Tuna: Get Creative with Your Presentation
Get Creative: Endless Possibilities for a Delicious Meal
Okay, so you've got your perfectly seared tuna, all rested and ready to go. Now it's time to get creative with your presentation. There are endless possibilities. You can serve it over a bed of rice, noodles, or quinoa. You can add a colorful salad with fresh vegetables and a tangy dressing. Or you can keep it simple and just serve it with a side of steamed vegetables and a squeeze of lemon.
My Go-To Combination: A Simple and Flavorful Option
Personally, I'm a big fan of serving my seared tuna with a side of roasted vegetables and a light, citrusy dressing. The combination of flavors and textures is just amazing. But hey, that's just me. Experiment and find what you like best.
Don't forget to add a splash of color to your plate. A few sprigs of fresh herbs or a scattering of edible flowers can really elevate your dish. It's all about making it look as good as it tastes.
(Part 7) seared tuna recipes: From Simple to More Adventurous
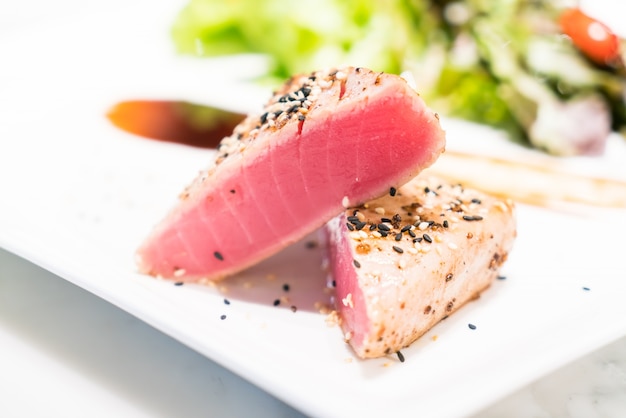
Simple Seared Tuna with Sesame Seeds: A Quick and Easy Option
Here's a quick and easy recipe that's perfect for a weeknight meal:
Ingredients:
- 1 tuna steak, about 1.5 inches thick
- 1 tablespoon grapeseed oil
- 1 tablespoon sesame seeds
- Salt and pepper to taste
Instructions:
- Pat the tuna steak dry with paper towels.
- Season the tuna with salt and pepper.
- Heat the grapeseed oil in a cast iron skillet over high heat.
- Add the tuna to the skillet and sear for 2 minutes per side.
- Sprinkle with sesame seeds and serve immediately.
Seared Tuna with Mango Salsa: A More Adventurous Flavor Combination
Here's a recipe that's a bit more adventurous:
Ingredients:
- 1 tuna steak, about 1.5 inches thick
- 1 tablespoon olive oil
- 1 mango, diced
- 1/2 red onion, diced
- 1/4 cup chopped cilantro
- 1/4 cup lime juice
- 1/4 teaspoon chili powder
- Salt and pepper to taste
Instructions:
- Pat the tuna steak dry with paper towels.
- Season the tuna with salt and pepper.
- Heat the olive oil in a cast iron skillet over high heat.
- Add the tuna to the skillet and sear for 2 minutes per side.
- While the tuna is cooking, combine the mango, red onion, cilantro, lime juice, and chili powder in a bowl.
- Season with salt and pepper to taste.
- Let the tuna rest for 5 minutes.
- Serve the tuna with the mango salsa.
(Part 8) Serving Tips: Elevate Your Presentation and Enjoyment
Presentation is Key: Make Your Dish a Visual Feast
Let's talk about presentation. You know, it's all about creating a visual feast, right? It's not just about the taste, it's about the whole experience. So, here are a few tips for presenting your seared tuna like a pro:
Think about the shape and size of the tuna. I like to slice it into thick slices or even leave it whole, depending on the recipe. You can also cut it into small squares or dice it for a salad.
Add some colour to your plate. A colourful salad or a vibrant salsa will make your dish even more appealing. I like to use a mix of different greens and vegetables, such as spinach, arugula, and cherry tomatoes.
Use fresh herbs and edible flowers for a touch of elegance. A sprig of rosemary or a few basil leaves can really make your dish pop.
Keep it simple, but don't be afraid to add a few touches of artistry. A dollop of sauce or a drizzle of oil can add a nice finishing touch.
Pairing with Drinks: Complementing Your Tuna with the Right Beverage
Now, what to drink with your perfectly seared tuna? It all comes down to personal preference. I like to pair it with a crisp, dry white wine, like Sauvignon Blanc or Pinot Grigio. But you can also enjoy it with a light-bodied red wine, like Pinot Noir or Beaujolais. If you're feeling adventurous, try a sparkling wine or a dry rosé.
Table Setting: Creating a Welcoming Atmosphere
Don't forget about the table setting. Choose a tablecloth and napkins that complement the colours of your dish. I like to use white or beige, which creates a clean and elegant backdrop. And don't forget to add some candles for a romantic touch.
(Part 9) FAQs: Addressing Common Questions About Seared Tuna
1. Can I use frozen tuna for this recipe?
You can use frozen tuna, but it won't be as good as fresh tuna. Frozen tuna often has a slightly different texture and flavor. If you're using frozen tuna, make sure to thaw it completely in the refrigerator before cooking.
2. How do I know if the tuna is cooked through?
You can check the doneness of the tuna by using the touch test. Gently press the tuna with your finger. If it feels firm and springy, it's cooked through. If it feels soft and jiggly, it needs more time. You can also use a meat thermometer. The ideal internal temperature for tuna is about 125-130 degrees Fahrenheit.
3. What happens if I overcook the tuna?
If you overcook the tuna, it will become dry and rubbery. It's best to err on the side of undercooking than overcooking. If you're unsure, it's always better to check the doneness with a meat thermometer.
4. Can I use any type of oil for searing the tuna?
It's best to use a neutral oil with a high smoke point, like grapeseed oil or avocado oil. These oils won't burn at high temperatures and will give your tuna a nice sear. You can also use olive oil, but make sure it's not extra virgin olive oil, because that has a low smoke point.
5. What are some other ways to cook tuna?
There are many different ways to cook tuna, including grilling, baking, and pan-frying. You can also use tuna in salads, sandwiches, and sushi. Experiment and find what you like best!
Now, go forth and conquer the world of seared tuna! You've got this. And remember, if you're ever unsure about anything, just ask! I'm always happy to help.
Happy cooking!
Everyone is watching

Corn on the Cob: The Ultimate Guide to Perfectly Cooked Ears
Healthy MealsAh, corn on the cob. Just the name evokes images of sunny days, barbecues, and that sweet, juicy flavour that ...

Scallops: The Ultimate Guide to Perfect Cooking
Healthy MealsAh, scallops. Those delicate, sweet, and utterly delicious morsels of the sea. They hold a special place in my...

Spaghetti Squash: The Ultimate Guide to Cooking and Serving
Healthy MealsRemember that time you saw spaghetti squash at the supermarket, looking all bumpy and strange, and thought, "W...

Salmon Cooking Times: Perfect Guide for Every Recipe
Healthy MealsLet me tell you, cooking salmon is an art form. It's all about getting that perfect balance: juicy and tender,...

Ham Cooking Time: How Long to Bake, Smoke, or Boil a Delicious Ham
Healthy MealsAh, ham. It's a classic, isn't it? A real crowd-pleaser, especially around holidays. And when done right, it'...