The ribeye roast, a culinary icon. It conjures up images of succulent, juicy meat, perfectly seared and brimming with flavour. It's the kind of dish that makes you feel like a master chef, even if, like me, you're just someone who appreciates a good roast dinner. But let's face it, getting a ribeye roast just right can be a bit of a challenge. Undercook it, and you'll end up with a tough, chewy disappointment. Overcook it, and you'll be left with a dry, disappointing mess.
That's where this guide comes in, my comprehensive guide to nailing that perfect ribeye roast every time. We'll dive into the secrets of cooking time, temperature, and everything in between, sharing tips and tricks I've picked up over the years. So, grab your favourite apron, pour yourself a refreshing beverage, and let's embark on this culinary adventure together!
(Part 1) The Anatomy of a Ribeye Roast: Understanding the Cut
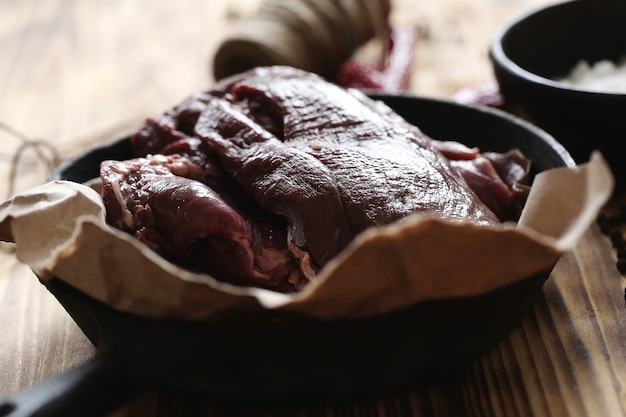
Before we get our hands dirty, let's take a closer look at the glorious ribeye roast itself. This cut of beef comes from the rib section and is known for its marbling – those beautiful streaks of fat that give it that irresistible flavour and tenderness. Understanding a few key points about the ribeye roast will make your cooking journey smoother.
1. Size Matters: A Roast for Every Occasion
Ribeye roasts come in a range of sizes, from small, compact beauties perfect for a romantic dinner to massive behemoths suitable for a feast. The size of your roast will have a direct impact on the cooking time, so knowing its weight is crucial.
2. Bone-In or Boneless: A Matter of Preference
Ribeye roasts can be found both bone-in and boneless. Bone-in roasts tend to be more flavorful because the bone helps to retain moisture during cooking. However, boneless roasts are easier to carve and offer a more streamlined presentation. Choose your preference based on your needs and cooking style.
(Part 2) Choosing the Perfect Ribeye Roast: A Butcher's Eye View
The path to a fantastic ribeye roast starts with selecting the right cut. Here's what I look for when I'm browsing the butcher's counter:
1. Marbling: The Key to Juiciness and Flavor
As I mentioned earlier, marbling is the secret to a juicy, flavourful ribeye roast. Look for roasts with good marbling throughout. The more marbling, the better, as it translates to richer flavour and incredible tenderness. A good butcher can often point you towards roasts with the best marbling, so don't hesitate to ask for their recommendations.
2. Colour: A Sign of Freshness and Quality
The colour of the beef can provide clues about its freshness and quality. A bright, cherry red colour indicates fresh meat. Avoid roasts that have a dull, brown colour, as this could be a sign of age and potentially lower quality. A slightly darker red colour can also indicate a more mature beef, which can be a preference for those who appreciate a richer flavour.
3. Texture: Firm and Supple for a Tender Outcome
A good ribeye roast should feel firm and supple to the touch. Avoid roasts that feel mushy or have a strange smell. A slight sniff test can be helpful in assessing the overall freshness. If the meat has an off odour, it's best to choose another roast. Remember, your senses are powerful tools in selecting quality meat.
(Part 3) Prepping Your Ribeye Roast: Setting the Stage for Success
Now that you've got your prized ribeye roast, it's time to give it some TLC before it goes into the oven. Here's my approach to prepping for a perfect roast:
1. Pat It Dry: Preventing Steam and Ensuring a Crisp Crust
Start by patting your roast dry with paper towels. This helps to ensure a nice even sear and prevents excess moisture from steaming the meat, which can lead to a soggy crust. A crisp crust is a hallmark of a well-cooked ribeye roast, so don't skip this step.
2. Seasoning: Keep It Simple, Let the Beef Shine
I prefer to keep my seasoning simple for ribeye roasts. A good sprinkle of salt and black pepper is all you really need. The natural flavour of the beef is the star of the show, and too many spices can overwhelm it. However, if you're feeling adventurous, a touch of garlic powder, onion powder, or even a pinch of dried rosemary can enhance the flavour profile. Just use them sparingly, allowing the beef's inherent richness to shine through.
3. Fat Cap: A Delicious Detail
If your ribeye roast has a fat cap, leave it on! The fat cap acts as a natural insulator, helping to keep the meat moist during cooking. It also contributes to a luscious, flavourful crust. You can score the fat cap to help it render evenly, but it's not essential. The fat will melt down as the roast cooks, adding both flavour and moisture to the meat.
(Part 4) Cooking Methods: Your Choices for a Delicious Outcome
There are a few different ways to cook a ribeye roast, but my go-to methods are roasting in the oven and reverse searing. Let's delve into each of them in more detail.
1. oven roasting: The Classic Approach
Oven roasting is a classic way to cook a ribeye roast, and it's relatively simple. Here's the basic process:
- Preheat your oven to 450°F (230°C). A high initial temperature helps to create a beautiful crust.
- Place the ribeye roast on a roasting rack set inside a baking pan. The rack allows air to circulate around the roast, ensuring even cooking.
- Roast for 15 minutes, then reduce the oven temperature to 325°F (160°C). The lower temperature allows the roast to cook more slowly and evenly.
- Continue roasting until the internal temperature reaches your desired level of doneness. This is where a meat thermometer comes in handy.
I usually aim for a medium-rare doneness, which is around 135°F (57°C). However, your preferred level of doneness will vary, so adjust the cooking time accordingly. We'll get into specific cooking times for different sizes of roasts in the next section. Remember, a meat thermometer is your best friend in achieving the perfect doneness.
2. Reverse Searing: Slow and Steady Wins the Race for Tenderness
Reverse searing is a bit more involved but can produce incredibly juicy and flavorful results. It's a method that prioritizes slow, even cooking, ensuring a tender, succulent roast. Here's how it works:
- Preheat your oven to 250°F (120°C). The low temperature allows the roast to cook slowly and evenly, preventing it from drying out.
- Place the ribeye roast on a roasting rack set inside a baking pan. The rack provides air circulation, and the pan will catch any drippings for potential gravy.
- Roast until the internal temperature reaches 125°F (52°C) for medium-rare. This can take a few hours depending on the size of the roast. Patience is key here, as the slow cooking allows the meat to become incredibly tender.
- Remove the roast from the oven and let it rest for 15 minutes. This allows the juices to redistribute throughout the meat, resulting in a more flavorful and succulent roast.
- While the roast is resting, heat a cast iron skillet or griddle over high heat. A hot surface is essential for creating a beautiful, crispy crust.
- Sear the roast for 2-3 minutes per side, creating a beautiful crust. The high heat sears the exterior, giving it a delicious crust and locking in the juices.
- Let the roast rest for another 10 minutes before carving and serving. This allows the juices to settle, resulting in a more tender and flavorful roast.
Reverse searing allows the meat to cook slowly and evenly, ensuring that it stays tender and juicy. The final sear adds a delicious crust and intensifies the flavour. It's a method that yields incredibly flavorful and succulent results, justifying the extra time and effort.
(Part 5) Cooking Times: A Guide to Success for Every Size Roast
Now, let's get into the nitty-gritty of cooking times. Remember, these are just guidelines. The actual cooking time will vary depending on the thickness and weight of your roast, as well as your oven's temperature. It's always a good idea to use a meat thermometer to ensure your roast is cooked to your liking. A meat thermometer is an indispensable tool for achieving perfect doneness, taking the guesswork out of cooking.
1. Oven Roasting Cooking Times: A Reference for Various Weights
Here's a table that provides approximate cooking times for ribeye roasts based on their weight. This is for oven roasting at 325°F (160°C):
| Weight (lbs) | Cooking Time (minutes) | Internal Temperature (F) |
|---|---|---|
| 2-3 | 60-75 | 135-140 (Medium-rare) |
| 4-5 | 75-90 | 135-140 (Medium-rare) |
| 6-7 | 90-105 | 135-140 (Medium-rare) |
| 8-9 | 105-120 | 135-140 (Medium-rare) |
2. Reverse Searing Cooking Times: A Timetable for Patience
Reverse searing requires a bit more patience, but it's worth it. Here's a general guideline for reverse searing:
- For a 3-4 lb roast, plan for 3-4 hours at 250°F (120°C) until the internal temperature reaches 125°F (52°C).
- For a 5-6 lb roast, plan for 4-5 hours at 250°F (120°C) until the internal temperature reaches 125°F (52°C).
- For a 7-8 lb roast, plan for 5-6 hours at 250°F (120°C) until the internal temperature reaches 125°F (52°C).
Remember, these times are approximate. Use a meat thermometer to check the internal temperature to ensure your roast is cooked to your liking. The key is to be patient and allow the meat to cook slowly and evenly. A meat thermometer is your best friend in this process, giving you accurate readings and ensuring perfect doneness.
(Part 6) Resting: A Crucial Step for Tenderness and Juiciness
After you've cooked your ribeye roast to perfection, it's important to let it rest before carving and serving. This is a crucial step that shouldn't be skipped! Resting allows the juices to redistribute throughout the meat, resulting in a more tender and flavorful roast. Think of it as giving the roast a chance to relax and recover after its time in the oven.
Let the roast rest for at least 15 minutes, covered with foil, before carving. This keeps the roast warm and allows the juices to redistribute throughout the meat. While it's resting, you can prepare your sides and get your table ready.
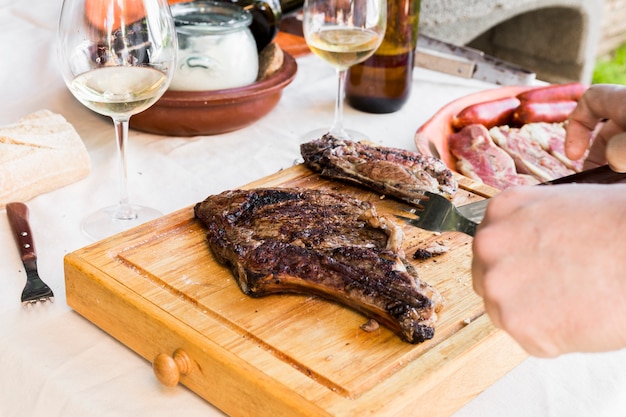
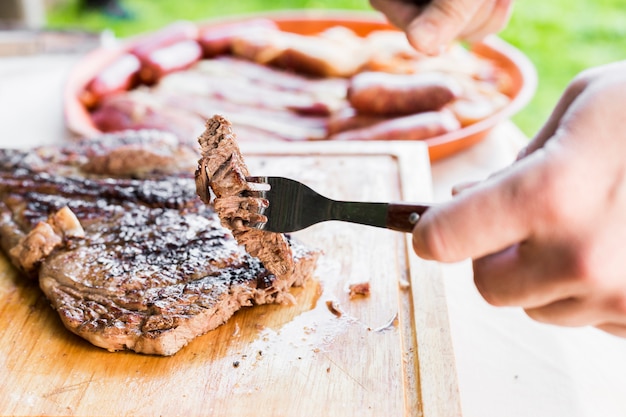
(Part 7) Carving: A Skill to Master for a Stunning Presentation
Carving a ribeye roast can seem daunting, but it's actually quite straightforward. Here's how I approach it:
- Use a sharp carving knife. A dull knife will tear the meat and make it look messy. Invest in a good quality carving knife, or visit your local butcher for assistance.
- If your roast is bone-in, carve around the bone to remove the meat. Use a gentle sawing motion to remove the meat from the bone, avoiding excessive pressure.
- Slice the meat against the grain. This helps to make the meat more tender. Look for the natural direction of the muscle fibers and slice perpendicular to them. This will make the meat easier to chew and more tender.
- Cut slices about 1/2 inch thick. Thin slices are easier to chew and offer a more elegant presentation.
- Arrange the sliced meat on a platter and serve immediately. A beautifully arranged platter adds to the overall dining experience.
Don't be afraid to ask for help from a butcher or a seasoned cook if you're feeling unsure about carving. It's better to ask than to ruin a perfectly cooked roast! There's no shame in seeking guidance, especially from those who have years of experience.
(Part 8) Serving Your Masterpiece: The Grand Finale
The moment of truth has arrived! Your ribeye roast is cooked to perfection, rested, and ready to be devoured. Now, it's time to dress it up and present it with pride. The final touches are crucial in creating a memorable culinary experience.
1. Plating with Flair: Adding Visual Appeal to the Table
Arrange your beautifully carved slices of ribeye roast on a platter. You can add a touch of elegance with some fresh herbs, a sprig of rosemary, or a few slices of lemon. Let the meat be the star, but a little bit of visual appeal never hurts. The aroma alone will have your guests salivating, but a touch of visual appeal adds to the overall sensory experience.
2. Accompanying Delights: A Symphony of Flavors and Textures
No ribeye roast is complete without some fantastic sides. Consider a medley of roasted vegetables, a creamy mashed potato, a vibrant green salad, or a rich gravy. The possibilities are endless. Let your culinary creativity flow! Think about contrasting textures and flavours to create a balanced and satisfying meal. For instance, the rich, juicy roast pairs beautifully with the crispness of a green salad or the earthy flavour of roasted vegetables.
3. Wine Pairing: A Symphony of Flavors
A good glass of wine can elevate your ribeye roast experience to new heights. Choose a red wine with robust tannins, such as Cabernet Sauvignon, Merlot, or Shiraz. These wines will complement the rich flavour of the beef and create a harmonious symphony on your palate. A full-bodied red wine with rich tannins can stand up to the flavour of the beef, enhancing the overall dining experience.
(Part 9) FAQs: Your Questions Answered for a Stress-Free Cook
I'm sure you're bursting with questions about ribeye roasts, so let's tackle some of the most common ones.
1. What is the best temperature to cook a ribeye roast?
The ideal temperature for cooking a ribeye roast depends on your preferred level of doneness. Here's a general guideline:
- Rare: 125°F (52°C) - A rare roast will have a cool, red centre.
- Medium-rare: 130-135°F (54-57°C) - A medium-rare roast will have a warm, pink centre.
- Medium: 140-145°F (60-63°C) - A medium roast will have a slightly pink centre.
- Medium-well: 150-155°F (65-68°C) - A medium-well roast will have a very slight pink tinge.
- Well-done: 160°F (71°C) - A well-done roast will have a brown centre throughout.
Remember, these are just guidelines. Use a meat thermometer to check the internal temperature of your roast to ensure it's cooked to your liking. A meat thermometer is an essential tool for achieving consistent results and ensuring your roast is cooked to your exact preference.
2. Can I cook a ribeye roast in a slow cooker?
While you can technically cook a ribeye roast in a slow cooker, it's not the ideal method. Slow cookers tend to make the meat very tender, bordering on mushy. If you're looking for a more traditional roast, stick with the oven or reverse searing. These methods will yield a more robust and flavorful result. The slow cooker is better suited for cuts of meat that require a longer cooking time and benefit from a more tender texture.
3. How do I know if my ribeye roast is done?
The best way to determine if your ribeye roast is done is to use a meat thermometer. Insert the thermometer into the thickest part of the roast, making sure it doesn't touch any bone. Remove the roast from the oven when it reaches your desired internal temperature. A meat thermometer is an indispensable tool for achieving perfect doneness, taking the guesswork out of cooking.
4. What happens if I overcook a ribeye roast?
Overcooked ribeye roast will be dry and tough. The fat will render out, leaving the meat dry and lacking in flavour. To avoid overcooking, use a meat thermometer and check the internal temperature regularly. Overcooking is a common mistake, especially with leaner cuts of meat like ribeye. Using a meat thermometer allows you to monitor the internal temperature accurately and avoid overcooking.
5. What can I do with leftover ribeye roast?
Leftover ribeye roast is a delicious treasure! You can use it to create a variety of dishes, such as sandwiches, salads, or even a hearty soup. Leftover roast also makes a fantastic addition to a charcuterie board. Get creative and experiment with different recipes to maximize the flavour and enjoyment of your leftover roast. It's a great way to stretch the meal and make the most of your delicious ribeye roast.
Everyone is watching

Corn on the Cob: The Ultimate Guide to Perfectly Cooked Ears
Healthy MealsAh, corn on the cob. Just the name evokes images of sunny days, barbecues, and that sweet, juicy flavour that ...

Perfect Pork Roast Oven Cooking Time: A Guide to Delicious Results
Healthy MealsThere's something truly satisfying about a perfectly roasted pork. The aroma alone is enough to make your mout...

Ham Cooking Time: How Long to Bake, Smoke, or Boil a Delicious Ham
Healthy MealsAh, ham. It's a classic, isn't it? A real crowd-pleaser, especially around holidays. And when done right, it'...

Scallops: The Ultimate Guide to Perfect Cooking
Healthy MealsAh, scallops. Those delicate, sweet, and utterly delicious morsels of the sea. They hold a special place in my...

Spaghetti Squash: The Ultimate Guide to Cooking and Serving
Healthy MealsRemember that time you saw spaghetti squash at the supermarket, looking all bumpy and strange, and thought, "W...