(Part 1) Picking Your Prime: The Foundation of a Great Roast
The Cut: Choosing Your Rib Champion
Prime rib refers to a cut from the rib section of a beef carcass, often called a "standing rib roast" because it's sold with the bones still attached. You'll usually see it in two main sizes:
- prime rib roast: A heavyweight champion, usually weighing between 3-8 pounds. Perfect for big gatherings or when you love those leftovers!
- Rib Eye Roast: A more manageable size, typically weighing around 2-4 pounds. Ideal for smaller meals or if you're cooking for just a few people.
Now, here's a tip I've learned over time: if you're aiming for a more succulent and tender roast, go for a rib eye roast. It tends to be more marbled, leading to a richer flavor and a melt-in-your-mouth texture.
The Grade: The Meat's "Quality Control" Mark
The grade of the beef tells you about the level of marbling, those beautiful streaks of fat that contribute to tenderness and flavor. Aim for a higher grade like Select or Choice. Prime is the top of the line, but it's also the priciest.
My Personal Preference: Where I Find My Prime
Personally, I've found that a 3-4 pound rib eye roast is the perfect size for my family. It's lean enough to avoid being too fatty, but still incredibly flavorful and juicy. And I always prefer to get my meat from a local butcher. The quality is often better, and they offer a wider selection. Plus, they're a great resource for advice on picking the perfect cut.
(Part 2) Prepping the Roast: Setting the Stage for Flavor
The Paper Removal: A Quick Cleanup
First, remove any paper or netting the butcher may have used to wrap the roast. This is important because it can prevent browning and potentially burn during cooking.
Pat It Dry: Achieving a Perfect Crust
Pat the roast dry with paper towels. This is crucial for a beautiful, crispy crust on the outside, locking in those delicious juices. It also prevents excess moisture from steaming the meat, leading to a less desirable texture.
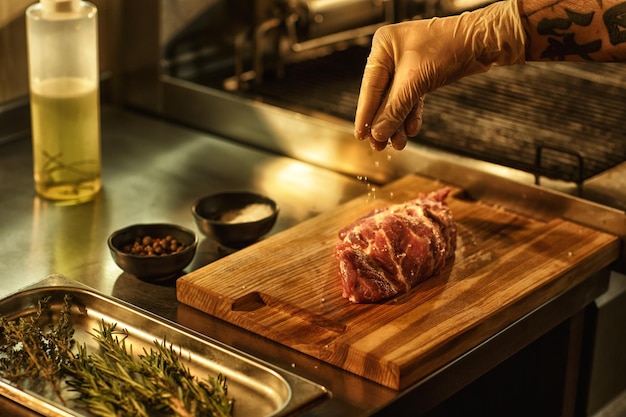
Seasoning Your Roast: A Symphony of Flavor
Time for the fun part! Seasoning your prime rib is where you can really express your culinary creativity. You can go simple with just salt and pepper, or add layers of flavor with your favorite herbs and spices. I love using a basic blend of salt, pepper, garlic powder, onion powder, and paprika, but the possibilities are endless.
I've tried everything from dry rubs to herb pastes, and I've found that a simple rub applied generously to the entire roast, including the cut sides of the bones, yields the best results. You can either apply the seasoning directly to the meat or create a paste by mixing it with a little olive oil or butter. Let those flavors penetrate by seasoning the meat well in advance.
The Power of Salt: A Flavor Booster
Salt is more than just a seasoning; it's a flavor enhancer. It helps to draw out excess moisture, contributing to a tender and juicy roast. I've found that salting the meat a day or two before cooking, allowing it to sit uncovered in the fridge, is the key to unlocking that truly incredible flavor.
(Part 3) Mastering the Oven: The Heat of the Moment
Preheat, Preheat, Preheat!: The Foundation of a Great Sear
Start by preheating your oven to a high temperature. This is crucial for getting a delicious sear on the outside, which seals in the juices and creates a crispy, flavorful crust. I usually preheat mine to 450°F (232°C) for the initial sear.
roasting time: A Guide to Perfectly cooked meat
The cooking time for your prime rib depends on its size and your desired level of doneness. Here's a general rule of thumb: cook a 3-4 pound roast for 15-20 minutes per pound at 450°F (232°C) for the initial sear. Then, lower the temperature to 325°F (163°C) and continue cooking for an additional 15-20 minutes per pound for medium-rare.
For example, a 3-pound roast would cook for 45-60 minutes at 450°F (232°C) for the initial sear, followed by 45-60 minutes at 325°F (163°C) for medium-rare.
Keep in mind that this is just a guideline. The actual cooking time can vary depending on your oven, the thickness of the roast, and your desired level of doneness.
The meat thermometer: Your Doneness Guide
Don't rely solely on time to gauge doneness. Invest in a good-quality meat thermometer and use it to check the internal temperature of the roast. For medium-rare, you're aiming for an internal temperature of 130°F (54°C). For medium, it's 140°F (60°C), and for well-done, it's 160°F (71°C).
Resting the Roast: Letting the Flavors Settle
Once the roast has reached your desired internal temperature, remove it from the oven and let it rest for at least 15-20 minutes. This crucial step allows the juices to redistribute throughout the roast, resulting in a more tender and flavorful piece of meat. During the resting time, cover the roast loosely with foil to keep it warm.
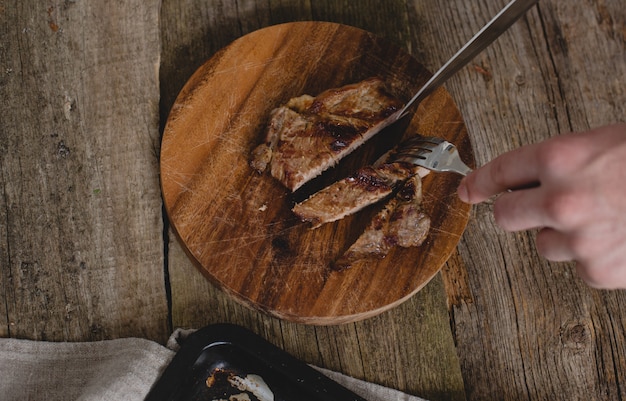
(Part 4) Carving the Prime Rib: The Grand Finale
The moment has arrived: the grand reveal! Here's how to carve your prime rib like a pro, so it's not only delicious but also visually stunning.A Sharp Knife: The Key to Perfect Slices
Use a sharp carving knife to make clean, even slices. A dull knife will shred the meat, resulting in an unappetizing presentation. You can also use a meat cleaver to cut through the bones. If you're using a carving knife, use a sawing motion to cut through the bones.
The Carving Technique: Step-by-Step
1. Place the roast on a cutting board with the bone side facing up.
2. Cut between the bones to remove the ribs.
3. Slice the meat against the grain to ensure tender, juicy slices.
Serving Up Your Creation: A Feast for the Senses
Arrange the sliced meat on a platter, alongside any accompaniments you've prepared. Prime rib is a superstar, but it needs a supporting cast! Some classic pairings include mashed potatoes, roasted vegetables, Yorkshire pudding, and gravy. Let those flavors mingle and create a truly unforgettable dining experience.
(Part 5) Temperature Guide: Your Guide to Perfect Doneness
Knowing the internal temperature of your prime rib is crucial to achieving the desired level of doneness. Here's a breakdown of the different temperatures and what they correspond to:| Doneness | Internal Temperature (°F) | Internal Temperature (°C) |
|---|---|---|
| Rare | 120-125 | 49-52 |
| Medium-Rare | 130-135 | 54-57 |
| Medium | 140-145 | 60-63 |
| Medium-Well | 150-155 | 66-68 |
| Well-Done | 160 | 71 |
Doneness: A Personal Preference
Ultimately, the ideal level of doneness is a matter of personal preference. Some people love their prime rib rare, while others prefer it well-done. The key is to cook the roast to your desired temperature and enjoy it!
(Part 6) FAQs: Addressing Your Prime Rib Queries
Now, let's address some common questions people often have about cooking prime rib.1. How do I know when the prime rib is done?
The best way to determine doneness is by using a meat thermometer. Insert the thermometer into the thickest part of the roast, making sure it doesn't touch any bones. Once the internal temperature reaches your desired level, the roast is done.
2. Can I cook prime rib in a slow cooker?
While you can technically cook prime rib in a slow cooker, it's not the ideal method. The long, slow cooking time can result in a tough and dry roast. It's best to stick with oven cooking for prime rib.
3. What should I serve with prime rib?
Prime rib is a versatile dish that pairs well with a variety of sides. Some classic options include mashed potatoes, roasted vegetables, Yorkshire pudding, and gravy.
4. How long can I keep prime rib in the fridge?
Raw prime rib can be stored in the refrigerator for 3-5 days. Once cooked, it can be stored in the refrigerator for 3-4 days or frozen for up to 2-3 months.
5. What should I do with leftover prime rib?
Leftover prime rib is a culinary treasure waiting to be explored! It can be sliced and served cold in sandwiches or salads. It can also be shredded and used in tacos, enchiladas, or soups.
(Part 7) The Importance of Resting: Unlocking Tenderness
As I mentioned earlier, resting your prime rib after cooking is crucial for a juicy, flavorful roast. This step is all about allowing the juices to redistribute throughout the meat, preventing them from running out when you carve it. You'll be rewarded with tender, succulent slices of prime rib that melt in your mouth.Resting Technique: The Art of Patience
1. After the roast has reached the desired internal temperature, remove it from the oven and transfer it to a cutting board.
2. Tent the roast loosely with a piece of aluminum foil. This will trap in the heat and allow the roast to rest without cooling down too quickly.
3. Let the roast rest for 15-20 minutes, or even longer, if possible. The longer the resting time, the more the juices will redistribute.
(Part 8) The Art of the Roast: Beyond the Recipe
Cooking prime rib is more than just following a recipe. It's a journey of sensory experience, a process that involves patience, attention to detail, and a touch of culinary artistry. The satisfaction of creating a dish that impresses your guests and leaves them craving more is truly rewarding.So, embrace the challenge. Experiment with different seasonings, techniques, and sides. Don't be afraid to deviate from the norm and create your own signature prime rib recipe. And remember, practice makes perfect. The more you cook prime rib, the more confident you'll become in your abilities.
Happy roasting!
Everyone is watching

Corn on the Cob: The Ultimate Guide to Perfectly Cooked Ears
Healthy MealsAh, corn on the cob. Just the name evokes images of sunny days, barbecues, and that sweet, juicy flavour that ...

Perfect Pork Roast Oven Cooking Time: A Guide to Delicious Results
Healthy MealsThere's something truly satisfying about a perfectly roasted pork. The aroma alone is enough to make your mout...

Ham Cooking Time: How Long to Bake, Smoke, or Boil a Delicious Ham
Healthy MealsAh, ham. It's a classic, isn't it? A real crowd-pleaser, especially around holidays. And when done right, it'...

Scallops: The Ultimate Guide to Perfect Cooking
Healthy MealsAh, scallops. Those delicate, sweet, and utterly delicious morsels of the sea. They hold a special place in my...

Spaghetti Squash: The Ultimate Guide to Cooking and Serving
Healthy MealsRemember that time you saw spaghetti squash at the supermarket, looking all bumpy and strange, and thought, "W...