Let's talk Pernil! Not just any old pork roast, mind you, but a true showstopper – a dish that'll make your guests gasp, "ooh" and "aah" and beg for seconds. We're talking about Pernil, the glorious, juicy, flavour-packed roast pork shoulder that's the heart and soul of Puerto Rican cuisine.
Now, I've been in the kitchen for years, trying out different ways to cook Pernil. But the method I always come back to is the tried-and-true oven roasting at 300 degrees. It's simple, reliable, and consistently delivers that melt-in-your-mouth, tender, succulent pork we all crave.
So grab your apron, get ready to roll up your sleeves, and let's dive into the wonderful world of Pernil cooking!
(Part 1) Setting the Stage: The Importance of Preparation
Before even thinking about the oven, we need to lay the groundwork. It's all about the prep, my friend! Think of it like building a house – no one throws bricks together without a sturdy foundation, right?
The magic of Pernil lies in its flavour, and that flavour comes from the marinade. Every family has its own secret recipe, passed down through generations. Treat that recipe with the utmost respect – it's a culinary treasure! But don't worry, if you're a Pernil newbie, I've got a basic recipe that'll set you on the right path.
The Key Players in Our Flavor Symphony
Here's what you'll need to create your marinade masterpiece:
- The Star of the Show: A good quality pork shoulder, around 6-8 pounds. Bone-in is key for maximum flavour and tenderness.
- The Zing Factor: Citrus juice – a mix of orange and lime is my go-to. It cuts through the richness of the pork, adding a bright, tangy flavour that's simply irresistible.
- A Touch of Sweetness: A little brown sugar adds a caramel-like note that beautifully complements the savoury flavours.
- The Savoury Base: Salt, pepper, garlic powder, onion powder – these are the essential seasonings that create a flavour foundation for our Pernil.
- The Secret Weapon: Adobo seasoning. This is where things get really interesting! Adobo is a blend of spices that varies from brand to brand, but always includes a mix of oregano, cumin, and paprika, adding a depth of flavour that's simply irresistible.
- Optional Extras: For an extra kick, you can add a splash of rum, some chopped onions, and even a few bay leaves for that extra "je ne sais quoi."
Marinating Like a Pro
Now, let's talk about the marination process – this is where the real magic happens! You want to give your Pernil at least 24 hours to soak up all those delicious flavours. But if time is tight, a minimum of 4 hours will do the trick.
Here's my tried-and-true method:
- Get Mixing: Combine all your marinade ingredients in a large bowl. Don't be shy with the adobo – it's the key to that authentic Pernil flavour.
- The Massage: It's time to get your hands dirty! Take your pork shoulder and give it a good rub with the marinade. Make sure you coat it all over, including the underside – we want every bit of that meat to be infused with flavour!
- The Storage: Place your marinated pork shoulder in a large container or a resealable bag. Refrigerate for at least 4 hours, or up to 24 hours. The longer you marinate, the more intense those flavours will become.
- The Patience: Let your Pernil chill out in the fridge while you go about your day. It's tempting to rush the process, but trust me, patience is key. The longer you let it soak, the more rewarding the final result will be.
(Part 2) The Oven Roasting Ritual: A Step-by-Step Guide
Alright, the marinade has done its work, and your Pernil is ready for its starring role. Now it's time to get cooking! Preheat your oven to 300 degrees Fahrenheit (150 degrees Celsius). I always set a timer for 30 minutes to ensure the oven is good and hot before I get started.
1. The First Layer of Flavor: The Aromatics
Let's start by creating a flavour foundation in the oven with our aromatics. This step is crucial for building those layers of deliciousness that make Pernil so special.
- The All-Star: Take a large onion, cut it in half, and place it in the bottom of your roasting pan. This onion will add a sweet and savoury depth to your Pernil.
- The Extras: Throw in a few cloves of garlic, a few bay leaves, and some black peppercorns for an extra punch of flavour.
- The Touch of Citrus: Don't forget a few slices of orange or lime – they'll infuse your roasting pan with a bright, citrusy aroma.
2. The Centerpiece: Setting the Pernil in the Oven
Now, it's time to put our star on stage. Carefully place your marinated pork shoulder on top of the aromatics in your roasting pan. Don't worry about overcrowding the pan – there's plenty of room.
3. The Slow Roast: The Key to Tenderness
Okay, let's get this show on the road! Slide your roasting pan into the preheated oven and set a timer for at least 4 hours. That's right, 4 whole hours! We're going for a slow roast, the secret to truly tender and juicy Pernil.
As your Pernil roasts, the aroma that fills your kitchen will be intoxicating! And don't worry about those growling stomach noises – it's a sign that you're on the right track to a delicious feast.
4. The Importance of Patience
It's tempting to keep peeking into the oven, but resist! Every time you open that door, you let precious heat escape, which can affect the cooking process.
Just relax, put on some music, pour yourself a glass of something delicious, and enjoy the anticipation of a wonderful meal. Your Pernil will be ready soon enough!
(Part 3) The Turning Point: Basting and Roasting to Perfection
Time has passed, the aroma is making your mouth water, and your stomach is rumbling with anticipation. It's time to check on our Pernil.
1. The First Check: Assessing the Progress
After the initial 4 hours of roasting, carefully remove your pan from the oven. Use a meat thermometer to check the internal temperature of the pork shoulder. It should be around 145 degrees Fahrenheit (63 degrees Celsius). If it's not quite there yet, no worries – we'll continue roasting. But if the temperature is at or above 145 degrees, we can move on to the basting and browning process.
2. The Magic Touch: Basting for Extra Flavor
Basting is a key step for adding moisture and extra flavour to your Pernil. The best part? It's super simple!
Here's how:
- The Liquid Gold: Take the marinade that you used to soak your Pernil and pour it into a small saucepan. Heat it over medium heat until it comes to a simmer.
- The Basting Ritual: Using a basting brush, generously brush the marinade over your Pernil. Make sure to coat it evenly, including the underside. This step will infuse the meat with those deep, rich flavours.
- Back in the Oven: Return the roasting pan to the oven and continue cooking for another 30-45 minutes.
- The Browning Process: During this final stage, your Pernil will start to brown beautifully. You'll know it's ready when the skin is crispy and golden brown, a sight that will make your taste buds sing!
3. The Final Check: Doneness and Resting Time
After those 30-45 minutes, take your Pernil out of the oven and check the internal temperature again. It should be at least 160 degrees Fahrenheit (71 degrees Celsius). If it's not quite there yet, pop it back in the oven for another 15-20 minutes.
Once your Pernil has reached the desired temperature, let it rest for 15-20 minutes before carving. This resting time allows the juices to redistribute throughout the meat, making it even more tender and juicy.
As the Pernil rests, the aroma will fill your home with pure culinary magic. You'll be just a few moments away from enjoying the fruits of your labor!
(Part 4) Carving and Serving Your Masterpiece
Your Pernil is done, and the aroma is making you drool! It's time to get carving!
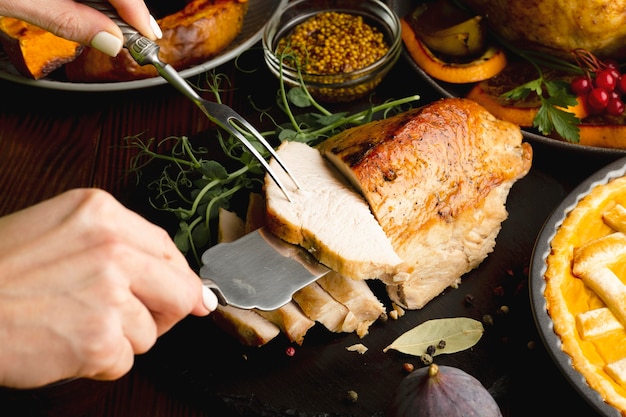
1. Carving Like a Pro
Carving a whole pork shoulder might seem intimidating, but it's actually quite straightforward. The key is a sharp carving knife and a bit of patience. Here's a step-by-step guide:
- The Starting Point: Begin by slicing the skin of the Pernil. Make a few shallow cuts to help you remove the skin later.
- Removing the Bone: Carefully slice along the bone, using your knife to separate the meat from the bone. You can save the bone for making broth or soup later.
- The Thin Slices: Now, it's time to slice the meat. cut across the grain of the meat, making thin slices. Aim for slices that are about 1/4 inch thick. This will ensure each bite is tender and full of flavour.
- The Finishing Touch: Once you've carved all the meat off the bone, remove the skin and discard it. The skin will have become crispy, but it can be a bit tough, so it's best to leave it off.
2. Presentation is Key
With your Pernil beautifully carved, it's time to arrange it on a platter. I like to use a large, oval-shaped platter. Place the slices of Pernil in a circular pattern, with the bone in the center of the platter. This creates a beautiful and eye-catching presentation that will impress your guests.
3. Accompaniments for a Perfect Feast
No Pernil feast is complete without the right side dishes. Here are some of my favorites:
- The Side Dish Staple: Arroz con gandules – a flavorful rice dish with pigeon peas, sofrito, and pork. It's a classic combination that complements the Pernil beautifully.
- The Creamy Companion: Mofongo – mashed plantains with garlic, olive oil, and often pork cracklings. It's the perfect creamy side to balance out the richness of the Pernil.
- The Salsa Sensation: Salsa de cebolla – a simple salsa made with onions, cilantro, lime juice, and olive oil. It adds a bright, fresh flavor that cuts through the richness of the Pernil.
- The Sweet Counterpoint: sweet plantains – fried or baked plantains provide a welcome touch of sweetness to the meal. The contrast of sweet and savory is truly delicious.
- The Traditional Choice: Tostones – fried green plantains that have been flattened and then fried again. They're crispy, salty, and irresistible. They add a wonderful texture contrast to the meal.
With these delicious side dishes, your Pernil feast will be truly unforgettable!
(Part 5) Beyond the Feast: Leftover Inspiration
You've enjoyed your Pernil feast, and now you've got some leftovers. Don't let them go to waste! There are so many delicious ways to use up those leftover pork slices.
1. The Sandwich Superstar
One of my favourite ways to use leftover Pernil is to make sandwiches. Think Cuban sandwiches, but with a Puerto Rican twist! Pile those slices of Pernil high on a crusty roll, add some pickles, mustard, and maybe even some Swiss cheese. You've got yourself a delicious and satisfying lunch or dinner.
2. The Quick and Easy Salad
If you're looking for a lighter meal, try adding some leftover Pernil to a salad. It's a great way to add some protein and flavour to your salad. I like to mix it with romaine lettuce, cherry tomatoes, red onions, and a tangy vinaigrette.
3. The Comforting Soup
Pernil leftovers make an amazing base for a hearty soup. Chop up those leftover slices of Pernil, add them to your favourite soup recipe, and let it simmer until it's all warmed through. It's a great way to use up leftover pork and to make a comforting meal.
(Part 6) The Pernil Journey: My Personal Experience
I've been cooking Pernil for years now, and it's become a bit of a ritual for me. I love the process of marinating the pork, watching it slowly roast in the oven, and finally carving it up and enjoying the fruits of my labour.
My first experience with Pernil was at a family gathering. My aunt, who is a master chef in the kitchen, was the one who introduced me to this beautiful dish. I remember being blown away by the flavour and the tenderness of the meat. It was like nothing I had ever tasted before. From that moment on, I was hooked.
Over the years, I've experimented with different marinade recipes and cooking methods. But I always come back to this basic oven roasting method. It's simple, it's reliable, and it always delivers a delicious result. Plus, the slow roasting method allows the flavours to really develop, making for a truly memorable meal.
I've also found that cooking Pernil is a great way to connect with my culture and heritage. It's a dish that brings people together, and it's something that I can share with my loved ones and make them feel connected to their roots.
For me, cooking Pernil is more than just making a meal. It's a journey of flavour, tradition, and connection. And I wouldn't trade it for the world.
(Part 7) The Time Factor: How Long to Roast Your Pernil
You might be wondering, "How long do I really need to roast my Pernil?" That's a great question, and the answer depends on the size of your pork shoulder.
Here's a general guideline:
| Pork Shoulder Size | Roast Time |
|---|---|
| 4-5 pounds | 3-4 hours |
| 6-7 pounds | 4-5 hours |
| 8-9 pounds | 5-6 hours |
Remember, these are just estimates. The best way to know when your Pernil is done is to use a meat thermometer. It should reach an internal temperature of 160 degrees Fahrenheit (71 degrees Celsius).
(Part 8) Troubleshooting: Common Pernil Issues and Solutions
Let's be honest, cooking can be a bit of a rollercoaster. Sometimes things go smoothly, and sometimes you encounter a few bumps in the road. Don't worry, we've all been there! Here are a few common Pernil issues and solutions:
1. The Dry Meat Dilemma
If your Pernil is dry, it's likely because it was overcooked. To prevent this, make sure to use a meat thermometer and to take it out of the oven once it reaches an internal temperature of 160 degrees Fahrenheit (71 degrees Celsius).
2. The Undercooked Issue
On the other hand, if your Pernil is undercooked, it's important to return it to the oven and continue cooking until it reaches the desired temperature. You can also use a meat thermometer to make sure it's cooked through.
3. The Skin Woes
If the skin of your Pernil is not crispy, try increasing the oven temperature to 400 degrees Fahrenheit (200 degrees Celsius) for the last 30 minutes of cooking. This will help to crisp up the skin.
(Part 9) FAQs: Your Pernil Questions Answered
1. Can I Marinate My Pernil for More Than 24 Hours?
Absolutely! You can marinate your Pernil for more than 24 hours. In fact, the longer you marinate it, the more intense the flavours will be. Just make sure to keep it refrigerated to prevent any bacterial growth.
2. What Can I Use Instead of Adobo Seasoning?
If you don't have adobo seasoning, you can create your own blend of spices. A good substitute is a mix of oregano, cumin, paprika, garlic powder, and black pepper. You can adjust the proportions to your taste preferences.
3. Can I Cook My Pernil in a slow cooker?
Yes, you can cook Pernil in a slow cooker! It's a great option if you're looking for a hands-off method. Just make sure to marinate your pork shoulder first. Then, place it in the slow cooker with some of the marinade, and cook on low for 8-10 hours. The slow cooker will result in beautifully tender and flavorful Pernil.
4. How Do I Reheat Leftover Pernil?
The best way to reheat leftover Pernil is to wrap it in foil and place it in a preheated oven at 300 degrees Fahrenheit (150 degrees Celsius) for about 30 minutes. You can also reheat it in a skillet over medium heat. Just make sure to heat it through thoroughly.
5. What are some other delicious ways to cook Pernil?
Besides oven roasting, you can also cook Pernil on a grill, in a smoker, or even in a pressure cooker. Each method has its own unique benefits and flavour profile. Experimenting with different cooking methods can be a fun way to discover new tastes and textures.
That's it for my comprehensive guide to Pernil cooking! Go out there, get your ingredients together, and give it a go. I promise you won't regret it. And remember, if you have any questions, don't hesitate to ask. I'm always happy to help!
Everyone is watching

Corn on the Cob: The Ultimate Guide to Perfectly Cooked Ears
Healthy MealsAh, corn on the cob. Just the name evokes images of sunny days, barbecues, and that sweet, juicy flavour that ...

Perfect Pork Roast Oven Cooking Time: A Guide to Delicious Results
Healthy MealsThere's something truly satisfying about a perfectly roasted pork. The aroma alone is enough to make your mout...

Ham Cooking Time: How Long to Bake, Smoke, or Boil a Delicious Ham
Healthy MealsAh, ham. It's a classic, isn't it? A real crowd-pleaser, especially around holidays. And when done right, it'...

Scallops: The Ultimate Guide to Perfect Cooking
Healthy MealsAh, scallops. Those delicate, sweet, and utterly delicious morsels of the sea. They hold a special place in my...

Spaghetti Squash: The Ultimate Guide to Cooking and Serving
Healthy MealsRemember that time you saw spaghetti squash at the supermarket, looking all bumpy and strange, and thought, "W...