I've always loved a good steak, but for years, I was terrified of cooking one. It seemed like such a daunting task – all that talk of sear, crust, and doneness levels left me feeling a bit lost. But then, one day, I decided to face my fears and give it a go. And you know what? It wasn't as hard as I thought. In fact, it was surprisingly simple and the results were delicious.
So, if you're also a beginner who's hesitant to tackle steak on the stovetop, fear not! I'm going to break down the process into simple, easy-to-follow steps. You'll be surprised how quickly you can master this culinary skill and impress your friends and family with perfectly cooked steaks every time.
(Part 1) Choosing Your Weapon: The Steak
The first step to a great steak is choosing the right cut. This is where things can get a little confusing. There are so many different cuts out there, each with its own flavour and texture. But don't worry, we'll simplify it.
A Guide to Popular steak cuts
Here's a breakdown of some of the most popular cuts and what they're good for, along with some tips for choosing the right one for your needs:
- Ribeye: This is a classic choice known for its rich marbling and buttery flavour. It's ideal for grilling or pan-searing. It's a bit more expensive than other cuts, but the flavour is worth it. If you're looking for a steak that will melt in your mouth, this is the one for you.
- new york strip: Another popular cut with a more lean and robust flavour. It's great for grilling, pan-searing, or even broiling. This is a good choice if you prefer a less fatty steak. It's also a great value for the price.
- filet mignon: The most tender cut, known for its delicate flavour. Perfect for those who like their steak melt-in-your-mouth tender. This is the most expensive cut, but it's also the most tender. It's perfect for a special occasion.
- Sirloin: A lean and versatile cut with good flavour. It's a great value option for grilling or pan-searing. This is a good all-around steak that's perfect for weeknight dinners. It's also a good choice if you're on a budget.
- flank steak: A lean and flavorful cut, often used for grilling or marinating. It's best cooked medium-rare to medium. This is a great choice for stir-fries or fajitas. It's also a good option for marinating, as it absorbs flavour well.
When choosing your steak, look for one that's evenly marbled. This means there's a good amount of fat distributed throughout the meat, which will contribute to a juicy and flavorful steak. Also, make sure the steak is at least an inch thick for optimal cooking. This ensures you'll get a nice sear and a juicy interior.
(Part 2) Prepping for Battle: Getting Your Steak Ready
Now that you've got your steak, it's time to get it ready for cooking. This is a crucial step to ensure a flavorful and juicy outcome.
1. Taking Your Steak Out of the Fridge
Remember, patience is key! Let your steak sit at room temperature for at least 30 minutes before cooking. This allows the steak to come to a more even temperature, resulting in more consistent cooking. Don't worry, this won't make the steak go bad. It just helps ensure you get a juicy, evenly cooked steak. If you're cooking a thicker steak, you might want to let it sit out for 45 minutes to an hour.
2. Patting it Dry
Once your steak is at room temperature, pat it dry with paper towels. This is essential for achieving a good sear. Excess moisture can prevent the steak from browning properly, leading to a bland and mushy surface. A good sear is what gives your steak that crispy, flavorful crust. So, make sure to pat it dry!
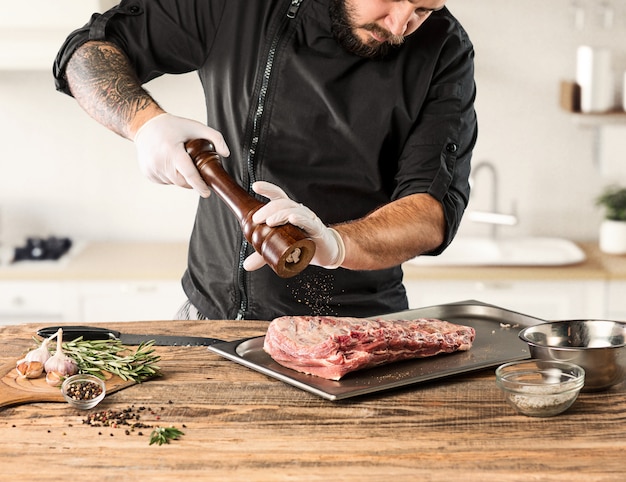
3. Seasoning Your Steak (With Love!)
Now comes the fun part: seasoning your steak! I'm a big fan of keeping it simple with just salt and pepper. However, you can get creative with other seasonings like garlic powder, paprika, or even a blend of herbs. But remember, less is more. Too much seasoning can overwhelm the natural flavor of the steak. A generous pinch of salt and pepper is all you really need.
For a more intense flavour, consider a dry rub. Simply mix your desired seasonings (salt, pepper, garlic powder, paprika, etc.) in a bowl and rub it all over the steak. Let the steak sit at room temperature for 15 minutes, allowing the rub to penetrate the meat. You can get really creative with your dry rubs. There are countless combinations out there! Just remember to avoid using too many spices, as you want to let the natural flavour of the steak shine through.
(Part 3) Choosing Your Weapon: The Pan
You've got your steak, it's prepped, and now it's time to choose your weapon: the pan! This is a crucial element that can significantly impact the final outcome. Not all pans are created equal.
1. Cast Iron: The OG of steak cooking
cast iron pans are the OG of steak cooking. They retain heat incredibly well, ensuring a nice, even sear on your steak. They're also incredibly durable, lasting a lifetime with proper care. But be warned, they can get very hot, so handle them with care. Use oven mitts or a pot holder when handling a hot cast iron pan. And be sure to season your cast iron pan regularly to keep it in good shape.
2. Stainless Steel: A Reliable Workhorse
stainless steel pans are a reliable workhorse in the kitchen. They heat up quickly and evenly, making them suitable for searing steaks. Plus, they're dishwasher-safe, which is a bonus. However, they might not retain heat as well as cast iron, so you might need to adjust your cooking time. Stainless steel pans are also a good choice for browning other meats, like chicken or fish.
3. Non-Stick: The Beginner's Best Friend
non-stick pans are perfect for beginners. They prevent the steak from sticking to the pan, making flipping easier. However, they might not get as hot as cast iron or stainless steel, so you may need to use a higher heat setting. Keep in mind that most non-stick pans are not recommended for high heat, so be careful with the temperature. If you're using a non-stick pan, make sure it's oven-safe if you plan to finish cooking your steak in the oven.
(Part 4) The Heat Is On: Getting the Pan Ready
Now that you've chosen your pan, it's time to get it nice and hot. The key to a perfect sear is high heat. This will create a beautiful, crispy crust on the outside while keeping the inside juicy and tender.
1. Medium-High Heat: The Sweet Spot
Aim for medium-high heat on your stovetop. This is usually around 7-8 on a typical stovetop scale. You can test the heat by placing a drop of water on the pan. If it sizzles and evaporates quickly, you're ready to go. If it takes longer than a few seconds, your pan isn't hot enough.
2. Adding Oil: A Lubricant for Your Steak
Once your pan is hot, add a generous amount of oil. I prefer to use avocado oil or grapeseed oil, as they have a high smoke point and won't burn easily. You can also use olive oil, but be careful not to let it smoke. You don't want your steak to taste burnt.
A good rule of thumb is to use about 1 tablespoon of oil for a 1-inch thick steak. If you're cooking a thicker steak, you may need to use more oil.
3. Let the Oil Heat Up
Let the oil heat up for a minute or two before adding the steak. The hot oil will help create a crisp crust and prevent the steak from sticking to the pan. You'll know the oil is ready when it shimmers slightly.
(Part 5) The Battle Begins: Cooking the Steak
Alright, the moment of truth has arrived. It's time to put your steak in the pan and start cooking!
1. The First Sear: The Foundation of Your Steak
Gently place your steak in the hot pan. You should hear a satisfying sizzle! Don't move it for a couple of minutes. This allows the first side to develop a nice, crispy crust. This is crucial for flavour and texture. Don't be tempted to flip it too soon.
If you're cooking a thicker steak, you may need to sear each side for 3-4 minutes. But keep a close eye on it to make sure it doesn't burn.
2. Flipping the Steak: A Skill You'll Master
After 2-3 minutes, you're ready to flip. Use a pair of tongs to carefully flip the steak. Avoid using a fork as it can puncture the meat and cause juices to escape. Once flipped, sear the other side for another 2-3 minutes, or until a nice crust forms.
Don't worry if your steak sticks a bit when you flip it. This is normal. Just gently pry it loose with your tongs. If it's really stuck, you can try adding a little more oil to the pan.
3. Cooking the Sides: Bringing Out the Depth
Now, it's time to cook the sides. Again, use your tongs to carefully rotate the steak 90 degrees. Sear each side for another minute. This helps to create a beautiful, evenly browned steak.
If you're using a smaller pan, you may need to do this in two steps. First, sear the sides, then rotate the steak 90 degrees again and sear the other two sides.
4. Doneness: Finding Your Perfect Spot
This is where things get a little tricky. You need to find your perfect doneness level. But don't worry, I've got you covered.
| Doneness | internal temperature | How It Looks | Feel |
|---|---|---|---|
| Rare | 125-130°F (52-54°C) | Red center, cool to the touch | Soft |
| Medium-Rare | 130-135°F (54-57°C) | Slightly pink center, warm to the touch | Springy |
| Medium | 140-145°F (60-63°C) | Pink center, hot to the touch | Firm |
| Medium-Well | 150-155°F (65-68°C) | Slightly pink center, very hot to the touch | Very firm |
| Well-Done | 160°F (71°C) and above | No pink center, very hot to the touch | Very firm |
If you're unsure about doneness, you can use a meat thermometer to check the internal temperature. But honestly, the best way to learn is by feel.
5. Resting Your Steak: Allowing It to Relax
After cooking, it's important to let your steak rest for 5-10 minutes before slicing and serving. This allows the juices to redistribute evenly throughout the steak, resulting in a more tender and flavorful meal. While it's resting, you can prepare any sides or sauces you might want to serve with your steak.
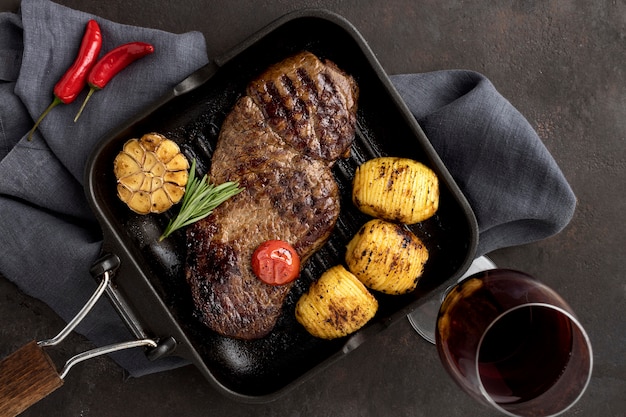
(Part 6) The Final Touch: Slicing and Serving
Okay, your steak has rested and is ready to be enjoyed! It's time to slice and serve your delicious creation.
1. Slicing: Finding the Right Angle
Use a sharp knife to slice the steak against the grain. This means slicing perpendicular to the direction of the muscle fibers. This will make the steak easier to chew and enhance the flavour.
If you're not sure which way the grain is running, look for the lines of fat or muscle fibers. You want to slice across those lines.
2. Serving: Putting It All Together
Now, it's time to plate your masterpiece! Serve your steak on a warm plate with your favorite sides. I love serving my steaks with roasted vegetables, mashed potatoes, or a simple salad. And don't forget about a sauce! There are so many delicious sauces you can make, from classic béarnaise to creamy mushroom sauce.
Here are a few tips for plating your steak:
- Arrange the steak slices on a warm plate. This will help to keep the steak warm and prevent it from getting cold too quickly.
- Add your favorite sides. A mix of colors and textures will make your plate more visually appealing.
- Drizzle with your favorite sauce. A little bit of sauce can really elevate your steak.
(Part 7) Beyond the Basics: Taking Your Steak Skills to the Next Level
Now that you've mastered the basics, it's time to level up your steak game. Here are a few tips and tricks to make your steak even more impressive.
1. reverse searing: A Master Chef's Technique
Reverse searing is a technique that involves cooking the steak at a low temperature for an extended period before searing it at high heat. This results in a more evenly cooked steak with a tender, juicy interior. To do this, preheat your oven to 250°F (120°C). Season your steak and place it on a baking sheet. Cook for about 30 minutes, or until the internal temperature reaches about 110°F (43°C) for medium-rare. Then, sear the steak in a hot pan for 1-2 minutes per side to achieve a crispy crust.
Reverse searing is a great way to cook a steak if you're worried about overcooking it. It's also a good technique for cooking thicker steaks.
2. Pan-Frying: A Quick and Delicious Method
Pan-frying is a great option if you're looking for a quick and easy way to cook a steak. To pan-fry a steak, heat a tablespoon of oil in a heavy skillet over medium-high heat. Season your steak with salt and pepper and place it in the hot skillet. Cook for 3-4 minutes per side, or until a nice crust forms. Then, reduce the heat to medium and continue cooking for another 2-3 minutes per side, or until the steak reaches your desired doneness.
Pan-frying is a good technique for cooking thinner steaks, as it allows the steak to cook quickly and evenly.
3. Marinating: Adding Flavor and Tenderness
Marinating your steak can add flavour and tenderness. A simple marinade can be made with olive oil, lemon juice, garlic, and herbs. Let the steak marinate for at least 30 minutes, or up to overnight.
Marinating is a great way to add flavour to a steak. You can use any type of marinade you like, but make sure to use an acidic ingredient like lemon juice or vinegar to help tenderize the meat.
4. The Art of the Steak Rub
A good steak rub can really enhance the flavour of your steak. A simple rub can be made with salt, pepper, garlic powder, paprika, and onion powder. You can also get creative with other spices like cumin, oregano, or chili powder.
Steak rubs are a great way to add flavour and complexity to your steak. You can use a pre-made rub or create your own. Experiment with different spices and find a rub that you like.
(Part 8) FAQs: The Answers to Your Burning Steak Questions
Now that you've learned the basics of cooking a steak on the stovetop, you're probably ready to answer some common questions about cooking a steak. Here are some FAQs to get you started.
1. How Long Should I Cook a Steak?
The cooking time for a steak depends on the thickness of the steak and the desired doneness level. A general rule of thumb is to cook a 1-inch thick steak for 4-5 minutes per side for medium-rare. For well-done steak, you'll need to cook it for longer, about 6-7 minutes per side. Use a meat thermometer to check the internal temperature to ensure the steak is cooked to your liking.
The best way to determine the cooking time is to use a meat thermometer. However, if you don't have one, you can use the "touch test" to gauge the doneness.
2. How Do I Know When My Steak Is Done?
There are a few ways to tell if your steak is done. You can use a meat thermometer to check the internal temperature. You can also use the "touch test" to gauge the doneness. To do this, gently press the center of the steak with your finger. If it feels firm, it's well-done. If it feels springy, it's medium. And if it feels soft, it's rare.
The best way to determine the doneness of your steak is to use a meat thermometer. This will ensure that your steak is cooked to your liking.
3. What Should I Serve With My Steak?
The possibilities are endless! You can serve your steak with classic sides like mashed potatoes, roasted vegetables, or a simple salad. You can also get creative with more unique sides like asparagus with hollandaise sauce or a mushroom risotto.
There are so many great sides that you can serve with steak. I like to choose sides that complement the flavor of the steak, such as roasted vegetables or a creamy sauce.
4. Can I Cook a Steak in the Oven?
Yes, you can absolutely cook a steak in the oven. This is a great option if you're cooking multiple steaks or if you prefer a more even cook. Preheat your oven to 400°F (200°C). Season your steak with salt and pepper and place it on a baking sheet. Cook for 10-15 minutes, or until the steak reaches your desired doneness.
Cooking a steak in the oven is a good option if you want a more consistent cook. It's also a good option if you're cooking a lot of steaks at once.
5. What if My Steak Is Too Thin?
If your steak is too thin, you can still cook it on the stovetop. Just reduce the cooking time. You'll likely only need to cook it for 2-3 minutes per side. Make sure to use a meat thermometer to check the internal temperature.
If you're cooking a thin steak, it's important to watch it closely so that it doesn't overcook. You can also cook it over a lower heat.
And there you have it, a beginner's guide to cooking a perfect steak on the stovetop! I hope this guide has given you the confidence to tackle this culinary challenge. Remember, practice makes perfect. So don't be afraid to experiment and find what works best for you. Happy grilling!
Everyone is watching

Corn on the Cob: The Ultimate Guide to Perfectly Cooked Ears
Healthy MealsAh, corn on the cob. Just the name evokes images of sunny days, barbecues, and that sweet, juicy flavour that ...

Scallops: The Ultimate Guide to Perfect Cooking
Healthy MealsAh, scallops. Those delicate, sweet, and utterly delicious morsels of the sea. They hold a special place in my...

Spaghetti Squash: The Ultimate Guide to Cooking and Serving
Healthy MealsRemember that time you saw spaghetti squash at the supermarket, looking all bumpy and strange, and thought, "W...

Salmon Cooking Times: Perfect Guide for Every Recipe
Healthy MealsLet me tell you, cooking salmon is an art form. It's all about getting that perfect balance: juicy and tender,...

Ham Cooking Time: How Long to Bake, Smoke, or Boil a Delicious Ham
Healthy MealsAh, ham. It's a classic, isn't it? A real crowd-pleaser, especially around holidays. And when done right, it'...