There’s something about a perfectly cooked steak that just screams “indulgence.” That beautiful, crusty exterior giving way to juicy, tender meat… it’s a symphony of flavors and textures. And the best part? You don’t need a fancy grill or years of experience to achieve steak nirvana. With just a trusty pan and a few simple tips, you can be whipping up restaurant-quality steaks in your own kitchen.
I’ll be honest, I wasn’t always a steak-cooking pro. I’ve had my fair share of dry, tough, or unevenly cooked disasters. But after countless experiments (and a few burnt offerings), I finally cracked the code. And I’m here to share my knowledge with you, my fellow steak enthusiasts.
Part 1: Getting Started
choosing the right cut
First things first, let’s talk about the cut of meat. You want something that’s going to hold its shape and cook evenly – no floppy, unevenly cooked steaks here! Think ribeye, sirloin, or new york strip. These cuts are all marbled with fat, which helps keep the steak juicy and flavorful.
If you’re feeling adventurous, try a flank steak, but be warned, it’s a bit tougher and requires a little more finesse. It’s all about knowing your cut and choosing the right one for the job.
Thickness is Key
The thickness of your steak is crucial. You want something that's at least 1 inch thick. Why? Because a thicker steak will cook more evenly and have a better chance of achieving that perfect sear. Think of it like this: a thicker steak provides more “meat” to hold onto the heat and cook through evenly.
You can always ask your butcher to cut it to your desired thickness. Just make sure they know you're aiming for a pan-fried steak, not a grill.
Temperature Matters
Now, I know this might seem like a small detail, but the temperature of your steak before cooking can make a big difference. I’m not talking about room temperature here, although that's a good start. No, I’m talking about getting your steak to a specific temperature before it even hits the pan. Think of it like a warm-up for your steak.
Why is this important? Well, if you’re throwing a cold steak into a hot pan, it’s going to create a temperature shock. This can lead to uneven cooking and a steak that’s tough on the outside and cold in the center.
The ideal temperature for your steak before cooking is around 45-55 degrees Fahrenheit (7-13 degrees Celsius). You can achieve this by taking the steak out of the fridge about 30-45 minutes before cooking. This will allow the steak to come up to temperature slowly and evenly.
Part 2: Prepping Your Steak

Salt and Pepper - the Essential Duo
Okay, so we’ve got our steak picked out and it’s at the right temperature. Now let's get it prepped. This is where we unleash the salt and pepper – the essential duo for any steak lover.
Salt is a game changer, trust me. It draws out the moisture in the steak and creates a flavorful crust. I like to use coarse salt, but you can use whatever you prefer. Just don’t skimp on the amount! A generous sprinkle is key.
And don’t forget the pepper! A good black pepper grind adds another layer of flavor and depth. For a more intense flavor, you can even use a peppercorn blend or freshly ground black peppercorns.
Time for a Rub?
Now, this is where things get fun. You can just stick with salt and pepper, or you can get a little creative and add a rub. A rub is basically a mixture of herbs and spices that you can apply to your steak. There are endless possibilities here, but some of my favorites include garlic powder, onion powder, paprika, and chili powder. You can even add a bit of sugar for a hint of sweetness.
Whatever your flavor preference, just be sure to rub it in generously and let the steak hang out for at least 30 minutes to allow the flavors to meld. This gives the spices time to infuse the steak and create a more complex flavor profile.
Oil Up!
Finally, it’s time to get that pan good and hot. Use a cast iron pan if you have one – they hold heat like a champ and are perfect for searing. But if you don’t have one, a regular heavy-bottomed pan will do the trick.
Heat the pan over medium-high heat, then add a good glug of oil. I prefer to use neutral-flavored oil like canola or grapeseed, but you can use any type you like. Just make sure it has a high smoke point so it doesn’t burn.
You’ll know the pan is ready when the oil starts to shimmer and you can see a wisp of smoke. This means the pan is hot enough to create that beautiful, crispy crust on your steak.
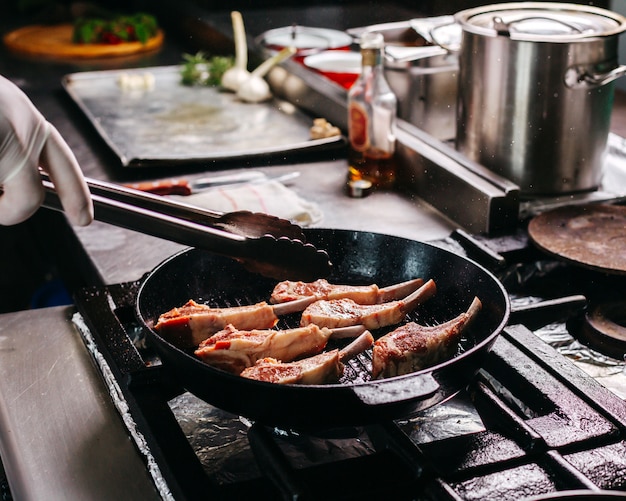
Part 3: The Searing Process

Ready, Set, Sear!
This is the moment you’ve been waiting for – the searing! Place your steak in the hot pan, making sure to give it plenty of space. You want the steak to sear, not steam.
Don’t move it for a few minutes, let it form a nice crust on the bottom. You’ll know it’s ready when you can easily lift the steak off the pan. Time to flip! Give that other side a few minutes to get a good sear, too.
The Flip Flop
Now, here's a little tip for getting those perfect sear marks. After you’ve flipped your steak, rotate it by 90 degrees. This will give you those gorgeous criss-cross sear marks that you see in restaurants. It’s a small detail, but it makes all the difference in the presentation.
Don't Forget the Sides!
Once both sides have a nice crust, it’s time to cook the edges. This will ensure the steak is cooked evenly. Simply tilt the pan slightly and let the steak rest against the side for a few minutes. Then repeat on the other side.
This step is crucial for getting that perfect sear and preventing the steak from being undercooked on the edges. Think of it as a little extra TLC for your steak!
Part 4: Achieving Your Desired Doneness
Temperature Check
You’re almost there! Now it’s time to make sure the steak is cooked to your liking. The best way to do this is with a meat thermometer. You can find one at most supermarkets. Insert the thermometer into the thickest part of the steak and avoid touching bone.
Here’s a handy chart that shows the internal temperatures for different levels of doneness:
| Doneness | Internal Temperature (°F) | Internal Temperature (°C) |
|---|---|---|
| Rare | 125-130 | 52-54 |
| Medium Rare | 130-135 | 54-57 |
| Medium | 135-140 | 57-60 |
| Medium Well | 140-145 | 60-63 |
| Well Done | 145 | 63 |
Don’t have a thermometer? You can always use the “finger test”. Press your finger against your palm, then press the steak. If the steak feels the same, it’s rare. If it feels firmer, it’s medium rare. And if it feels much firmer, it’s well done.
Just keep in mind that this method is less accurate than using a thermometer. It’s a good back-up, but always try to use a thermometer for the most precise results.
Rest and Enjoy
Once your steak is cooked to your liking, take it off the heat and let it rest for 5-10 minutes. This allows the juices to redistribute and prevents the steak from becoming dry.
Why rest? Imagine the steak as a little sponge. When you cook it, the heat causes the juices to move to the surface. If you cut into the steak immediately, those juices will run out, leaving you with a dry steak. But if you let it rest, the juices have a chance to redistribute throughout the steak, resulting in a juicier, more flavorful bite.
Now, it’s time to dig in! You can enjoy your steak with a side of mashed potatoes, roasted vegetables, or a salad. I like to top mine with a bit of butter and some herbs. A sprinkle of fresh parsley or thyme really elevates the flavor.
Part 5: Taking it to the Next Level
Add a Sauce
Want to take your steak to the next level? Try adding a sauce. A good steak sauce can really elevate the flavor. There are plenty of store-bought options available, but if you’re feeling adventurous, you can even make your own.
Some popular sauces include:
- Mushroom Sauce: Earthy and rich, this sauce is a classic pairing for steak. You can make it from scratch using mushrooms, onions, butter, and cream.
- Béarnaise Sauce: A creamy, tangy sauce made with egg yolks, butter, and tarragon. It’s a little more elaborate, but worth the effort.
- Peppercorn Sauce: A punchy and flavorful sauce made with peppercorns, cream, and butter. It adds a nice kick to your steak.
- Red Wine Sauce: A rich and savory sauce made with red wine, shallots, and herbs. It’s a great way to add depth of flavor to your steak.
When adding a sauce, just make sure it complements the flavor of the steak, not overpower it. You want the sauce to enhance the flavor, not mask it.
Finishing Touches
For a truly decadent experience, you can even add some finishing touches to your steak. A sprinkle of fresh herbs, a drizzle of truffle oil, or a dollop of horseradish cream can all add a touch of elegance.
Just be sure to keep it simple and let the flavor of the steak shine through. You don’t want to overdo it with the finishing touches – a little goes a long way.
Part 6: Common Mistakes to Avoid
Overcrowding the Pan
One of the biggest mistakes beginners make is overcrowding the pan. When you overcrowd the pan, the steak won’t sear properly. The steak will steam instead of cook, and you’ll end up with a tough, chewy steak.
Make sure to give your steak plenty of space in the pan. You want to make sure each side has ample contact with the hot pan to achieve that perfect sear. If your pan is too small, cook the steaks in batches to ensure even cooking.
Not Letting the Steak Rest
Another common mistake is not letting the steak rest after cooking. This is crucial for allowing the juices to redistribute and preventing the steak from becoming dry. Always let your steak rest for at least 5-10 minutes before cutting into it.
Cutting into the Steak Too Soon
This is a classic mistake that everyone makes at least once. Cutting into the steak too soon will cause all the juices to run out, leaving you with a dry, disappointing steak. Resist the temptation and let the steak rest for a few minutes before you slice into it.
Using a Cold Pan
If you want to get that perfect sear, you need to make sure your pan is hot. A cold pan will steam the steak instead of sear it, and you won't get that crispy crust.
Heat the pan over medium-high heat before adding the steak. You should be able to see a shimmer in the oil when it’s ready. If you have a cast iron pan, you can even test it by dropping a few water droplets into the pan. If they sizzle and evaporate immediately, the pan is ready.
Ignoring the Temperature
Finally, don't ignore the temperature. Using a thermometer is essential for ensuring the steak is cooked to your liking. There's nothing worse than biting into a steak that's overcooked and tough.
Don’t be afraid to check the temperature multiple times to ensure it’s cooked to your desired doneness. It’s better to be safe than sorry!
Part 7: FAQs
Here are some frequently asked questions about cooking steak in a pan:
1. What kind of pan should I use?
A cast iron pan is ideal for pan-frying steak because it holds heat well and provides an even sear. However, a heavy-bottomed stainless steel pan or non-stick pan will also work. Avoid using thin pans as they will not heat up evenly and may lead to uneven cooking.
2. How long should I sear the steak for?
The searing time will depend on the thickness of your steak and the desired level of doneness. Generally, you'll want to sear each side for 2-3 minutes, or until a nice crust forms. For a thicker steak, you may need to sear for a bit longer.
3. Should I use butter or oil for searing?
You can use either butter or oil, but oil has a higher smoke point than butter, so it's better for searing. Butter has a lower smoke point, meaning it will burn at a lower temperature.
You can add a knob of butter towards the end of cooking to add flavor and richness. This will give your steak a nice golden brown color and add a delicious buttery flavor.
4. Can I cook a steak in a pan without searing it?
Technically, you can, but you won't get that crispy crust and flavorful sear that makes pan-fried steak so delicious. Searing is a crucial step in achieving that restaurant-quality steak.
5. How long should I let the steak rest before slicing into it?
Let the steak rest for at least 5-10 minutes before slicing into it. This allows the juices to redistribute and prevents the steak from becoming dry.
Part 8: Conclusion
Now, I know this might seem like a lot of information, but trust me, once you've mastered the basics, pan-frying steak is a breeze. So, next time you're craving a delicious and juicy steak, ditch the grill and give this method a try. You'll be surprised how easy it is to achieve those restaurant-quality results in your own kitchen.
Happy cooking!
Everyone is watching

Corn on the Cob: The Ultimate Guide to Perfectly Cooked Ears
Healthy MealsAh, corn on the cob. Just the name evokes images of sunny days, barbecues, and that sweet, juicy flavour that ...

Perfect Pork Roast Oven Cooking Time: A Guide to Delicious Results
Healthy MealsThere's something truly satisfying about a perfectly roasted pork. The aroma alone is enough to make your mout...

Ham Cooking Time: How Long to Bake, Smoke, or Boil a Delicious Ham
Healthy MealsAh, ham. It's a classic, isn't it? A real crowd-pleaser, especially around holidays. And when done right, it'...

Scallops: The Ultimate Guide to Perfect Cooking
Healthy MealsAh, scallops. Those delicate, sweet, and utterly delicious morsels of the sea. They hold a special place in my...

Spaghetti Squash: The Ultimate Guide to Cooking and Serving
Healthy MealsRemember that time you saw spaghetti squash at the supermarket, looking all bumpy and strange, and thought, "W...