There's something undeniably comforting and satisfying about a perfectly roasted chicken. The crisp, golden skin, the tender, succulent meat, and that irresistible aroma that permeates your entire home – it’s a dish that never fails to evoke feelings of warmth and happiness.
But let's face it, the thought of roasting a whole chicken can sometimes feel daunting. All those fancy techniques, the basting, the flipping, the timing… it can seem like a real chore. But trust me, it's actually much simpler than you might think!
This article is your guide to conquering the art of roast chicken, breaking down my foolproof recipe and revealing my favorite tips and tricks along the way. Even if you consider yourself a kitchen novice, I guarantee you'll be able to create a delicious and impressive roast chicken that will have everyone raving.
(Part 1) Choosing the Right Chicken
The journey to a perfect roast chicken begins with selecting the right bird. You want a chicken that's plump and juicy, but not so large that it takes forever to cook. My go-to size is about 1.5kg (3.3 lbs), which comfortably feeds 2-3 people. If you're hosting a larger gathering, simply scale up with a bigger bird.
The Perfect Bird: What to Look For
Here are a few key features to look for when choosing your chicken:
- Skin: The skin should be smooth and pale, with a slightly yellowish hue. Avoid any chicken with skin that appears discolored or has tears or punctures. A smooth skin indicates a well-handled bird.
- Breasts: The breasts should be plump and firm, not thin or bony. This is a good indication of a healthy, well-nourished chicken.
- Legs: The legs should be firm and well-shaped, not too skinny or thin. This is another sign of a healthy bird.
- Smell: Trust your nose! A fresh chicken should have a mild, almost sweet smell. If it smells sour or ammonia-like, it's a sign that the chicken is not fresh and you should avoid it.
(Part 2) Preparing the Chicken: A Dry Bird is a Happy Bird
Once you've chosen your beautiful bird, it's time to get it prepped and ready for roasting. This stage is crucial for achieving that gloriously crispy skin we all crave.
Pat it Dry: The Key to Crispy Skin
The first step is to pat the chicken dry with paper towels. This is essential to remove any excess moisture, allowing the skin to crisp up beautifully in the oven. The drier the skin, the crispier it will become!
Seasoning: Flavor Unleashed
Now comes the fun part: seasoning your chicken. There's a whole world of possibilities here, but my go-to recipe is simple yet incredibly flavorful:
- Salt: A generous sprinkle of sea salt is essential for enhancing the natural flavors of the chicken. I usually use about 1.5 tsp for a 1.5kg chicken, but adjust based on your preference.
- Black Pepper: Freshly ground black pepper adds a lovely kick to the seasoning. The flavor is far more potent than pre-ground pepper, so a little goes a long way.
- Herbs: I'm a big fan of fresh herbs like rosemary, thyme, and sage. You can tuck a few sprigs under the skin, or chop them and rub them all over the chicken. This infuses the chicken with a wonderful aromatic depth.
Stuffing the Bird: Flavorful Options
Stuffing your roast chicken is a personal choice, but I highly recommend it. It's a great way to add extra flavor and moisture, creating a truly satisfying meal.
Here are a couple of my favorite stuffing options:
- Lemon and Herbs: A classic and always delicious combination. Simply stuff the cavity with lemon wedges, rosemary sprigs, and a few cloves of garlic. The lemon adds a bright, citrusy note, while the herbs provide a fragrant aroma.
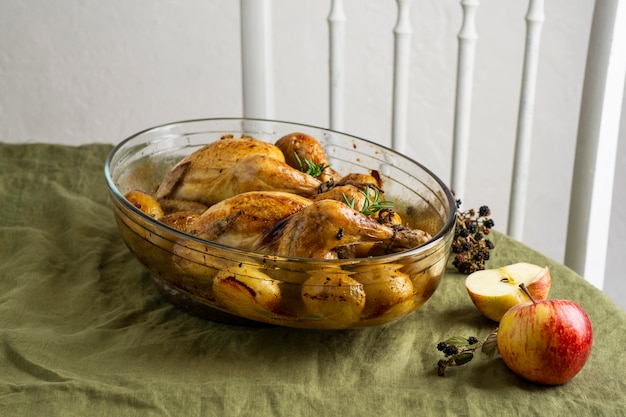
- Bread Stuffing: This is a hearty and satisfying stuffing, perfect for a winter meal. You can create a simple bread stuffing with bread cubes, onions, herbs, and sausage meat. Just be sure not to overstuff the cavity, as this can hinder the cooking process.
(Part 3) roasting time: The Big Moment
Now that your chicken is prepped and ready to go, it's time for the main event: roasting!
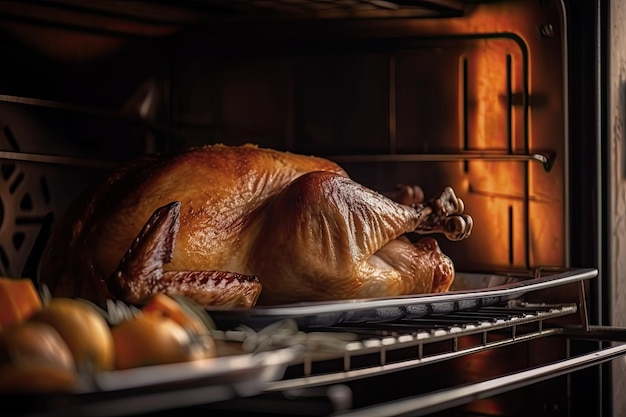
Preheating: The Secret to Even Cooking
The first step is to preheat your oven to 200°C (400°F). This ensures that the chicken cooks evenly and quickly, achieving that perfect golden brown exterior and succulent interior.
Roasting Time: A Simple Guide
The roasting time will vary depending on the size of your chicken, but a good rule of thumb is to roast it for 1 hour and 15 minutes per kilo (2.2 lbs). For example, a 1.5kg (3.3 lbs) chicken would roast for about 1 hour and 45 minutes.
roasting techniques: Achieving Crispy Perfection
Here are two effective roasting techniques to consider:
- Roasting on a Rack: This is my personal preference, as it allows air to circulate freely around the chicken, ensuring even cooking and a deliciously crispy skin. You can use a roasting rack placed over a baking tray, or simply rest the chicken on a bed of vegetables like onions and carrots, which also add flavor.
- Roasting in a Pan: If you don't have a roasting rack, you can roast the chicken directly in a pan. Make sure the pan is large enough to accommodate the chicken without overcrowding.
Basting: Locking in Moisture and Flavor
To keep the chicken moist and the skin golden, basting is key. This involves spooning some of the fat and juices from the roasting pan over the chicken every 15-20 minutes. It adds moisture and flavor, resulting in a truly delicious roast chicken.
(Part 4) Resting the Chicken: A Crucial Step
Once the chicken is cooked, it's incredibly important to let it rest for 10-15 minutes before carving. This allows the juices to redistribute throughout the meat, resulting in a much more tender and flavorful dish.
How to Tell if It's Cooked: Signs of Success
There are a few ways to determine if your chicken is cooked through:
- Temperature: The most reliable method is to use a meat thermometer. Insert the thermometer into the thickest part of the thigh, avoiding the bone. The internal temperature should reach 74°C (165°F).
- Juices: When you pierce the thickest part of the thigh with a knife, the juices should run clear. If they are still pink, the chicken needs to cook a little longer.
- Appearance: The chicken should be golden brown and the skin should be crispy.
(Part 5) Serving the Roast Chicken: A Feast for the Senses
Now that your chicken is cooked and rested, it's time to serve it up!
Carving the Chicken: A Simple Guide
Use a sharp carving knife for the best results.
- Start with the Legs: Remove the legs by cutting through the joint where the leg meets the thigh. Then, cut the thigh from the drumstick at the joint.
- Cut the Breasts: Once the legs are removed, carve the breasts by slicing along the bone, separating them from the carcass.
- Remove the Wings: Finally, remove the wings by cutting through the joint where the wing meets the breast.
Serving Suggestions: A Symphony of Flavors
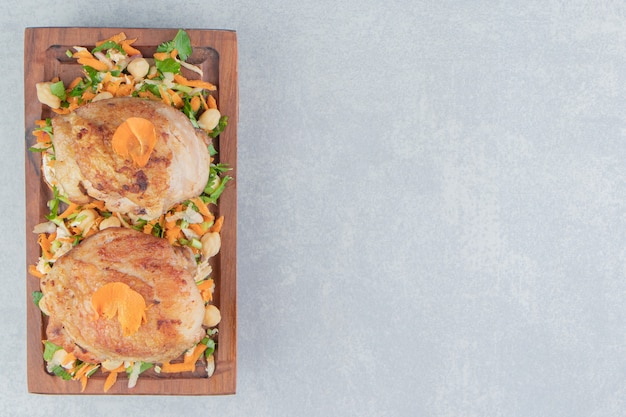
- roast potatoes: A classic accompaniment for roast chicken. Simply toss potatoes with olive oil, salt, and pepper, and roast them in the oven until golden brown and crispy.
- roast vegetables: Other vegetables that pair beautifully with roast chicken include carrots, parsnips, broccoli, and asparagus. Roast them alongside the chicken for a delicious, one-pan meal.
- Gravy: Make a rich and flavorful gravy from the pan juices using flour, butter, and stock. It adds a touch of richness and savory depth to the dish.
- Salad: A light and refreshing salad is the perfect way to balance out the richness of the roast chicken.
(Part 6) leftover roast chicken: Delicious Possibilities
Have some leftover roast chicken? Don’t worry, there are countless ways to use it up!
- chicken salad: Chop the leftover chicken and combine it with mayonnaise, celery, and onion. Serve it on bread or crackers for a quick and easy lunch or snack.
- Chicken Soup: Use the leftover chicken to make a hearty and comforting soup. Add vegetables, noodles, or rice for a complete meal.
- Chicken Sandwiches: Use the leftover chicken to create delicious sandwiches with your favorite toppings, such as lettuce, tomato, cheese, or avocado.
- Chicken Pie: Use the leftover chicken to make a delicious chicken pie. Add vegetables, gravy, and a flaky crust for a comforting and satisfying meal.
(Part 7) Tips and Tricks: Mastering the Roast
- Don't Overcrowd the Pan: Make sure there's enough space for air to circulate around the chicken, ensuring even cooking and crispy skin. If necessary, roast the chicken in two batches.
- Invest in a Meat Thermometer: A meat thermometer is a small investment that can save you a lot of stress. It provides accurate temperature readings, guaranteeing perfectly cooked chicken.
- Don't Overcook the Chicken: Overcooked chicken will be dry and tough. Aim for an internal temperature of 74°C (165°F).
- Rest the Chicken: Always rest the chicken for 10-15 minutes before carving. This allows the juices to redistribute, resulting in a more tender and flavorful dish.
- Experiment with Flavors: Don't be afraid to try different herbs, spices, and stuffing to create your own unique roast chicken recipe.
(Part 8) My Favourite roast chicken recipe: A Proven Winner
Here's my go-to recipe for a delicious and foolproof roast chicken:
Ingredients:
- 1.5kg (3.3 lbs) chicken
- 1.5 tsp sea salt
- 1 tsp freshly ground black pepper
- 2 sprigs of rosemary
- 1 sprig of thyme
- 2 cloves of garlic, crushed
- 1 lemon, cut into wedges
- 1 tbsp olive oil
- 1 onion, quartered
- 2 carrots, chopped
- 2 parsnips, chopped
Instructions:
- Preheat oven to 200°C (400°F).
- Pat the chicken dry with paper towels.
- Season the chicken with salt, pepper, rosemary, thyme, and garlic. Tuck some of the herbs under the skin.
- Stuff the chicken cavity with lemon wedges.
- Place the onion, carrots, and parsnips in a roasting pan.
- Place the chicken on top of the vegetables.
- Drizzle the chicken with olive oil.
- Roast for 1 hour and 45 minutes, or until the internal temperature reaches 74°C (165°F).
- Let the chicken rest for 10-15 minutes before carving.
(Part 9) Serving Suggestions: A Culinary Symphony
Serve your perfectly roasted chicken with your favorite side dishes, creating a harmonious symphony of flavors:
- Roast Potatoes: Classic and delicious!
- Roast Vegetables: Carrots, parsnips, broccoli, and asparagus all make wonderful companions.
- Gravy: A rich and flavorful gravy adds a touch of decadence.
- Salad: A light and refreshing salad provides a lovely counterpoint to the rich flavors of the chicken.
(Part 10) FAQs: Answers to Your Roast Chicken Questions
- How long do I roast a chicken?
The roasting time will vary depending on the size of your chicken, but a good rule of thumb is to roast it for 1 hour and 15 minutes per kilo (2.2 lbs). So, for a 1.5kg (3.3 lbs) chicken, you’d roast it for about 1 hour and 45 minutes.
- How do I know when my chicken is cooked?
The best way to ensure the chicken is cooked through is to use a meat thermometer. Insert the thermometer into the thickest part of the thigh, avoiding the bone. The internal temperature should reach 74°C (165°F). You can also check the juices: When you pierce the thickest part of the thigh with a knife, the juices should run clear. If they are still pink, the chicken needs to cook a little longer.
- What should I serve with roast chicken?
Roast chicken pairs well with a variety of side dishes, including roast potatoes, roast vegetables, gravy, and salads.
- Can I freeze leftover roast chicken?
Yes, you can freeze leftover roast chicken. Simply let it cool completely, then store it in an airtight container in the freezer for up to 3 months.
- What are some tips for making crispy chicken skin?
To get crispy chicken skin, pat the chicken dry with paper towels before roasting. Roast the chicken on a rack, and don't overcrowd the pan. You can also baste the chicken with melted butter or olive oil during cooking.
So there you have it – my comprehensive guide to creating the perfect roast chicken! Don't be intimidated by the idea of roasting a whole bird. With a little planning and this simple recipe, you can create a delicious and impressive meal that will delight your family and friends. Happy cooking!
Everyone is watching

Corn on the Cob: The Ultimate Guide to Perfectly Cooked Ears
Healthy MealsAh, corn on the cob. Just the name evokes images of sunny days, barbecues, and that sweet, juicy flavour that ...

Perfect Pork Roast Oven Cooking Time: A Guide to Delicious Results
Healthy MealsThere's something truly satisfying about a perfectly roasted pork. The aroma alone is enough to make your mout...

Ham Cooking Time: How Long to Bake, Smoke, or Boil a Delicious Ham
Healthy MealsAh, ham. It's a classic, isn't it? A real crowd-pleaser, especially around holidays. And when done right, it'...

Scallops: The Ultimate Guide to Perfect Cooking
Healthy MealsAh, scallops. Those delicate, sweet, and utterly delicious morsels of the sea. They hold a special place in my...

Spaghetti Squash: The Ultimate Guide to Cooking and Serving
Healthy MealsRemember that time you saw spaghetti squash at the supermarket, looking all bumpy and strange, and thought, "W...