You're looking for the perfect beef fillet roast, aren't you? That melt-in-your-mouth, juicy, flavour-packed masterpiece that leaves everyone speechless. I've been on that quest myself, battling tough, dry, disappointing results for years. But trust me, once you crack the code, it's a game-changer. It's not just about throwing a hunk of meat in the oven and hoping for the best. It's about understanding the science behind it, the little tricks that make all the difference, and knowing exactly what to do, step by step.
In this guide, I'll share my personal secrets to a beef fillet roast that's so tender it practically melts in your mouth and so juicy it'll leave you wanting more. We'll cover everything, from choosing the right cut to nailing the perfect sear, understanding rest times, and mastering the art of carving. So, grab a cuppa, settle in, and let’s get cooking!
(Part 1) The Beef: Getting Started
Choosing the Right Cut: A Key to Tenderness
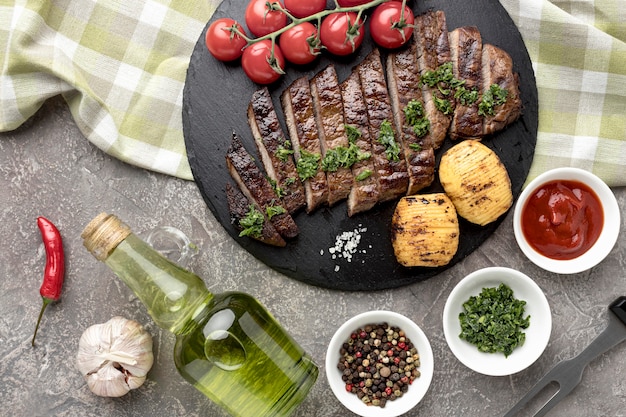
First things first, let's talk about the star of the show – the beef. You want a cut that's naturally tender, with good marbling – those streaks of fat that add flavour and juiciness. For me, a fillet, or tenderloin, is the absolute winner. It's the most tender cut on the whole beast, guaranteeing that melt-in-your-mouth experience. I've tried other cuts like sirloin or ribeye, and while they can be delicious, they're not as consistently tender as the fillet.
Now, think about the size. I find a 1.5 to 2 kg (3 to 4 lb) fillet is just right for a family meal. If you're feeding a smaller group, a 1kg (2 lb) fillet is plenty.
Prepping the Beef: Setting the Stage for Success
Before we get to the cooking, let's get your fillet ready. First, pat it dry with kitchen paper, which helps ensure a good sear. Then, leave it at room temperature for about 30 minutes before cooking. This allows the meat to come up to room temperature, resulting in more even cooking.
If you're feeling fancy, you can tie the fillet with kitchen twine. This helps it cook more evenly and gives it a lovely presentation. But honestly, it's not essential. The important thing is to make sure the fillet is tied snugly so it doesn't unravel during cooking.
(Part 2) The Seasoning: Flavour Booster
Let's talk seasoning. It's crucial for a tasty roast, and you want to get it right! I like to keep it simple but effective. A good quality sea salt and freshly ground black pepper is all you really need.
Now, I know some folks like to add other spices, like garlic powder, paprika, or herbs. But remember, you want the flavour of the beef to shine through. Go easy on the extra stuff, or it might overpower the natural flavour. A subtle touch of herbs, like rosemary or thyme, can add a lovely aroma, but don’t overdo it.
Don’t forget to season liberally all over the fillet. Be generous with your salt and pepper, coating the entire surface evenly. It's a key step in bringing out the flavour of the beef.
(Part 3) The Technique: The Heart of the Roast
Here's where things get exciting, the actual cooking process! This is where it all comes together.
The Sear: Building a Crust
This is the first step in creating a delicious beef fillet roast. The sear is all about building a beautiful, crispy crust on the outside of the fillet. I like to use a cast iron pan – it gets wicked hot and gives the best results. But if you don't have one, don't worry, any heavy-bottomed pan will do.
First, heat your pan over high heat. You want it smoking hot! Then, add a bit of oil to the pan, enough to coat the bottom. I typically use rapeseed oil, but you can use any oil with a high smoke point.
Now, carefully place the fillet in the pan, making sure it sizzles as soon as it touches the pan. Cook for about 2 minutes on each side, or until you have a beautiful, deep brown crust.
Don't overcrowd the pan! You want the fillet to have plenty of space to sear properly. If you have a big fillet, you might need to sear it in batches. Don't worry, it's worth it for that perfect crust.
The Roast: Perfecting the Interior
Once you've got a beautiful sear, it's time to transfer the fillet to the oven. You'll be aiming for a medium-rare finish, which means an internal temperature of about 54°C (130°F). If you prefer your meat cooked more, adjust the temperature accordingly.
Preheat your oven to 180°C (350°F). Place the fillet on a roasting rack set over a baking sheet. This allows for even heat circulation, preventing the meat from steaming in its own juices. It also helps ensure a crispy crust.
The cooking time depends on the size of your fillet. A general rule of thumb is about 15 minutes per 450g (1 lb) for a medium-rare finish. However, it’s always best to use a meat thermometer to check the internal temperature, especially if you're unsure.
While the fillet is roasting, you can baste it with some of the juices from the pan. This helps keep it moist and adds a bit more flavour. Basting can be done every 15 minutes, but it's not essential.
The Rest: Time for Tenderness
When the fillet reaches your desired internal temperature, take it out of the oven and let it rest. This is crucial for achieving the perfect roast, so don't skip it!
Cover the fillet loosely with some foil and let it rest for at least 15 minutes. This allows the juices to redistribute throughout the meat, resulting in a more tender and juicy roast. The longer you rest it, the more tender it will become.
(Part 4) The Sauce: Elevating the Experience
Let's talk about the sauce. It's a game-changer for a beef fillet roast, adding another layer of flavour and richness.
Now, you can buy ready-made gravy, but let's be honest, homemade is always better. And it's not as hard as you might think. A simple pan sauce, made with the juices from the pan, captures all that delicious flavour.
Making a Simple Pan Sauce
There's nothing quite like a good pan sauce.
First, carefully pour off any excess fat from the pan. Then, add a tablespoon of butter and a tablespoon of flour to the pan, whisking it over a medium heat until it forms a smooth paste.
Gradually whisk in about 125ml (?? cup) of beef stock, making sure there are no lumps.
Bring the sauce to a simmer and let it cook for a few minutes, stirring occasionally, until it thickens slightly.
If you want to add a bit more depth of flavour, you can add a tablespoon of red wine vinegar or some Dijon mustard.
Strain the sauce through a sieve to remove any bits, and season to taste. It's so simple and adds so much to the whole experience.
(Part 5) The Sides: Complements to the Roast
Now, let's think about the sides. You want something that will complement the rich, meaty flavour of the beef fillet roast.
Personally, I like to keep it simple and classic. Roasted potatoes are a must-have, they soak up all those delicious juices. You can also add some seasonal vegetables, like asparagus, green beans, or broccoli.
Here are a few ideas to get you started:
side dish Ideas
- Roasted potatoes with rosemary and garlic
- Roasted asparagus with lemon and parmesan
- Honey-roasted carrots with cumin
- Sautéed green beans with garlic and butter
- Creamed spinach
- Gratin Dauphinois
- Roasted root vegetables
- Wild rice pilaf
The best part? You can prepare the sides while the roast is resting, so everything is ready at the same time.
(Part 6) The Carving: Art and Technique
Okay, so the roast is rested, the sauce is simmering, the sides are ready. It’s time to carve!
This is your moment to show off your skills (or at least try to look like you know what you're doing!)
The Essential Tools
You'll need a sharp carving knife, of course. A good quality carving fork also helps to hold the meat in place as you carve.
Now, the fillet is naturally quite tender, so you don’t need to be too aggressive with your carving. You want to slice it neatly, about 1 cm (?? inch) thick.
If you've tied the fillet with twine, remove it before carving.
The Carving Process
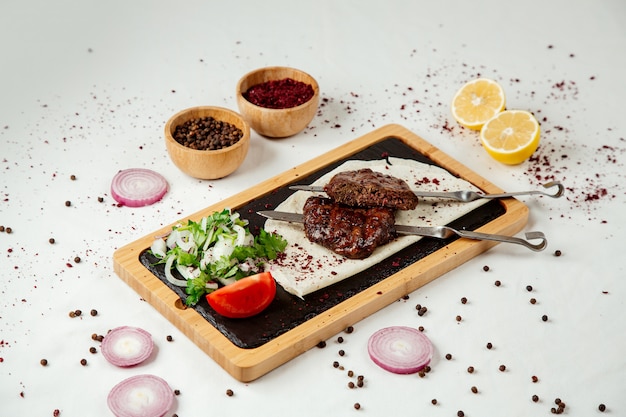
Start by carving the fillet into thin slices, working from one end to the other.
You want to cut against the grain of the meat. This helps to make the slices more tender.
As you carve, arrange the slices on a serving platter.
And don’t forget to pour some of that delicious sauce over the top!
(Part 7) Serving: Time to Enjoy!
The moment has arrived! Your beef fillet roast is ready to be enjoyed.
I like to serve it with a generous spoonful of sauce, along with some of those delicious side dishes.
Now, you can get fancy with the presentation if you want, but honestly, I think it looks pretty great just as it is.
Just make sure you have enough plates and cutlery, and get ready to be impressed by your own cooking skills!
(Part 8) The Leftovers: Not to Waste!
Let’s face it, you're probably going to have leftovers. And that's a good thing! Beef fillet roast is amazing the next day, especially in a sandwich or salad.
Here are a few ideas to use up those leftovers:
Leftover Ideas
- Beef fillet sandwiches with horseradish sauce
- Beef fillet salad with mixed greens, roasted vegetables, and a vinaigrette dressing
- Beef fillet hash with potatoes, onions, and peppers
- Beef fillet pasta with a creamy tomato sauce
- Beef fillet stir-fry with vegetables and a soy sauce glaze
- Beef fillet tacos with salsa and guacamole
Just remember to store the leftovers in the fridge for up to 3 days, or freeze them for longer storage.
(Part 9) The Mistakes to Avoid
Now, you're well on your way to becoming a beef fillet roast expert, but even the best cooks make mistakes! Here are some common mistakes to avoid, so your roast turns out perfectly every time:
Common Mistakes and How to Avoid Them
| Mistake | Solution |
|---|---|
| Overcooking the fillet | Use a meat thermometer to check the internal temperature and take it out of the oven before it reaches your desired level of doneness. |
| Under-seasoning the fillet | Season generously with salt and pepper before cooking. |
| Not resting the fillet | Let the fillet rest for at least 15 minutes after cooking to allow the juices to redistribute. |
| Using a dull knife to carve the fillet | Use a sharp carving knife to slice the fillet neatly. |
| Not searing the fillet properly | Ensure the pan is smoking hot and cook for 2 minutes per side to achieve a beautiful, crispy crust. |
| Overcrowding the pan during searing | Sear the fillet in batches if necessary to ensure each side has ample space to sear properly. |
| Not basting the fillet during roasting | Baste the fillet every 15 minutes with the pan juices for added moisture and flavor. |
Avoiding these common mistakes will ensure a delicious, tender, and juicy roast every time.
FAQs: Your Questions Answered
You've got questions, and I've got answers! Here are some of the most common questions people have about making a beef fillet roast:
1. What's the best way to tell if the fillet is cooked to my liking?
The best way to tell if the fillet is cooked to your liking is to use a meat thermometer. Insert the thermometer into the thickest part of the fillet, making sure it doesn’t touch any bone. For a medium-rare finish, you want an internal temperature of about 54°C (130°F). If you prefer your meat cooked more, you can adjust the temperature accordingly.
2. Can I cook the fillet in a slow cooker?
It's not recommended to cook a fillet in a slow cooker. The slow cooker can make the fillet tough and dry, as it's best for cuts of meat that benefit from long, slow cooking.
3. Can I add garlic to the fillet?
You can certainly add garlic to the fillet! I like to add a few cloves of garlic, minced or sliced, to the pan when searing the fillet. This adds a lovely flavour to the roast. You can also try rubbing the fillet with a garlic paste before searing.
4. What's the best way to store leftover fillet?
Store leftover fillet in the fridge for up to 3 days in an airtight container. You can also freeze the leftover fillet for up to 3 months. To freeze, wrap the fillet tightly in plastic wrap and then in aluminum foil.
5. Can I use a different cut of beef?
While a fillet is the most tender and best for a roast, you can use other cuts, such as sirloin or ribeye. Just remember that these cuts might be a bit tougher and may require longer cooking times. You can also try a chuck roast or a brisket, but these cuts are best cooked using a slow cooking method.
I hope this guide has helped you achieve the perfect beef fillet roast. Now go on, impress your family and friends with this delicious dish!
Everyone is watching

Corn on the Cob: The Ultimate Guide to Perfectly Cooked Ears
Healthy MealsAh, corn on the cob. Just the name evokes images of sunny days, barbecues, and that sweet, juicy flavour that ...

Perfect Pork Roast Oven Cooking Time: A Guide to Delicious Results
Healthy MealsThere's something truly satisfying about a perfectly roasted pork. The aroma alone is enough to make your mout...

Ham Cooking Time: How Long to Bake, Smoke, or Boil a Delicious Ham
Healthy MealsAh, ham. It's a classic, isn't it? A real crowd-pleaser, especially around holidays. And when done right, it'...

Scallops: The Ultimate Guide to Perfect Cooking
Healthy MealsAh, scallops. Those delicate, sweet, and utterly delicious morsels of the sea. They hold a special place in my...

Spaghetti Squash: The Ultimate Guide to Cooking and Serving
Healthy MealsRemember that time you saw spaghetti squash at the supermarket, looking all bumpy and strange, and thought, "W...