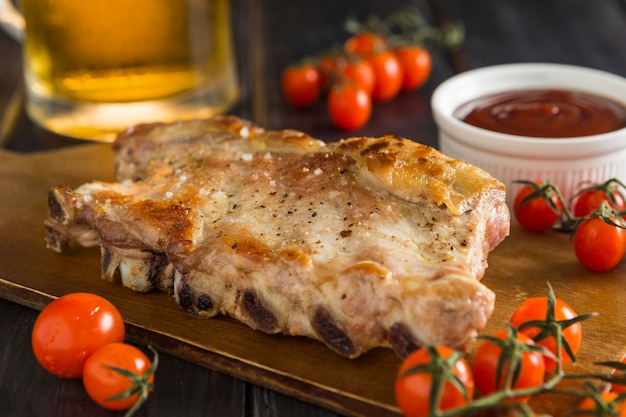
Let's face it, there's something truly magical about ribs. That smoky, savoury aroma wafting through the kitchen, the tender, melt-in-your-mouth texture, the way they just disappear from the plate – it's pure culinary bliss. But achieving that perfect, fall-off-the-bone rib experience can be a bit of a journey, especially if you're not a seasoned barbecue aficionado.
I've certainly had my fair share of rib mishaps – dry, tough ribs that left me feeling more frustrated than satisfied. But through trial and error, a sprinkle of patience, and a whole lot of experimentation, I've discovered a method that delivers consistently amazing results: the 275°F low and slow oven technique.
This article is your guide to unlocking the secrets of oven-baked ribs, a method that's both straightforward and rewarding. We'll delve into the science behind this gentle cooking method, explore different rib cuts, and walk you through the entire process, from prepping to serving, ensuring you have all the tools you need for rib-roasting success. So, grab a comfy seat, a cup of tea, and let's dive in!
(Part 1) The Science of Slow and Steady
Why 275°F? Well, it's all about that slow and steady heat, a gentle approach that yields incredible results. Think of it as a culinary transformation – a long, slow dance between heat and meat that produces tender, flavour-packed ribs.
The Magic of Low and Slow
When you cook ribs at a low temperature, the heat works its magic gradually, penetrating the meat without rushing the process. This slow, controlled heat allows the collagen, a protein that gives meat its toughness, to break down into gelatin. And gelatin is the secret ingredient that gives those ribs that incredible, melt-in-your-mouth texture.
Beyond Tenderness
But the benefits of low and slow don't stop at tenderness. This method also encourages the fat to render more evenly, adding moisture and flavour to the meat. Think of it as a natural basting process, where the rendered fat creates a delicious, succulent glaze that infuses the ribs with extra flavour.
A crispy bark: The Finishing Touch
And let's not forget the crispy bark, that golden brown crust that adds a delightful textural contrast and elevates the flavour profile. The long, gentle cooking time allows the sugars in the rub to caramelize, creating a deliciously smoky, crunchy layer that will have you craving more.
(Part 2) Choosing Your Rib Cut: The Starting Point
Just like any culinary adventure, selecting the right ingredients is key. Choosing the perfect cut of ribs is the starting point for achieving rib-roasting greatness. Let's break down the most popular types of ribs and explore what makes them unique.
Baby back ribs: Delicate Flavour
These are the quintessential ribs, known for their delicate flavour and tender meat. They come from the upper part of the rib cage and are smaller and more compact than their spare rib counterparts.
spare ribs: Hearty and Robust
Spare ribs are larger and meatier, coming from the lower part of the rib cage. They tend to have a stronger, more robust flavour and a higher fat content, resulting in a richer, more intense rib experience.
St. Louis Ribs: The Best of Both Worlds
St. Louis ribs are a clever compromise – spare ribs that have been trimmed and shaped to remove the cartilage, creating a more uniform and easier-to-cook cut. They offer the meatiness of spare ribs with the clean, uniform shape of baby back ribs.
My Go-To Choice: A Personal Preference
Personally, I'm a big fan of St. Louis ribs. They strike a beautiful balance between flavour and tenderness, and their uniform shape makes them incredibly easy to manage in the oven. But ultimately, the choice is yours. Explore your options, experiment, and discover your favourite rib cut.
(Part 3) Prepping for Perfection: Getting Ready to Roast
Now that you've chosen your ribs, it's time to prepare them for their oven adventure. The prepping stage is crucial for ensuring those ribs achieve maximum tenderness and develop a delicious crust.
1. The Membrane: A Crucial Removal
That thin, white membrane on the back of the ribs, known as the silver skin, can be tough and chewy. It's best to remove it before cooking. Use a sharp knife or a paper towel to gently lift and peel it away. You'll be thankful for the effort later!
2. Seasoning: Unleash Your Creativity
This is where the fun begins! Seasoning your ribs is a chance to personalize your recipe and create a flavour profile that suits your taste. I prefer a simple dry rub made with salt, pepper, paprika, garlic powder, and onion powder. But feel free to experiment with other spices like cumin, chili powder, brown sugar, or even a hint of cayenne pepper for a touch of heat.
3. The Wrap: Creating a Steamy Environment
After seasoning, I like to wrap my ribs in aluminum foil, creating a steamy environment that helps to tenderize the meat and keep it moist. Wrap the ribs tightly, ensuring no gaps for steam to escape. This "steam bath" will contribute to those melt-in-your-mouth results.
(Part 4) The Oven Magic: Bringing Your Ribs to Life
Finally, it's time to put those ribs in the oven and watch them transform into culinary masterpieces. Here's a step-by-step guide to ensure a successful oven roast:
1. Setting the Stage: Oven Prep
Preheat your oven to 275°F. Place the wrapped ribs on a baking sheet or in a roasting pan. If you have a meat thermometer, it's a great idea to use it during this stage to ensure your oven is maintaining the correct temperature.
2. The Long Wait: Patience Is Key
This is where patience really pays off. Depending on the size of your ribs, they will take anywhere from 3 to 4 hours to cook. It's a long process, but the results are well worth the wait. During this time, you can relax, enjoy a good book, or simply watch the magic unfold in the oven.
3. The Unwrap: Checking for Tenderness
After the initial 3-4 hours, unwrap the ribs and check for tenderness. If the meat feels tender enough to pull away from the bone with little effort, you're ready to move on to the next stage. If they need a little more time, wrap them back up in foil and continue cooking for another 30 minutes to an hour.
(Part 5) The Finishing Touches: Elevating Your Ribs
With your ribs cooked to perfection, it's time to add those final touches that will take them from good to absolutely amazing.
1. The Glaze: A Delicious Transformation
I like to slather my ribs with a homemade barbecue sauce during the last hour of cooking. This adds a delicious, smoky flavour and creates a beautiful, glossy finish. You can find countless barbecue sauce recipes online, or simply use your favourite store-bought brand. Experiment with different sauces to find your personal favourite.
2. The Smoker: Adding a Depth of Flavour
For an extra smoky depth of flavour, you can finish your ribs in a smoker for 30-60 minutes. The smoke permeates the meat, adding a unique, woodsy dimension to the flavour profile. If you have access to a smoker, it's definitely worth trying.
3. The Rest: Allowing Juices to Redistribute
Once the ribs are cooked, let them rest for 15-20 minutes before slicing and serving. This allows the juices to redistribute throughout the meat, resulting in even more tender and flavourful ribs.
(Part 6) Serving Up Your Ribs: A Feast for the Senses
And now for the moment you've been waiting for – time to dig in! Here are a few tips for serving your ribs like a pro, ensuring an unforgettable dining experience.
1. The Perfect Sidekick: Enhancing Your Feast
No rib feast is complete without a delicious side dish. Creamy coleslaw, tangy potato salad, a classic baked bean recipe – these are all excellent accompaniments that complement the rich flavour of the ribs.
2. The Cut: Ensuring Every Bite is Perfect
When slicing your ribs, use a sharp knife to cut between the bones. This ensures each piece is juicy and tender. If you're using a rack of ribs, you can also separate the ribs individually for easier serving.
3. The Presentation: Making Your Ribs Shine
Arrange your ribs on a platter or serving dish and garnish with fresh herbs like parsley or chives for a touch of elegance. A few sprigs of rosemary or a sprinkle of smoked paprika add a visual appeal and a subtle aromatic touch.
(Part 7) Tips for Rib-Roasting Success: Mastering the Art
Here are a few additional tips to ensure your ribs are a hit every time, making your rib-roasting adventures even smoother and more successful.
1. Avoiding Overcooked Ribs: Maintaining Tenderness
Ribs can easily become dry if overcooked. Check for tenderness regularly throughout the cooking process and adjust the cooking time as needed.
2. The Meat Thermometer: Your Reliable Companion
A meat thermometer is your best friend for ensuring your ribs are cooked to perfection. Aim for an internal temperature of 190°F to 200°F. Once the meat reaches this temperature, it's usually a good indication that the ribs are cooked through and tender.
3. Experimentation: Unleashing Your Culinary Creativity
Don't be afraid to experiment with different flavours. There's a whole world of delicious rib rubs and sauces just waiting to be discovered. Try different spice combinations, experiment with different types of barbecue sauce, and create your own signature rib recipe.
(Part 8) FAQs: Common Questions Answered
Here are answers to some of the most frequently asked questions about oven-baked ribs, providing insights to make your rib-roasting journey even smoother.
1. Can I Cook Ribs in a slow cooker?
Yes, absolutely! Slow cookers are an excellent option for ribs because they provide a gentle, even heat that helps to tenderize the meat. You can use a similar low and slow approach in a slow cooker, just adjust the cooking time based on your specific slow cooker model.
2. How do I Store Leftover Ribs?
Store leftover ribs in an airtight container in the refrigerator for up to 3 days. You can reheat them in the oven or on the stovetop. For reheating in the oven, wrap the ribs in foil to retain moisture.
3. What Temperature Should I Use for a Smoker?
The ideal temperature for smoking ribs is between 225°F and 250°F. This allows the smoke to permeate the meat, creating a delicious smoky flavour.
4. What is the Best Way to Tell if Ribs are Done?
The best way to determine if your ribs are done is by checking for tenderness. The meat should easily pull away from the bone and have a slightly springy texture. If the meat is still stuck to the bone, continue cooking for another 30 minutes to an hour.
5. What is the Best Way to Avoid Dry Ribs?
The key to avoiding dry ribs is to cook them low and slow, ensuring they are properly wrapped during the cooking process. This helps to trap the moisture and prevent the meat from drying out. Don't overcook them.
(Part 9) Conclusion: Mastering the Art of Oven-Baked Ribs
Cooking ribs at 275°F is a culinary tradition that has been passed down through generations, a testament to the enduring appeal of these succulent, flavourful treasures. It's a technique that requires patience, precision, and a touch of culinary artistry. But with a little practice, a dash of experimentation, and this comprehensive guide, you can master this art and create a rib experience that will leave your guests utterly delighted. So, embrace the journey, explore different flavours, and have fun discovering the magic of oven-baked ribs!
Everyone is watching

Corn on the Cob: The Ultimate Guide to Perfectly Cooked Ears
Healthy MealsAh, corn on the cob. Just the name evokes images of sunny days, barbecues, and that sweet, juicy flavour that ...

Perfect Pork Roast Oven Cooking Time: A Guide to Delicious Results
Healthy MealsThere's something truly satisfying about a perfectly roasted pork. The aroma alone is enough to make your mout...

Ham Cooking Time: How Long to Bake, Smoke, or Boil a Delicious Ham
Healthy MealsAh, ham. It's a classic, isn't it? A real crowd-pleaser, especially around holidays. And when done right, it'...

Scallops: The Ultimate Guide to Perfect Cooking
Healthy MealsAh, scallops. Those delicate, sweet, and utterly delicious morsels of the sea. They hold a special place in my...

Spaghetti Squash: The Ultimate Guide to Cooking and Serving
Healthy MealsRemember that time you saw spaghetti squash at the supermarket, looking all bumpy and strange, and thought, "W...