I've always been a sucker for a good egg. Whether it's a sunny-side-up breakfast, a poached egg on a weekend brunch, or a fried egg nestled on a burger, there's something undeniably satisfying about a perfectly cooked egg. But it wasn't always this way. My early attempts at egg cooking were, let's say, less than perfect. Soggy whites, runny yolks, and even the occasional exploding egg were common occurrences in my kitchen. It wasn't until I started experimenting with cast iron that my egg game truly levelled up.
There's something magical about cooking eggs in cast iron. It imparts a lovely golden crust, keeps the yolk perfectly runny, and best of all, it makes cleaning up a breeze. Over the years, I've honed my techniques, trying out different methods and experimenting with different types of cast iron. I've learned a thing or two about what works and what doesn't, and I'm excited to share my insights with you.
In this article, we'll embark on a journey through the world of cast iron egg cooking. We'll delve into the essential equipment you'll need, uncover the secrets to achieving that perfect golden crust, explore the best ways to cook different types of eggs, and share some handy tips and tricks to avoid those dreaded disasters. So, grab your favourite cast iron pan, a few eggs, and let's get cooking!
(Part 1) The Cast Iron Essentials: Choosing the Right Tools for the Job

Choosing the Right Pan: Size, Shape, and Seasoning
The first step on this egg-cellent journey is choosing the right cast iron pan. Not all cast iron is created equal, and finding the perfect pan for your needs is key.
Firstly, consider the size. For a single egg, a smaller skillet, like an 8-inch pan, will do just fine. But if you're cooking for a crowd or prefer to cook multiple eggs at once, a larger pan, like a 10 or 12-inch skillet, is a better choice. You want enough space for your eggs to cook evenly without overcrowding the pan.
Secondly, think about the shape. Most cast iron skillets come in a round shape, which works perfectly for eggs. However, if you're planning on cooking other things in your pan, you might consider a square or rectangular option for more versatility.
Finally, don't underestimate the importance of the handle. A cast iron pan can get incredibly hot, so make sure the handle is comfortable and sturdy. A long, wooden handle provides a good grip and keeps your hand away from the heat. Look for a handle that is well-balanced and doesn't feel awkward to hold, especially when your pan is full of sizzling hot eggs.
And remember, cast iron is all about seasoning. A well-seasoned pan will have a smooth, non-stick surface that will help your eggs slide around easily, making for a truly enjoyable cooking experience. If you're buying a new pan, it's usually pre-seasoned, but don't be afraid to give it an extra layer of seasoning yourself. This is a process that gets easier with time and will make your pan even better. A well-seasoned cast iron pan becomes like a trusty old friend, ready to deliver consistent results with every use.
The Tools of the Trade: Your Essential Egg Cooking Companions
Once you've got your trusty cast iron pan, let's talk about the other tools you'll need for a flawless egg experience:
- Spatula: A good spatula is essential for flipping eggs without breaking the yolk. Opt for a thin, flexible spatula made from silicone or metal. The flexibility allows you to slide it under the egg without disrupting the delicate yolk. A silicone spatula is ideal for non-stick surfaces and won't scratch the seasoning of your cast iron pan.
- Tongs: These are helpful for transferring the eggs to and from the pan, especially if you're using a larger skillet. Tongs provide a secure grip, allowing you to easily lift the eggs without the risk of them slipping or falling apart.
- Whisk: A whisk comes in handy for beating eggs before cooking, especially for scrambled or omelets. A whisk creates air pockets in the eggs, resulting in a lighter and fluffier texture.
- Basting brush: This is optional, but a basting brush can be used to evenly distribute oil or butter in the pan. A basting brush ensures that every inch of the pan is coated, preventing sticking and promoting even browning.
- Timer: A timer is crucial for keeping track of cooking time, especially for soft-cooked eggs. A timer prevents overcooking and ensures that your eggs are cooked to your exact preference.
These tools are your trusty companions in the kitchen, so make sure you have them on hand for a successful egg adventure. They might seem simple, but they play a crucial role in achieving those perfectly cooked eggs you've been dreaming of.
(Part 2) The Art of Preheating: Setting the Stage for Egg Excellence

Now, let's talk about the key to perfect cast iron egg cooking - preheating.
Think of preheating as setting the stage for your egg performance. A properly preheated pan ensures even cooking and prevents sticking. It's like warming up your vocal cords before a big performance - you wouldn't want to go on stage cold, right? Similarly, a cold cast iron pan can lead to uneven cooking and sticking, resulting in a less-than-ideal egg experience.
Here's how to preheat your cast iron pan like a pro:
The Stovetop Approach: A Classic Method for Even Heating
- Start with a Medium Heat: Don't rush the process. Begin by placing your cast iron pan on the stovetop over medium heat. Allow the pan to heat up gradually to ensure even heat distribution.
- Patience is Key: Let the pan heat up slowly and evenly. It usually takes about 5-7 minutes for a cast iron pan to reach the right temperature. Don't be tempted to crank up the heat; slow and steady wins the race in this case.
- The Oil Test: To know if your pan is ready, add a small amount of oil, like vegetable oil or canola oil, to the pan. If the oil shimmers and starts to move around, you're good to go. This indicates that the pan is hot enough to create that beautiful golden crust on your eggs.
This method works best for frying or poaching eggs. It's a tried and true method that delivers consistently excellent results.
The Oven Option: For a Truly Even Heat Distribution
For a truly even heat distribution, you can also preheat your cast iron pan in the oven. This method is especially helpful if you're planning on cooking multiple eggs or making omelets. The oven provides a consistent and even heat, ensuring that your eggs cook perfectly from edge to edge.
- Oven Preheat: Preheat your oven to 350°F (175°C). This temperature will allow the cast iron pan to heat up thoroughly and evenly.
- Pan in the Oven: Place your empty cast iron pan on a rack in the middle of the oven to heat up for about 10-15 minutes. The oven's heat will penetrate the pan, ensuring that it is heated evenly throughout.
- Remove and Oil: Carefully remove the pan from the oven using oven mitts, and immediately add your oil or butter. You're ready to cook! The pan will be piping hot, ready to create those perfectly cooked eggs.
No matter which method you choose, ensure your cast iron pan is hot enough before adding your eggs. This will help you achieve that perfect golden crust and prevent your eggs from sticking. It's the foundation for success, so don't skip this crucial step.
(Part 3) The Oil Debate: Butter or Oil? The Great Cast Iron Dilemma
Now that your pan is preheated and ready, let's talk about the oil. This is where opinions start to diverge. Do you go for butter, with its rich flavour and beautiful browning, or do you stick with oil, known for its heat tolerance and neutral flavour? It's a classic debate that has been raging among cooks for generations.
Personally, I'm a fan of both. But each has its own advantages:
The Butter Argument: For a Deliciously Rich and Golden Crust
Butter adds a delicious, creamy flavour to eggs and creates a beautiful, golden-brown crust. The richness of butter infuses the eggs with a wonderful aroma and flavour, enhancing the overall taste. However, butter has a lower smoke point than oil, meaning it can burn more easily if the pan gets too hot. So, be careful not to overheat your pan when using butter. Pay close attention to the heat and adjust it accordingly to avoid any burning.
The Oil Argument: For Heat Tolerance and a Neutral Flavour
Oil has a higher smoke point, making it ideal for high-heat cooking. It also has a neutral flavour, allowing the eggs to shine through. The heat tolerance of oil is crucial for preventing burning, especially when cooking eggs over high heat. The neutral flavour ensures that the delicate taste of the egg is not overpowered by any strong oil flavours.
The Compromise: The Best of Both Worlds
To get the best of both worlds, I often use a combination of oil and butter. I start with a thin layer of oil to prevent sticking, then add a knob of butter for flavour and browning. This is a great way to get that perfect golden crust and buttery flavour without burning the butter. It's a balanced approach that delivers the best of both options.
Ultimately, the choice is yours. Experiment with different oils and butters and find what works best for your taste buds and cooking style. There's no right or wrong answer, so go with what you enjoy and what suits your preferences.
(Part 4) Cracking the Code: The Perfect Egg: A Guide to Egg Selection and Preparation
Now, the moment of truth - cracking the egg. This seemingly simple act is crucial for achieving a flawless result. Here are a few tips to ensure your egg doesn't end up as a cracked shell mess:
- Choose fresh eggs: Start with fresh eggs for the best results. Fresh eggs have firmer whites that hold their shape better during cooking. Older eggs may have thinner whites that spread more easily, resulting in a less aesthetically pleasing egg.
- Crack Gently: Crack your eggs gently over a small bowl, avoiding any harsh taps that can damage the yolk. A gentle tap is all you need to crack the shell without compromising the delicate yolk.
- Check for Shells: Before adding the egg to the pan, check for any shell fragments and carefully remove them. A shell fragment in your egg can lead to a nasty surprise while cooking, ruining your egg experience.
- Don't Overcrowd the Pan: Avoid overcrowding the pan. Each egg needs enough space to cook evenly and prevent sticking. Overcrowding the pan leads to uneven cooking and can result in your eggs sticking together.
- Add the Egg: Once your pan is preheated and oiled, carefully add your egg to the centre of the pan. Allow the egg to settle into the hot pan, creating that beautiful golden crust.
And remember, there's no one-size-fits-all approach to cooking eggs. It's all about understanding your own preferences and adjusting the cooking time accordingly. Experiment with different cooking times to find what suits your taste buds and create those perfect eggs you've been yearning for.
(Part 5) Cooking the Classics: Different Types of Eggs: Mastering the Art of Frying, scrambled eggs, and Poaching
Now that you're equipped with the basics, let's explore the most popular ways to cook eggs in cast iron:
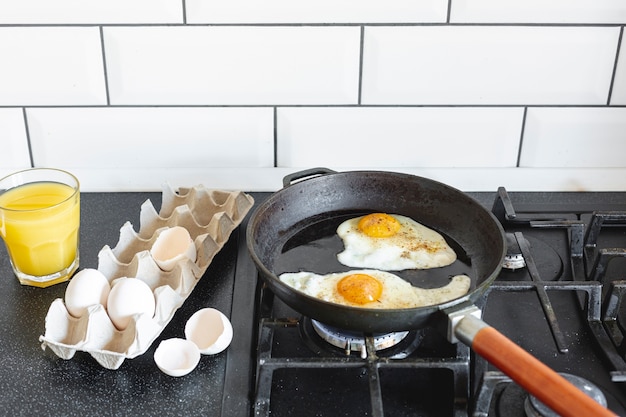
Fried Eggs: Sunny-Side Up, Over Easy, and Over Hard: The Cast Iron Classics
Fried eggs are the quintessential cast iron egg experience. They're simple to cook, incredibly versatile, and always satisfying. There's something about a perfectly fried egg, with its crisp edges and runny yolk, that makes it a breakfast staple.
Here's a breakdown of the three main types of fried eggs:
| Type | Cooking Time | Yolk |
|---|---|---|
| Sunny-Side Up | 2-3 minutes per side | Runny |
| Over Easy | 2-3 minutes per side | Slightly set |
| Over Hard | 4-5 minutes per side | Fully cooked |
When cooking fried eggs, use a spatula to gently lift the edges of the white to allow the heat to reach the yolk. This prevents the white from becoming rubbery and ensures a perfectly cooked yolk. You want to create a delicate balance between a crisp white and a runny yolk.
Scrambled Eggs: Fluffy and Delicious: A Cast Iron Delight
Scrambled eggs are a breakfast staple that's perfect for a quick and easy meal. There's something comforting about a plate of scrambled eggs, especially on a chilly morning. Here's how to cook scrambled eggs in cast iron:
- Beat the Eggs: Beat your eggs with a fork or whisk until they are frothy but not completely smooth. The goal is to create air pockets in the eggs, resulting in a lighter and fluffier texture.
- Add Milk or Cream: For extra creaminess, add a splash of milk or cream to the eggs. This creates a richer and more velvety texture, adding a touch of indulgence to your scrambled eggs.
- Season: Season your eggs with salt and pepper to taste. Don't be shy with the seasoning; it brings out the flavour of the eggs and enhances the overall taste.
- Cook Slowly: Pour the egg mixture into your preheated cast iron pan and cook over low to medium heat. Stir occasionally with a spatula to prevent the eggs from sticking. Cook the eggs slowly and gently, allowing them to cook evenly without overcooking.
- Cook to Your Preference: Cook until the eggs are set to your desired consistency. For a creamy texture, cook until the eggs are still slightly wet. For a drier texture, cook until they are completely cooked through. Experiment with different cooking times to find your perfect level of doneness.
To add a touch of indulgence, you can add a tablespoon of butter or cheese to your scrambled eggs while cooking. Experiment with different herbs and spices to create your own unique flavour combinations.
poached eggs: A Delicate Delight: A Surprisingly Effective Cast Iron Technique
Poached eggs, with their soft, pillowy yolks and silky whites, are a classic brunch treat. While poaching eggs in cast iron might seem a little unconventional, it can actually be a surprisingly effective method. The cast iron pan retains heat exceptionally well, creating a stable environment for perfectly poached eggs.
Here's how to poach eggs in cast iron:
- Heat the Water: Fill your cast iron pan with about an inch of water. Bring the water to a gentle simmer over medium heat. A gentle simmer is crucial for preventing the eggs from overcooking and creating a soft and delicate texture.
- Add Vinegar: Add a tablespoon of white vinegar to the simmering water. This helps the egg whites coagulate quickly and prevents them from spreading too much. The vinegar helps to create a compact and well-defined egg shape.
- Crack the Egg: Carefully crack the egg into a small bowl or ramekin. This prevents the yolk from breaking as you gently slide the egg into the water.
- Slide the Egg into the Water: Gently slide the egg into the simmering water. Avoid dropping the egg into the water, as this can cause the yolk to break.
- Cook for 3-4 Minutes: Cook for 3-4 minutes, or until the whites are set and the yolk is still runny. The cooking time may vary slightly depending on the size of the egg and your desired level of doneness.
- Remove with a Slotted Spoon: Remove the egg from the water using a slotted spoon. This allows the excess water to drain away, leaving you with a perfectly poached egg.
For a perfectly shaped poached egg, use a small, round cast iron pan, like a 6-inch skillet. This allows the egg to cook in a confined space, resulting in a more compact and aesthetically pleasing egg.
(Part 6) Mastering the Flip: The Art of Egg Handling: A Guide to Flawless Flipping
Flipping eggs in a cast iron pan can be tricky, especially if you're dealing with a runny yolk. Here are a few tips to help you master the art of egg flipping:
- Don't Rush: Let your egg cook undisturbed for at least 2-3 minutes before attempting to flip it. This allows the white to set and prevents the yolk from spilling out. Patience is key when flipping eggs, as it allows the white to firm up, making it easier to flip without breaking the yolk.
- Use a Spatula: A thin, flexible spatula is the best tool for flipping eggs. Slide the spatula underneath the egg, carefully lifting it up and gently flipping it over. The thinness of the spatula allows you to slide it under the egg easily, while the flexibility helps you to lift it without breaking the yolk.
- Don't Press: Avoid pressing down on the egg with the spatula. This can break the yolk and make a mess. Use a gentle lifting motion to flip the egg, minimizing the risk of breaking the yolk.
- Flip Once: Generally, flipping your egg once is enough. If you're making a sunny-side-up egg, you don't need to flip it at all. Too much flipping can lead to overcooked whites and a less-than-ideal texture.
- Practice Makes Perfect: As with any cooking technique, practice makes perfect. The more you cook eggs in cast iron, the more confident you'll become in your flipping skills. Don't be discouraged if your first attempts aren't perfect; keep practicing, and you'll soon be flipping eggs like a pro.
Flipping eggs is an art, and it takes time and practice to master. Don't be discouraged if your first attempts aren't perfect. With a little patience and persistence, you'll be flipping eggs like a pro in no time.
(Part 7) Beyond the Basics: egg cooking techniques: Elevating Your Cast Iron Egg Game to the Next Level
Now, let's delve into some more advanced egg cooking techniques that will elevate your cast iron egg game to the next level. These techniques allow you to explore new flavours and textures, transforming your eggs into culinary masterpieces.
The Cast Iron Omelet: A Culinary Masterpiece: A Guide to Fluffy and Delicious Cast Iron Omelets
An omelet is a true testament to the versatility of cast iron. It allows you to create a fluffy, airy omelet with a perfectly golden crust. An omelet is a classic breakfast or brunch dish that can be customized with an array of fillings. Here's how to make an omelet in cast iron:
- Beat the Eggs: Beat 2-3 eggs with a fork or whisk until they are frothy but not completely smooth. This incorporates air into the eggs, resulting in a lighter and fluffier omelet.
- Add Milk or Cream: Add a splash of milk or cream for extra creaminess. This adds richness and moisture to the omelet, creating a velvety texture.
- Season: Season your eggs with salt, pepper, and any other desired herbs or spices. Don't be afraid to experiment with different flavour combinations to create your own unique omelets.
- Preheat the Pan: Preheat your cast iron pan over medium heat. The hot pan ensures even cooking and prevents the omelet from sticking.
- Add Oil or Butter: Add a tablespoon of oil or butter to the preheated pan. This creates a non-stick surface and adds a touch of flavour to the omelet.
- Pour the Eggs: Pour the egg mixture into the hot pan. Spread the eggs evenly across the pan to ensure that they cook evenly.
- Cook for a Few Minutes: Cook for a few minutes, until the bottom of the omelet is set and the top is still slightly wet. This ensures that the omelet is cooked through without becoming dry and rubbery.
- Fold the Omelet: Using a spatula, gently lift one side of the omelet and fold it over to meet the other side. This creates the signature folded omelet shape.
- Cook for a Minute More: Cook for another minute or two, until the omelet is cooked through and golden brown. This final step ensures that the omelet is fully cooked and develops a beautiful golden crust.
- Serve: Slide the omelet onto a plate and enjoy! Add your favourite fillings, such as cheese, vegetables, herbs, or meats, and savor the deliciousness of a perfectly cooked omelet.
To add a touch of gourmet flair, you can fill your omelet with a variety of ingredients, like cheese, vegetables, herbs, or meats. Let your creativity flow and create your own signature omelet masterpiece.
The Cast Iron Egg Sandwich: A Breakfast Classic: Elevating the Simple Egg Sandwich
Who doesn't love a classic egg sandwich? It's a quick and satisfying breakfast that's perfect for any occasion. There's something about the combination of fluffy eggs, crispy bread, and your favourite fillings that makes it a timeless classic. Here's how to make an egg sandwich in cast iron:
- Cook the Eggs: Cook your eggs according to your preference. Fried, scrambled, or poached - the choice is yours. Choose the egg cooking method that best suits your taste and dietary needs.
- Toast the Bread: While your eggs are cooking, toast your bread slices in the oven or a toaster. The crispy texture of toasted bread adds a delightful contrast to the soft eggs.
- Add the Cheese: If you're adding cheese, place a slice of your favourite cheese on top of your toasted bread. Let the cheese melt slightly on the hot bread, creating a gooey and delicious topping.
- Assemble the Sandwich: Place your cooked eggs on top of the cheese, add any other desired fillings, like bacon, sausage, or avocado, and top with the other slice of toast. The cast iron pan is perfect for grilling sandwiches and giving them a crispy, golden crust.
- Serve: Enjoy your delicious egg sandwich!
The cast iron pan is perfect for grilling sandwiches and giving them a crispy, golden crust. It's a simple yet effective way to elevate your basic egg sandwich to the next level.
(Part 8) Tips and Tricks for Cast Iron Egg Cooking Success: A Guide to Achieving Flawless Eggs Every Time
With a little practice, you'll become a cast iron egg cooking expert. Here are a few more tips and tricks to make your journey even smoother:
- Don't Overcook: One of the biggest mistakes people make when cooking eggs is overcooking them. Overcooked eggs can become rubbery and dry. Overcooking can ruin the texture of the eggs, leaving them dry and unappealing.
- Use a Timer: A timer is your best friend when cooking eggs. It helps you keep track of cooking time and avoid overcooked eggs. A timer ensures that your eggs are cooked to your exact preference, preventing them from becoming overcooked and dry.
- Don't Be Afraid to Experiment: Cast iron egg cooking is all about experimentation. Try different types of eggs, oils, and toppings to find what works best for you. Experimentation is the key to discovering new flavours and textures, allowing you to create your own unique egg dishes.
- Clean with Care: Cast iron is a delicate material. Avoid using harsh detergents or scouring pads to clean your pan. Simply scrub with a stiff brush and hot water. Harsh detergents can strip away the seasoning, compromising the non-stick properties of the pan.
- Season Regularly: Regular seasoning helps maintain the non-stick surface of your cast iron pan. Season your pan with oil after each use to keep it in top condition. Regular seasoning prevents rust and ensures that the pan retains its non-stick properties.
Remember, cast iron egg cooking is a journey, not a destination. Don't be afraid to make mistakes, learn from them, and enjoy the process. With a little patience and practice, you'll be creating restaurant-quality eggs in your own kitchen in no time.
FAQs: Addressing Your Cast Iron Egg Cooking Questions
- Q: What type of oil should I use for cooking eggs in cast iron?
A: You can use any type of oil that has a high smoke point, such as vegetable oil, canola oil, or avocado oil. Butter can also be used, but it has a lower smoke point, so be careful not to overheat the pan. High-smoke point oils prevent burning and allow for higher cooking temperatures.
- Q: How do I prevent eggs from sticking to the cast iron pan?
A: Properly preheating the pan is key to preventing sticking. Ensure the pan is hot enough before adding your eggs and use a thin layer of oil or butter to coat the surface. A well-preheated pan ensures that the eggs cook quickly and don't have time to stick to the surface.
- Q: How do I know when my eggs are cooked to my liking?
A: The best way to tell if your eggs are cooked to your liking is to look at the whites and the yolk. For sunny-side-up eggs, the whites should be set and the yolk should be runny. For over-easy eggs, the whites should be set and the yolk should be slightly set. For over-hard eggs, the whites and yolk should be fully cooked. Pay close attention to the appearance of the eggs as they cook to determine the level of doneness.
- Q: Can I cook multiple eggs in a cast iron pan at the same time?
A: Yes, you can cook multiple eggs in a cast iron pan, but be sure to give each egg enough space to cook evenly. Avoid overcrowding the pan. Overcrowding the pan can lead to uneven cooking and sticking, so ensure that each egg has ample space.
- Q: How do I clean my cast iron pan after cooking eggs?
A: Avoid using harsh detergents or scouring pads to clean your cast iron pan. Simply scrub with a stiff brush and hot water. Harsh detergents can damage the seasoning and compromise the non-stick properties of the pan.
Everyone is watching

Corn on the Cob: The Ultimate Guide to Perfectly Cooked Ears
Healthy MealsAh, corn on the cob. Just the name evokes images of sunny days, barbecues, and that sweet, juicy flavour that ...

Perfect Pork Roast Oven Cooking Time: A Guide to Delicious Results
Healthy MealsThere's something truly satisfying about a perfectly roasted pork. The aroma alone is enough to make your mout...

Ham Cooking Time: How Long to Bake, Smoke, or Boil a Delicious Ham
Healthy MealsAh, ham. It's a classic, isn't it? A real crowd-pleaser, especially around holidays. And when done right, it'...

Scallops: The Ultimate Guide to Perfect Cooking
Healthy MealsAh, scallops. Those delicate, sweet, and utterly delicious morsels of the sea. They hold a special place in my...

Spaghetti Squash: The Ultimate Guide to Cooking and Serving
Healthy MealsRemember that time you saw spaghetti squash at the supermarket, looking all bumpy and strange, and thought, "W...