Let’s face it, dried chickpeas can seem a bit daunting. They’re not exactly the ‘grab-and-go’ ingredient you’d find in the fridge, are they? But trust me, once you taste the deliciousness of perfectly cooked dried chickpeas, you’ll be a convert. They’re so versatile – you can use them in salads, curries, dips, soups, or even as a meat substitute. And they’re super affordable and packed with nutrients, so you’re doing your wallet and your health a favour. This guide is going to walk you through the entire process, from soaking to cooking, and share some of my own tips and tricks along the way. You'll learn how to avoid common pitfalls and achieve those wonderfully tender, fluffy chickpeas that you’ve been dreaming of. So grab a bag of dried chickpeas and let’s get started!
(Part 1) Soaking: The Foundation of Flavor
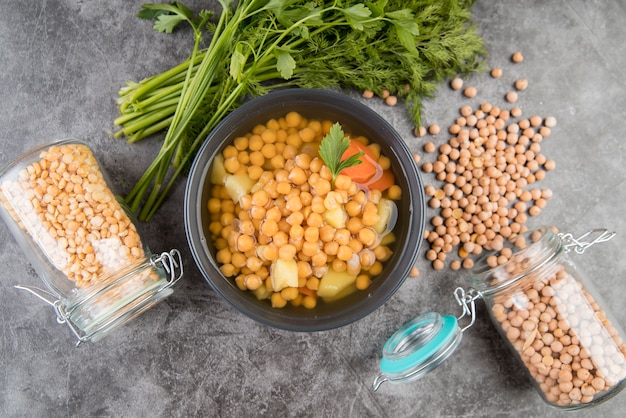
Soaking is the crucial first step. It not only helps soften the chickpeas and reduce cooking time, but also gets rid of those pesky little beany bits that can make your dish taste a bit off. It’s a bit like prepping a canvas before painting, giving you a better foundation for a delicious dish.
The Basics of Soaking
soaking chickpeas is simple, but there are a few things to keep in mind:
- Ratio: The classic ratio is 1 cup of dried chickpeas for every 4 cups of water. It’s like making a cup of tea, but with chickpeas instead of tea leaves!
- Time: Soak for at least 8 hours, but up to 24 hours is even better. I’ve found that the longer you soak them, the more flavourful they become. Overnight soaking is perfect for busy mornings.
- Storage: Find a large bowl or container, cover it with cling film or a plate, and pop it in the fridge. This keeps the water cool and prevents any funny business from happening. Remember, we want to encourage the chickpeas to soften, not start a party!
Beyond the Basics: Techniques for Extra Flavor and Texture
If you’re looking to take your chickpea game to the next level, there are a few tricks you can try.
1. Baking Soda Boost:
Adding a pinch of baking soda to the soaking water is a common trick that helps to soften the chickpeas even further and creates a fluffier texture. Just a small amount, about 1/2 teaspoon per cup of chickpeas, is all you need. It’s like a little magic ingredient that works wonders. While some chefs believe that baking soda alters the flavour, I personally find it makes a noticeable difference.
2. Salt and Baking Soda Surprise:
I've also tried soaking chickpeas in a solution of salt and baking soda, and the results were fantastic! The salt seemed to enhance the natural sweetness of the chickpeas, while the baking soda worked its magic, making them incredibly fluffy. It was like a symphony of flavours and textures!
3. Quick Fix: No-Soak Option
If you’re in a pinch and don’t have time for soaking, you can cook your chickpeas from dry. Just add them to a large pot, cover with water, and bring to a boil. Reduce the heat and simmer for at least 1 hour, or until tender. However, I’ve found that the texture is a little harder and the flavour less intense. So if you have the time, I definitely recommend soaking for the best results.
(Part 2) Cooking: The Art of Tenderness
Now that your chickpeas are plump and ready, it’s time to take them to the next level – the cooking stage. This is where you’ll transform them into a culinary delight.
The Simple Method: A Classic Approach
Here’s the basic method for cooking chickpeas on the stovetop. It's simple, reliable, and perfect for beginners:
- Drain and Rinse: Drain the soaked chickpeas and rinse them thoroughly. We want to get rid of any excess starch or debris that might affect the flavour.
- Fresh Water: Put the chickpeas in a large pot and cover them with fresh water, leaving about 1-2 inches of space at the top. This gives them room to breathe and prevents them from sticking to the bottom of the pot.
- Simmer Time: Bring the pot to a boil, then reduce the heat to low and simmer for 45 minutes to 1 hour, or until tender. Think of it as a slow, gentle dance for your chickpeas.
- Tenderness Test: You’ll know they’re ready when you can easily crush a chickpea between your fingers. If they’re still a bit firm, keep cooking for a bit longer.
A Twist of Flavor: Elevate Your Chickpeas with Herbs and Spices
Don’t be afraid to experiment with flavours during the cooking process! It’s like adding a dash of personality to your chickpeas.
- Salt and Pepper: A pinch of salt and pepper always enhances the flavour of any dish, and chickpeas are no exception.
- Bay Leaf: A bay leaf adds a subtle, earthy aroma that complements the flavour of the chickpeas.
- Garlic and Ginger: Adding a few cloves of garlic and a piece of ginger adds a warm, comforting flavour that’s perfect for curries and stews.
- Lemon Juice or Apple Cider Vinegar: A splash of lemon juice or apple cider vinegar balances out the sweetness of the chickpeas and adds a touch of brightness.
The pressure cooker Power: Speed Up Your Cooking
If you’re lucky enough to have a pressure cooker, it’s a game-changer for cooking chickpeas. It dramatically reduces the cooking time, making it an absolute lifesaver on busy nights.
Just add the drained and rinsed chickpeas to the pressure cooker, cover with water, and cook for 20-30 minutes, depending on your pressure cooker model. Make sure you follow the instructions provided in your pressure cooker’s manual. You’ll be amazed at how quickly your chickpeas are ready to go!
(Part 3) Understanding the Timing: Perfecting Your Chickpea Technique
Cooking time can vary depending on factors like the age of the chickpeas, the size of the batch, and the type of chickpeas you’re using. It’s always a good idea to check the chickpeas regularly and adjust the cooking time as needed.
Signs of Perfect Chickpeas
Here are a few signs to look out for to ensure your chickpeas are cooked to perfection:
- Tenderness: You should be able to easily crush a chickpea between your fingers. If it's still firm, it needs more cooking.
- Size: The chickpeas will have expanded slightly and become more plump. They’ll look like they’ve had a good meal and are happy and satisfied.
- Color: They should have a slightly creamy, off-white color, indicating they’re perfectly cooked.
Overcooked Chickpeas? Don't Despair!
We’ve all been there – those mushy, overly cooked chickpeas that feel more like mush than a hearty ingredient. If you think your chickpeas have gone a bit too far, don’t worry! You can still use them in dishes like hummus, where the texture is less important. Or, try blending them into soups or stews for a smoother consistency. Just avoid using them in salads or where you want them to hold their shape.
(Part 4) Storing and Using Cooked Chickpeas: Maximizing Your Culinary Potential
Now that you have perfectly cooked chickpeas, you’ll want to keep them fresh and ready to use.
Storing Cooked Chickpeas
Let the cooked chickpeas cool completely, then store them in an airtight container in the fridge for up to 5 days. They can also be frozen for up to 3 months. Just make sure to defrost them thoroughly before using.
Using Cooked Chickpeas
Cooked chickpeas are incredibly versatile and can be used in so many dishes. Here are some ideas to get you started:
Tasty Chickpea Ideas: Unleash Your Creativity
- Salads: Add them to your favourite salads for a boost of protein and texture. They work particularly well with Mediterranean and Greek salads, adding a delightful contrast to the fresh vegetables.
- Curries: Chickpeas are a staple in many Indian curries, lending a creamy texture and a delicious nutty flavour that perfectly complements the spices.
- Dips and Spreads: Hummus is a classic example of a chickpea-based dip. You can also use them in baba ghanoush, muhammara, or even a spicy roasted red pepper dip. They add a rich, earthy base to all kinds of dips.
- Soups: Chickpeas thicken up soups and add a satisfying flavour. Try them in lentil soup, chickpea and spinach soup, or even a hearty tomato soup. They add a hearty element that’s both delicious and nutritious.
- Falafel: These Middle Eastern delights are made from chickpeas and herbs. They’re perfect as a snack or served in a wrap. They're a tasty and portable snack that's packed with flavor.
- Meatless Meals: Chickpeas can be used as a meat substitute in veggie burgers, tacos, or even as a base for a vegan shepherd's pie. They’re a great source of protein and make for delicious and satisfying vegetarian meals.
(Part 5) Beyond the Basics: Experimenting with Flavor
While basic chickpeas are a great starting point, don’t be afraid to get creative with flavours. Think of it as adding your own personal touch to a blank canvas.
Flavored Chickpea Ideas: From Simple to Spectacular
- Roasted Chickpeas: Toss them with olive oil, spices, and a pinch of salt and roast in the oven until crispy. They’re a delicious snack or can be added to salads, soups, or grain bowls. They’re a healthy and satisfying snack, perfect for parties or gatherings.
- Smoked Chickpeas: You can infuse them with smoky flavours by adding a teaspoon of smoked paprika, a few drops of liquid smoke, or even a piece of smoked bacon to the cooking water. They bring a deep, smoky flavour to any dish.
- Herbed Chickpeas: Add fresh or dried herbs like parsley, dill, rosemary, or thyme to the cooking water for a fragrant boost. The herbs add a touch of freshness and complexity.
- Spicy Chickpeas: Add a touch of heat with chili flakes, cayenne pepper, or a dash of hot sauce. Perfect for those who like a little kick in their food.
(Part 6) chickpea variations: Exploring the World of Chickpeas
Did you know there are different types of chickpeas? Yes, they’re not all created equal! Each type has its own unique characteristics and is best suited for specific dishes.
Types of Chickpeas: A World of Flavor and Texture
Here are some common variations:
| Type | Characteristics |
|---|---|
| Kabuli Chickpeas: | Larger in size, with a smooth, pale skin and a slightly sweet flavour. Often used in salads and curries. Think of them as the classic, all-purpose chickpea. |
| Desi Chickpeas: | Smaller in size, with a rough, brown skin and a more earthy flavour. Often used in falafel and hummus. Their earthy flavour and firm texture make them perfect for these dishes. |
| Black Chickpeas (Kala Chana): | Smaller, with a dark, almost black skin. They have a firm texture and a slightly bitter flavour. Often used in curries and stews. Their unique flavour and texture add a distinct element to many dishes. |
(Part 7) Common Mistakes and How to Fix Them: Avoid Culinary Disasters
Even seasoned cooks can make mistakes. Here are some common pitfalls and how to avoid them:
Mistakes and Solutions: Troubleshooting Your Chickpea Journey
- Overcooking: This can happen if you simmer your chickpeas for too long. The result? Mushy chickpeas. To avoid this, check the chickpeas regularly and remove them from the heat once they're tender.
- Undercooked: You can tell if your chickpeas are undercooked if they’re still firm or have a slightly crunchy texture. Cook them for a bit longer until they're soft and tender.
- Unpleasant Taste: If your chickpeas have a slightly bitter taste, it might be because they weren’t rinsed properly after soaking. Rinse them thoroughly again, then try cooking them with a bay leaf or a bit of lemon juice.
- Foamy Water: Sometimes the water in which you're cooking the chickpeas can get foamy. This is completely normal and doesn't affect the flavour. If it bothers you, skim off the foam with a spoon.
(Part 8) Tips for Chickpea Success: Achieving Peak Flavor and Texture
Here are some extra tips to help you achieve perfect chickpeas every time:
Chickpea Tips: Expert Advice for Delicious Results
- Use fresh chickpeas: Older chickpeas can take longer to cook and might not be as tender. Always check the expiration date.
- Check the water level: Make sure the chickpeas are always covered with water. If the water starts to evaporate, add more.
- Don't overcrowd the pot: Give your chickpeas plenty of room to cook evenly. If your pot is too crowded, the chickpeas may not cook evenly.
- Let them cool: Allow the cooked chickpeas to cool completely before storing them. This helps to prevent them from becoming mushy.
FAQs: Your Chickpea Questions Answered
Still have some questions? I’ve got you covered! Here are some frequently asked questions about chickpeas:
1. Can I soak and cook chickpeas in the same pot?
Yes, you absolutely can! Just make sure to drain the soaking water before adding fresh water and bringing the chickpeas to a boil. I personally prefer using a separate pot for soaking and cooking to keep the kitchen clean, but it’s totally up to you.
2. What if I don't have a pressure cooker?
No problem! You can still cook delicious chickpeas on the stovetop. Just follow the instructions in Part 2. It will take a little longer than using a pressure cooker, but the results are just as great.
3. Can I use canned chickpeas instead of dried ones?
Absolutely! Canned chickpeas are a great convenience option. They're already cooked and ready to use. Just drain and rinse them before adding them to your recipes. However, I find that the flavour and texture of cooked dried chickpeas are superior. Plus, you’ll be surprised by how affordable dried chickpeas are.
4. What can I do with leftover cooked chickpeas?
The possibilities are endless! You can add them to salads, soups, curries, or use them as a base for hummus or other dips. Get creative and experiment with different flavours and textures.
5. Are chickpeas good for you?
Yes! Chickpeas are a nutritional powerhouse. They're a great source of protein, fiber, and iron. They're also low in fat and calories. Adding chickpeas to your diet can help you feel full and satisfied, making them a great addition to any healthy eating plan.
I hope this guide has been helpful in demystifying the art of cooking dried chickpeas. Remember, cooking is a journey, so don’t be afraid to experiment and find what works best for you. Enjoy those delicious, fluffy chickpeas!
Everyone is watching

Corn on the Cob: The Ultimate Guide to Perfectly Cooked Ears
Healthy MealsAh, corn on the cob. Just the name evokes images of sunny days, barbecues, and that sweet, juicy flavour that ...

Perfect Pork Roast Oven Cooking Time: A Guide to Delicious Results
Healthy MealsThere's something truly satisfying about a perfectly roasted pork. The aroma alone is enough to make your mout...

Ham Cooking Time: How Long to Bake, Smoke, or Boil a Delicious Ham
Healthy MealsAh, ham. It's a classic, isn't it? A real crowd-pleaser, especially around holidays. And when done right, it'...

Scallops: The Ultimate Guide to Perfect Cooking
Healthy MealsAh, scallops. Those delicate, sweet, and utterly delicious morsels of the sea. They hold a special place in my...

Spaghetti Squash: The Ultimate Guide to Cooking and Serving
Healthy MealsRemember that time you saw spaghetti squash at the supermarket, looking all bumpy and strange, and thought, "W...