Ah, chicken thighs. A versatile, flavourful, and budget-friendly cut of meat that's a staple in kitchens across the land. From crispy skin to succulent meat, chicken thighs are a true delight. But getting them cooked to perfection can be a bit of a puzzle.
We’ve all been there, staring at a pan of chicken thighs, wondering if we’ve given them enough time. And let’s be honest, no one wants to risk a dry, overcooked bird. Trust me, I’ve been there, and the result wasn’t pretty. That’s why I've dedicated countless hours to experimenting, researching, and, of course, indulging in my fair share of tasty chicken thighs to bring you this ultimate guide.
Get ready to conquer the chicken thigh world, because this guide is going to be your trusty companion. We’ll delve into everything you need to know, from understanding the different types of thighs to mastering various cooking methods. We’ll explore the secrets to achieving juicy, flavorful chicken thighs that will make your taste buds sing. So grab a cuppa, settle in, and let’s get cooking!
Part 1: Understanding the Different Types of Chicken Thighs

Before we dive into the cooking, it's important to understand the different types of chicken thighs available. Each type has its own unique characteristics that affect how they cook and what kind of final dish they're best suited for.
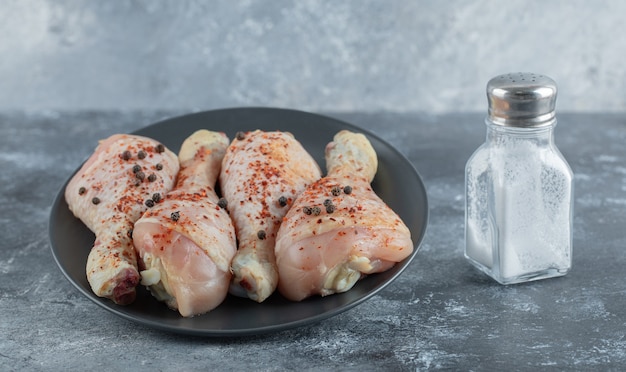
Skin-on vs. Skin-off
The first choice you'll face is whether to go for skin-on or skin-off thighs. Skin-on thighs are like a little package of deliciousness, offering a double whammy of flavor and texture. The skin acts as a natural barrier, keeping the juices locked in during cooking, resulting in exceptionally moist and tender meat. Plus, that crispy, golden-brown skin is a real treat. However, skin-on thighs can sometimes be a bit richer, and some folks prefer the leaner option of skin-off thighs.
Skin-off thighs offer a cleaner, leaner profile, perfect for those watching their fat intake. They still deliver juicy and flavorful meat, but they require a bit more attention to ensure they don't dry out during cooking. It's all about personal preference and what best suits your culinary needs.
Bone-in vs. Boneless
Next up, we have the bone-in vs. boneless debate. Bone-in thighs are a true classic. The bone acts like a little heat conductor, helping to distribute heat evenly and maintain moisture within the meat. It also adds a touch of extra flavour to the dish. Bone-in thighs tend to be more tender, as the bone provides some protection during cooking.
On the other hand, boneless thighs are a versatile option, perfect for chopping, dicing, or using in dishes where the bone would be a nuisance. They also cook faster than their bone-in counterparts, making them a convenient choice for busy weeknights.
Whole vs. Cut
Finally, there’s the whole vs. cut decision. Whole thighs are the traditional choice, consisting of both the leg and the thigh. They offer a good mix of lean and tender meat, perfect for roasting, grilling, or pan-frying.
Cut thighs are generally more convenient and can be found in various forms, like drumsticks, thighs, or boneless and skinless cuts. These smaller pieces cook faster and are great for stir-fries, curries, or simply as a side dish.
Part 2: Choosing the Right Chicken Thighs
You've got your types down, now it's time to pick the perfect chicken thighs. Here's what to look for when you're at the supermarket:
- Look for thighs that are plump and firm, with a bright, even color. Avoid any thighs that have a dull or discolored appearance. These could be an indicator of poor quality or freshness.
- Feel the thigh. It should be slightly springy to the touch. You don't want thighs that feel too soft or squishy. This could mean the meat is not as fresh or might have been frozen and thawed multiple times.
- Check the packaging. Make sure it's not ripped or damaged, and the thighs are properly sealed. This helps prevent contamination and ensures the meat has been properly handled.
And don't be afraid to ask your butcher for recommendations. They often have the best knowledge about the quality and freshness of their products, and they can offer valuable advice based on your specific needs.
Part 3: Prepping Your Chicken Thighs
Before you start cooking, there are a few prep steps that are crucial for success.
- Pat the thighs dry with paper towels. This helps create a crispy skin and prevents steam from building up during cooking. Wet skin will just steam the meat and make it soggy, so make sure those thighs are nice and dry.
- Season with salt and pepper. This is essential for flavour, and it also helps to draw out moisture. Salt acts as a natural tenderizer, while pepper adds a touch of warmth and depth.
- Let the thighs come to room temperature. This will help them cook more evenly and prevent the insides from being cold when the outside is cooked. Bringing your chicken thighs to room temperature helps them cook more consistently and prevents uneven cooking.
If you're feeling adventurous, you can also experiment with other spices and herbs to add more depth of flavor. Garlic powder, onion powder, paprika, or even a pinch of cayenne pepper can elevate your chicken thighs to new heights. Remember, a little seasoning goes a long way!
Part 4: oven roasting
Oven roasting is a classic way to cook chicken thighs, and it's super easy to do. It's a foolproof method that produces tender, juicy chicken thighs with a crispy skin. Here's how:
Steps for Oven Roasting
- Preheat your oven to 375°F (190°C).
- Place the chicken thighs in a single layer on a baking sheet.
- Roast for 30-40 minutes, or until the internal temperature reaches 165°F (74°C).
If you want crispy skin, you can broil the thighs for a few minutes at the end of the cooking time. This will help to crisp up the skin and add a touch of extra char.
Here are some tips for oven roasting:
- Don’t overcrowd the baking sheet. This can lead to uneven cooking and prevent the skin from getting crispy. Give those thighs some space to breathe and cook evenly.
- Add some vegetables to the baking sheet. This is a great way to make a one-pan meal. Roast some potatoes, carrots, or onions alongside your chicken for a complete and flavorful dish.
- Baste the thighs with butter or oil. This will help them to stay moist and add flavor. Basting helps to create a lovely sheen on the skin and keeps the meat juicy and flavorful.
- Use a meat thermometer. This is the best way to ensure that the chicken is cooked through. A meat thermometer takes the guesswork out of cooking, ensuring that your chicken is cooked to perfection.
roasting time Table
Here's a quick table to give you an idea of how long to roast chicken thighs based on their type:
| Type of Thigh | Cooking Time |
|---|---|
| Bone-in, Skin-on | 30-40 minutes |
| Boneless, Skin-on | 25-35 minutes |
| Bone-in, Skin-off | 25-35 minutes |
| Boneless, Skin-off | 20-30 minutes |
Remember, these are just estimates. Cooking times can vary depending on the size of your chicken thighs and your oven. Always check the internal temperature to ensure the chicken is cooked through.
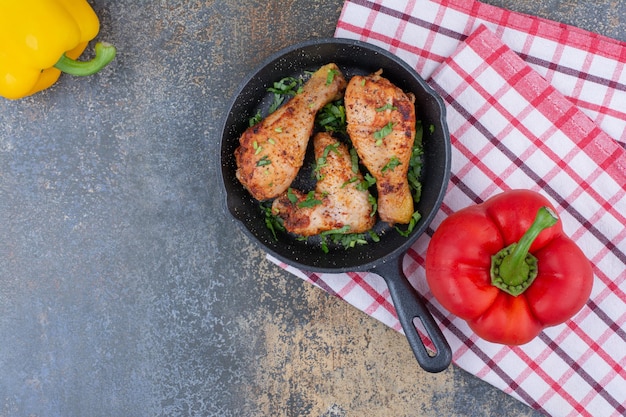
Part 5: Pan-Frying
Pan-frying is a great option for a quick and easy meal. It creates a crispy skin and juicy meat, perfect for weeknight dinners or a simple lunch.
Steps for Pan-Frying
- Heat a large skillet over medium-high heat.
- Add a tablespoon of oil to the skillet.
- Place the chicken thighs in the skillet, skin-side down, and cook for 5-7 minutes per side.
- Reduce heat to medium and cook for another 5-7 minutes, or until the internal temperature reaches 165°F (74°C).
If you want crispy skin, you can transfer the thighs to a baking sheet and broil them for a few minutes at the end of the cooking time. This is a great way to get that extra crispy crunch.
Here are some tips for pan-frying:
- Don’t overcrowd the skillet. This can lead to the thighs steaming instead of frying. Give those thighs some breathing room to cook evenly and develop a beautiful sear.
- Make sure the skillet is hot enough before adding the thighs. This helps to create a crispy skin. A hot skillet will sear the chicken quickly and prevent it from sticking.
- Don’t flip the thighs too often. Let them cook for a few minutes per side to get a nice sear. Flipping too often can prevent the skin from crisping up properly.
Part 6: Grilling
grilling chicken thighs is a wonderful way to enjoy the smoky flavours of grilling. It's perfect for summer barbecues and outdoor meals.
Steps for Grilling
- Preheat your grill to medium heat.
- Place the chicken thighs on the grill and cook for 5-7 minutes per side.
- Reduce heat to medium-low and cook for another 5-7 minutes, or until the internal temperature reaches 165°F (74°C).
If you want crispy skin, you can move the thighs to a hotter part of the grill for the last few minutes of cooking. This will give the skin a nice char and crisp it up.
Here are some tips for grilling:
- Make sure your grill is clean. This will prevent the chicken from sticking. A clean grill will ensure even cooking and prevent the chicken from sticking.
- Use a grill brush to clean the grates.
- Don't overcook the thighs. They should be juicy and tender, not dry and tough. Keep an eye on those thighs and don't let them overcook.
- Use a meat thermometer to ensure that the chicken is cooked through. A meat thermometer is essential for safe and accurate cooking.
Part 7: slow cooking
Slow cooking is a fantastic way to create incredibly tender and flavorful chicken thighs. It’s perfect for busy weeknights, as you can simply throw everything in the slow cooker and let it do its magic.
Steps for Slow Cooking
- Place the chicken thighs in the slow cooker.
- Add your favorite sauce or seasonings.
- Cook on low for 6-8 hours, or on high for 3-4 hours.
Here are some tips for slow cooking:
- Don’t overcrowd the slow cooker. This can lead to uneven cooking. Give those thighs some room to cook evenly and develop a beautiful texture.
- Add some liquid to the slow cooker. This will help to keep the chicken moist. A bit of broth, wine, or even just water will help prevent the chicken from drying out.
- Use a meat thermometer to ensure that the chicken is cooked through. Always check the internal temperature to ensure that your chicken is cooked to perfection.
You can also use a slow cooker to make pulled chicken or shredded chicken for sandwiches, salads, or tacos.
Part 8: How to Tell When Chicken Thighs are Done
You've cooked your chicken thighs, but how do you know if they're actually cooked through?
- The internal temperature should reach 165°F (74°C). You can use a meat thermometer to check this.
- The juices should run clear when you pierce the thigh with a knife. If the juices are still pink, the thigh needs more cooking time.
- The chicken should be firm to the touch. It shouldn't be jiggly or soft.
Don't be afraid to test the chicken by cutting into the thickest part and checking for a clear, non-pink center. If you're unsure, it's always best to err on the side of caution and cook for a few more minutes.
Part 9: FAQs
1. Can I cook chicken thighs from frozen?
Absolutely! You can cook chicken thighs from frozen, but it will take longer. Add about 50% more cooking time to your recipe. It's always a good idea to use a meat thermometer to ensure that the chicken is cooked through.
2. How do I store cooked chicken thighs?
Refrigerate cooked chicken thighs in an airtight container for up to 3-4 days. You can also freeze cooked chicken thighs for up to 3 months. Thaw frozen chicken thighs in the refrigerator overnight before cooking.
3. What can I do with leftover chicken thighs?
Leftover chicken thighs are incredibly versatile! You can use them in salads, sandwiches, tacos, quesadillas, soups, stews, or even pasta dishes. Get creative and have fun with it!
4. How can I make sure my chicken thighs are juicy?
To ensure juicy chicken thighs, it’s important to not overcook them. It's also helpful to keep them moist by adding a bit of liquid to the pan or slow cooker. If you're cooking them in the oven, try basting them with butter or oil.
5. How can I make crispy chicken skin?
For crispy chicken skin, make sure to pat the thighs dry with paper towels before cooking. If you're roasting or pan-frying, let the skin brown and crisp before flipping the thighs. You can also broil the thighs for a few minutes at the end of the cooking time to get extra crispy skin.
Part 10: Final Thoughts
cooking chicken thighs is easier than you think! By following these tips and techniques, you'll be able to create delicious, juicy, and perfectly cooked chicken thighs every time. So go forth, experiment, and enjoy the wonderful world of chicken thighs!
Remember, the key to success is knowing your chicken thighs, understanding the different cooking methods, and not being afraid to experiment. Happy cooking, everyone!
Everyone is watching

Corn on the Cob: The Ultimate Guide to Perfectly Cooked Ears
Healthy MealsAh, corn on the cob. Just the name evokes images of sunny days, barbecues, and that sweet, juicy flavour that ...

Scallops: The Ultimate Guide to Perfect Cooking
Healthy MealsAh, scallops. Those delicate, sweet, and utterly delicious morsels of the sea. They hold a special place in my...

Spaghetti Squash: The Ultimate Guide to Cooking and Serving
Healthy MealsRemember that time you saw spaghetti squash at the supermarket, looking all bumpy and strange, and thought, "W...

Salmon Cooking Times: Perfect Guide for Every Recipe
Healthy MealsLet me tell you, cooking salmon is an art form. It's all about getting that perfect balance: juicy and tender,...

Ham Cooking Time: How Long to Bake, Smoke, or Boil a Delicious Ham
Healthy MealsAh, ham. It's a classic, isn't it? A real crowd-pleaser, especially around holidays. And when done right, it'...