Right, let’s get down to business. As a seasoned home cook with a serious love affair with soup, I’ve spent a good chunk of my life tinkering in the kitchen, experimenting with different flavours and techniques. And let me tell you, there’s something truly magical about a perfectly clear broth – it’s like a blank canvas begging for culinary artistry. It’s all about getting those fundamentals just right.
This guide is my love letter to the art of making crystal-clear soup. We’re going to cover the whole shebang, from choosing the right ingredients to mastering the art of simmering. I’ll be sharing all my tricks and tips, the ones I’ve picked up over the years from seasoned chefs and my own personal experimentation. Whether you’re a seasoned soup pro or just starting out, there’s something here for you.
(Part 1) The Essence of a Good Broth

First things first, let’s talk about the heart and soul of a truly exceptional broth – the ingredients. It’s all about selecting the freshest, most flavourful components to create a foundation that sings. It’s the difference between a basic, bland broth and one that’s brimming with depth and character.
1. Choosing Your Protein: The Foundation of Flavor
Now, the protein is the star of the show – it’s what gives your broth its unique flavour profile. I’ve got a few favourite picks:
- Chicken: A classic for a reason! Chicken bones, especially those with a bit of cartilage, are packed with flavour and collagen, which adds a richness and body to your broth. Think about leftover rotisserie chicken bones, or even the carcass from your Sunday roast – they’re perfect for a flavour-packed broth. The cartilage is key! It breaks down during the simmering process, adding a gelatinous texture and mouthfeel that makes your broth feel luxurious. You can even use chicken feet for an extra boost of collagen, if you’re feeling adventurous.
- Beef: For a deeper, more intense flavour, beef bones are the way to go. You’ll want to use marrow bones for extra richness. The marrow adds a velvety texture and a hint of buttery richness to your broth. Look for bones with a good amount of marrow – you’ll know them by the slight bulge at the end. Beef bones also benefit from a quick roast before simmering. The browning adds extra depth and complexity to the flavour.
- Pork: Pork bones, particularly knuckle bones, offer a surprisingly delicate and sweet flavour. They’re fantastic for a lighter broth. Knuckle bones are a great option because they have a good amount of cartilage, which will add body and richness to your broth. They also work well with a quick sear before simmering, adding another layer of flavour to the final product.
2. The Veggie Powerhouse: Layering in Complexity
Don’t underestimate the power of vegetables in building a flavourful broth. They add complexity and depth that you just can’t replicate with just protein. My go-to veggie additions include:
- Onions: A classic for a reason. They add a sweet and savoury base to your broth. I love using whole onions, but you can also use chopped for a stronger flavour. For a more nuanced onion flavour, I recommend roasting the onions whole with the protein before adding them to the pot. The roasting brings out their natural sweetness and adds a hint of caramelisation.
- Carrots: Their earthy sweetness balances the richness of the protein. I use them whole, but feel free to chop them for a faster simmer. Carrots also benefit from roasting before simmering. This process brings out their natural sugars and adds a deeper, more complex flavour to your broth.
- Celery: Celery adds a refreshing, slightly bitter note that complements the other flavours beautifully. Use the whole stalks, including the leaves for maximum flavour. The leaves have a more concentrated flavour than the stalks, so don't be afraid to use them! They add a fresh, herbaceous element that balances the richness of the broth.
- Garlic: A little garlic goes a long way. It adds a pungent, aromatic note that adds depth and complexity. I usually add a few cloves to my broth. Garlic should be added whole to the pot, as chopping it releases the flavour too quickly. The cloves will slowly release their aroma and flavour as the broth simmers, adding a subtle layer of complexity.
- Herbs: A bouquet garni of fresh herbs (like thyme, parsley, and bay leaves) adds a beautiful fragrance and complexity to your broth. A bouquet garni is a simple bundle of herbs tied together with string. This allows you to easily remove the herbs before serving. The herbs release their aromatic oils into the broth as it simmers, adding a subtle yet noticeable flavour boost.
3. The Water is Key: The Foundation of Clarity
Okay, so we've got our protein and veggies sorted, but what about the water? Using good quality water is crucial. It's what your broth is built on! If you have access to spring water, I highly recommend it – it just tastes better. But don’t worry, tap water is perfectly fine too. I usually give it a good boil first to get rid of any chlorine. This simple step helps to ensure your broth is as pure and flavourful as possible.
(Part 2) The Art of Simmering: Coaxing Out Flavour
Now we’re getting into the good stuff! The simmering process is where all the magic happens. It’s a slow and steady dance between time and heat, coaxing out the very essence of your ingredients. It’s a process that takes patience, but trust me, the results are worth it.
1. Building the Foundation: Roasting for Richness
Start by roasting your protein and vegetables. This gives them a deeper, more concentrated flavour. I usually roast them in a hot oven until they’re slightly charred. Be careful not to burn them! Roasting your ingredients before simmering is a key step in creating a flavourful and nuanced broth. The browning process creates a complex layer of flavour that wouldn’t be present if you simply added them to the pot raw.
Once they’re roasted, transfer them to a large stock pot. Add your herbs, and fill the pot with enough water to cover everything by a few inches. Make sure your pot is large enough to accommodate all the ingredients without overcrowding. This will allow the broth to circulate freely and cook evenly.
2. Low and Slow: The Key to Clarity
Bring the broth to a boil, then reduce the heat to a gentle simmer. This is crucial. The key is to maintain a low, consistent simmer for a good amount of time. This allows the flavours to develop and meld. Don’t be tempted to crank up the heat – it’ll just make your broth cloudy. The low and slow simmer is essential for extracting maximum flavour from the ingredients and achieving that crystal-clear appearance.
3. The Skimming Process: A Crucial Step for Clarity
Here’s where things get a little hands-on. You'll need to skim off the foam that forms on the surface of the broth. This is called scum, and it can make your broth cloudy. Use a slotted spoon to skim off any scum that rises to the top. Do this every so often for the first hour or two. You’ll also want to skim off any excess fat that collects on the surface, especially when using beef or pork. Skimming regularly is a key step in achieving a crystal-clear broth. It removes impurities and excess fat, ensuring a clean and flavorful base for your soups.
4. The Time is Right: Finding the Sweet Spot
The simmering time will depend on the protein you’re using. chicken broth usually takes around 2-3 hours, while beef and pork broth can take up to 4-6 hours. I like to let my broth simmer for a good 4 hours to ensure maximum flavour extraction. Don’t be afraid to experiment and find what works best for you. The simmering time is crucial to developing rich, complex flavours in your broth. It allows the collagen to break down, the bones to release their minerals, and the vegetables to impart their sweetness and depth.
(Part 3) The Big Reveal: Strain and Store Your Liquid Gold
After all that simmering, it’s finally time to reveal your beautiful, crystal-clear broth! This is where the real magic comes in.
1. The Straining Ritual: Separating the Gems
You’re going to need a large, fine-mesh strainer or cheesecloth. Line your strainer with a few layers of cheesecloth if you have it – it’ll help catch any small particles that might escape. Set the strainer over a large bowl or another stock pot. Carefully pour the broth through the strainer, discarding the solids. You can use those solids to make a delicious stock, if you’re feeling ambitious. This step is crucial to achieving a crystal-clear broth. It removes all the solid ingredients and ensures a clean, smooth texture.
2. The Final Touch: Cooling Down for Clarity and Storage
Once the broth is strained, let it cool down slightly before storing. I usually let it cool down in the pot for a few minutes before transferring it to airtight containers. This allows the fat to solidify on the surface, making it easier to remove. You can also use a spoon to skim off any excess fat. Cooling the broth allows the fat to solidify on the surface, making it easier to remove. This is a key step for achieving that clear, clean appearance.
3. Storing Your Liquid Gold: Keeping the Flavour Fresh
I like to store my broth in the fridge for up to 3 days. You can also freeze it for longer storage. To freeze, transfer the broth to freezer-safe containers, leaving about an inch of headspace to allow for expansion. Thaw in the fridge overnight before using. Properly storing your broth will ensure its freshness and flavour. Refrigerated broth will last for up to 3 days, while freezing will extend the shelf life for up to 3 months.
(Part 4) Broth Beyond Basic: Flavor Twists for a Culinary Symphony
Now that you’ve got the basics down, let’s talk about adding some exciting twists to your broth.
1. Aromatic Additions: A World of Flavour
A touch of aromatic spices and herbs can transform your broth from plain to extraordinary. Here are a few ideas:
- Ginger and Lemongrass: A vibrant, refreshing combination that adds a touch of Asian flair to your broth. This combination is particularly well suited for chicken or vegetable broth. The ginger adds a spicy warmth, while the lemongrass provides a citrusy, slightly herbal note.
- Star Anise and Cloves: A classic combination that adds a warm, spiced aroma to your broth. This combination is perfect for beef broth or for adding a touch of warmth and complexity to your favourite winter soups. The star anise provides a licorice-like sweetness, while the cloves add a warm, pungent note.
- Fresh Chili Peppers: A touch of heat can really wake up your broth. Add a few slices or a whole pepper for a subtle kick. Fresh chili peppers can be added to any type of broth, depending on your desired level of heat. They add a vibrant, spicy kick that complements a wide range of flavour profiles.
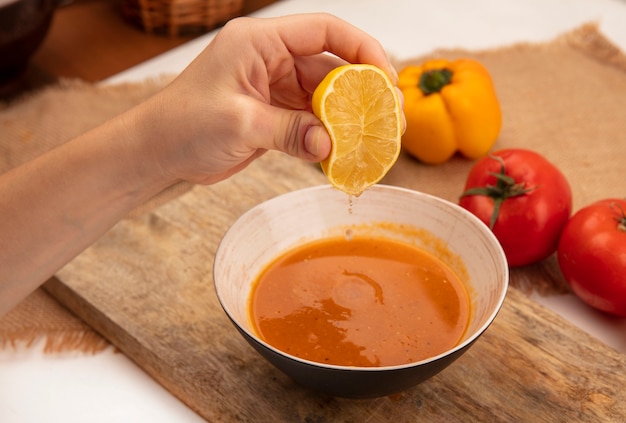
- Citrus Zest: A hint of lemon or orange zest adds a bright, citrusy note that compliments many flavours. Citrus zest can be added to chicken, vegetable, or seafood broth. It adds a refreshing, slightly tart note that balances the richness of the broth.
2. The Power of Vegetables: Expanding Your Palate
Beyond the basic veggies, you can add other ingredients to your broth for extra flavour.
- Tomatoes: A few chopped tomatoes add a rich, umami flavour that’s perfect for a hearty broth. Adding tomatoes to your broth provides a bright, acidic note that balances the richness of the protein. They work particularly well in beef broth or for creating a base for a tomato-based soup.
- Mushrooms: Mushrooms add a distinct earthy flavour that’s both complex and delicious. Mushrooms can be added to any type of broth, but they are especially well-suited for chicken or vegetable broth. They provide a unique, earthy flavour that adds depth and complexity to the final product.
- Leeks: Leeks have a sweeter, milder flavour than onions, making them a lovely addition to a lighter broth. Leeks work particularly well in chicken or vegetable broth. Their delicate flavour complements a wide range of ingredients and adds a subtle sweetness that complements the other flavours.
(Part 5) The Soup Symphony: Building Your Masterpiece
Okay, so now you’ve got your beautiful, clear broth. Now what? It’s time to get creative! Think of your broth as the foundation for a symphony of flavours – you can build upon it in so many ways.
1. The Classic Approach: Soups That Sing
Let’s start with the classics – the soups that never fail to satisfy.
- chicken noodle soup: The ultimate comfort food. Just add your favourite noodles, cooked chicken, and some chopped vegetables. This classic soup is a comfort food staple. The simple combination of chicken broth, noodles, and vegetables is both satisfying and comforting. It's a great way to use up leftover chicken and broth.
- Tomato Soup: A simple, yet satisfying soup made with tomato broth, some chopped tomatoes, and a touch of cream or milk. This classic soup is a favourite for a reason. It's easy to make, incredibly versatile, and perfect for any occasion.
- Beef barley soup: A hearty and filling soup made with beef broth, barley, vegetables, and some diced beef. This hearty soup is perfect for a cold winter day. The barley adds a satisfying texture, while the beef broth provides a rich and flavorful base.
2. Going Global: Adventures in Flavour
Don’t be afraid to explore different cuisines and flavours.
- Pho: A Vietnamese noodle soup made with a fragrant broth, rice noodles, herbs, and a variety of toppings. This iconic Vietnamese soup is a true culinary masterpiece. The fragrant broth is typically made with beef bones, spices, and a touch of sweetness. It's served with rice noodles, fresh herbs, and a variety of toppings, like bean sprouts, basil, and lime.
- Ramen: A Japanese noodle soup made with a rich, pork-based broth, wheat noodles, and various toppings. Ramen is a Japanese street food staple that has gained worldwide popularity. The rich, pork-based broth is a key element, and it's typically flavoured with soy sauce, mirin, and other ingredients. It's served with wheat noodles, marinated eggs, and a variety of toppings, like seaweed, bamboo shoots, and green onions.
- Miso Soup: A simple yet flavorful Japanese soup made with miso paste, dashi broth, and often seaweed or tofu. This simple yet flavorful soup is a staple in Japanese cuisine. The miso paste provides a salty, umami flavour, while the dashi broth adds a savory depth. It's typically served with wakame seaweed and tofu, but you can also add other ingredients, like mushrooms, green onions, or a soft-boiled egg.
3. Get Creative: Soup Delights
The possibilities are endless!
- Creamy Soups: Use your broth as the base for a creamy soup, adding a touch of cream or milk for a smooth and velvety texture. Creamy soups are perfect for a touch of indulgence. You can create creamy variations of classic soups, like tomato soup, or try something new, like a creamy mushroom soup.
- Spicy Soups: Add some heat with chili peppers, ginger, or your favourite spicy ingredients. Spicy soups are a great way to add a kick to your meal. You can create spicy variations of classic soups, like chili or a spicy chicken noodle soup, or try something completely new, like a spicy Thai coconut soup.
- Vegetable Soups: Showcase your favourite vegetables in a delicious broth-based soup. Vegetable soups are a healthy and satisfying option. You can create a simple vegetable broth with a few seasonal vegetables, or go all out with a hearty, chunky vegetable soup packed with your favourites.
(Part 6) Soup Tips and Tricks: The Secrets of Soup Success
I’ve been making soup for years, and I’ve picked up a few tricks along the way.
- Don't Overcrowd the Pot: Give your ingredients plenty of room to cook evenly. Overcrowding the pot can hinder the simmering process and lead to uneven cooking. Make sure your pot is large enough to accommodate all the ingredients without being too cramped.
- Don't Skimp on the Simmering Time: The longer you simmer, the more intense the flavour. Simmering time is crucial for developing rich, complex flavours. Don't be tempted to rush the process – the longer you simmer, the better the broth will be.
- Taste and Adjust: As you simmer, taste the broth and adjust seasonings accordingly. Taste as you go to ensure that the broth is well-seasoned. You may need to adjust the salt, pepper, or other seasonings as the broth simmers.
- Make a Double Batch: Double the recipe and freeze half for later. Making a double batch of broth is a great way to save time and effort. You can freeze the extra broth for later use in soups, sauces, or risottos.
- Use Leftover Broth: Don't throw away leftover broth! Use it as a base for sauces, risottos, or even a quick noodle dish. Leftover broth is a culinary treasure. It can be used to add depth and flavour to a wide range of dishes. It's a great way to add a touch of homemade goodness to your cooking.
(Part 7) FAQs: Addressing Your Questions
Now let’s address some common questions you might have.
1. Can I Use Pre-Made Broth?
Sure, you can use pre-made broth if you’re short on time. However, it won’t have the same depth and complexity as homemade broth. Plus, you have no control over the ingredients used. While pre-made broth can be a convenient option, it often contains added ingredients like salt, MSG, or preservatives that you might want to avoid. Making your own broth gives you control over the ingredients and ensures a fresher, more flavourful result.
2. Can I Make Broth Without Bones?
Absolutely! You can make a delicious broth with just vegetables. Just make sure to use a good mix of flavorful veggies to create a rich and satisfying base. If you don't want to use bones, you can create a delicious vegetable broth using a variety of vegetables. Choose vegetables that are known for their flavour, such as onions, carrots, celery, tomatoes, and mushrooms. The combination of flavours will create a broth that is both delicious and nutritious.
3. How Do I Make a Cloudy Broth Clear?
If your broth is cloudy, it’s probably because you haven’t skimmed off enough scum. You can also try adding a beaten egg white to the broth and simmering for a few minutes. The egg white will bind to the impurities, and you can skim it off with a slotted spoon. If your broth is cloudy, it means that there are still some impurities in it. Skimming regularly is the best way to prevent cloudiness. If your broth is already cloudy, you can try adding a beaten egg white to the pot. The egg white will bind to the impurities and rise to the surface, making it easier to skim off.
4. How Long Can I Store Homemade Broth?
Homemade broth can be stored in the fridge for up to 3 days. You can also freeze it for up to 3 months. Just make sure to thaw it in the fridge overnight before using. Properly storing your broth will ensure its freshness and flavour. Refrigerated broth will last for up to 3 days, while freezing will extend the shelf life for up to 3 months.
5. What Can I Do with Leftover Broth?
The possibilities are endless! Use leftover broth to make sauces, soups, stews, risottos, or even as a base for stir-fries. You can also add it to your pasta water for extra flavour. Leftover broth is a culinary treasure. It can be used to add depth and flavour to a wide range of dishes. It's a great way to add a touch of homemade goodness to your cooking.
(Part 8) The Joy of Broth: More Than Just a Soup Base
Making your own broth isn’t just about creating delicious soups. It’s about taking the time to cook with intention, to connect with the ingredients and the process.
It’s about understanding the magic of simmering, the way flavours meld and deepen over time. It’s about the satisfaction of creating something truly special from simple ingredients. It’s about the joy of sharing a warm bowl of soup with loved ones.
So, go forth and create! Embrace the art of broth making, and let your culinary creativity run wild. You’ll be amazed at what you can create. Happy simmering!
Everyone is watching

Corn on the Cob: The Ultimate Guide to Perfectly Cooked Ears
Healthy MealsAh, corn on the cob. Just the name evokes images of sunny days, barbecues, and that sweet, juicy flavour that ...

Scallops: The Ultimate Guide to Perfect Cooking
Healthy MealsAh, scallops. Those delicate, sweet, and utterly delicious morsels of the sea. They hold a special place in my...

Spaghetti Squash: The Ultimate Guide to Cooking and Serving
Healthy MealsRemember that time you saw spaghetti squash at the supermarket, looking all bumpy and strange, and thought, "W...

Salmon Cooking Times: Perfect Guide for Every Recipe
Healthy MealsLet me tell you, cooking salmon is an art form. It's all about getting that perfect balance: juicy and tender,...

Ham Cooking Time: How Long to Bake, Smoke, or Boil a Delicious Ham
Healthy MealsAh, ham. It's a classic, isn't it? A real crowd-pleaser, especially around holidays. And when done right, it'...