Let's be honest, folks: who doesn't love a good crispy potato? They're the ultimate comfort food, a taste of pure joy that makes any meal feel special. From the classic roast potatoes with their perfectly golden skin to the irresistible crunch of a homemade chip, there’s a magic to that satisfying "crackle" as you bite into a perfectly cooked spud. I've been on a bit of a potato obsession lately, experimenting in the kitchen, trying out different recipes and techniques to achieve that ultimate crispy potato perfection. And let me tell you, it's been a fascinating journey. So grab a comfy chair, brew yourself a nice cuppa, and let me share all my hard-earned wisdom with you. We'll delve into the secrets of achieving that perfect crunch, the best ways to cook and serve your spuds, and even uncover some unexpected crispy potato gems along the way. Buckle up, potato lovers, we're about to embark on a delicious adventure!
Part 1: The Art of crispy potatoes
The secret to achieving that perfect crispy potato? It’s all about drying out those spuds, my friends. You need to create a surface that can brown and crisp up beautifully, and that means removing as much moisture as possible. Think of it like a painting: you need a dry canvas for the flavors to truly shine through.
Drying Out for Ultimate Crispness
Now, most recipes will tell you to parboil your potatoes first. While that does help soften the insides, it can actually make it harder to achieve that crispy exterior. Imagine a potato soaked in water, its surface damp and resistant to browning. Not ideal for crispy perfection, right? That's why I prefer to skip the parboiling and go straight for a good drying session. Here’s my tried and true method, a simple yet effective process that's guaranteed to deliver:
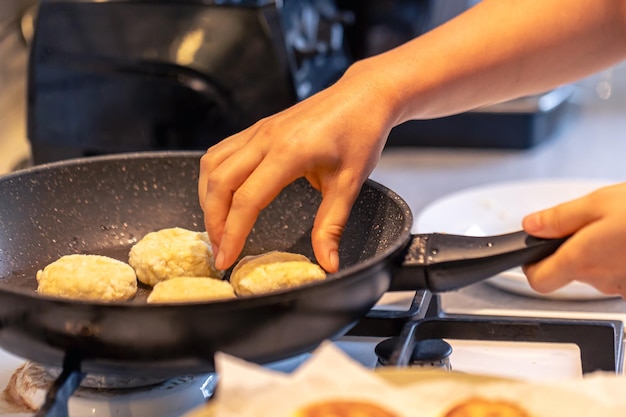
- Cutting: Chop those potatoes into whatever shape you fancy. I love chunky wedges for their rustic charm, but you can do thin fries for a classic crunch, cubes for a quick cook, or whatever your heart desires. The key is to create surfaces that will maximize contact with the heat source, whether it's an oven or a pan of hot oil.
- Soaking: This step is crucial! Soak your chopped potatoes in cold water for at least 30 minutes. This helps remove excess starch, that pesky culprit that can make your potatoes sticky instead of crispy. Imagine a potato covered in a glue-like film, hindering its ability to brown and crisp up. That's what we're trying to avoid!
- Drying: Now comes the magic. After soaking, thoroughly dry your potatoes using a clean tea towel or kitchen paper. The key here is to remove every last bit of moisture, leaving those spuds as dry as a desert. Imagine each potato as a tiny sponge, soaking up the heat and turning golden brown as it releases its remaining moisture.
- Salting: Sprinkle your potatoes generously with salt. Salt helps draw out even more moisture and creates a delicious flavour. It's a classic culinary trick, and it works wonders. Imagine the salt as a tiny magician, pulling moisture from the potato and creating a surface that's ready to crisp up like a dream.
This simple method has made a huge difference in the crispiness of my potatoes, turning even the most stubborn spuds into golden wonders. It’s a bit of extra work, but trust me, the results speak for themselves!
Part 2: The Ultimate Roasting Technique

Now, let's talk about roasting. It's a real classic, a method that consistently delivers stunningly crispy potatoes. The oven, with its dry heat and spacious environment, allows the potatoes to slowly brown and crisp up, revealing their full potential.
The perfect roast Potato
- Preheating: Start by preheating your oven to 220 degrees Celsius (425 degrees Fahrenheit). A hot oven is key for crispy potatoes, acting like a powerful furnace that transforms the potato's exterior into a golden, crunchy delight.
- The Baking Sheet: I like to use a large baking sheet, but feel free to use a roasting pan if you prefer. And here’s a little tip I picked up from my grandma: line the baking sheet with parchment paper. It makes clean-up a breeze! Imagine yourself effortlessly peeling off that parchment paper, leaving your baking sheet sparkling clean, with no burnt-on potato bits to contend with.
- Spreading Out: Spread your potatoes out in a single layer on the baking sheet, making sure they're not crowded. This allows them to cook evenly and get nice and crispy on all sides. Imagine each potato having its own little space to breathe, bask in the heat, and transform into a crisp, golden masterpiece.
- The First Roast: Pop your potatoes into the oven and roast for about 20 minutes. Resist the urge to peek too often, for the first stage of roasting is all about getting those potatoes nice and tender. Imagine the heat gently softening the insides, preparing them for the ultimate crispy transformation.
- The Flip: After 20 minutes, take your potatoes out of the oven. Give them a good shake or flip them over, making sure they are well-distributed again.
- The Final Roast: Now, crank up the heat to 240 degrees Celsius (465 degrees Fahrenheit) and roast those potatoes for another 15-20 minutes until they are golden brown and crispy. Imagine the heat intensifying, coaxing the potato's surface into a glorious, golden-brown state.
- Resting: Once they’re done, don't rush to serve them right away. Let them rest for a few minutes on the baking sheet. This will allow them to crisp up even more and prevent them from becoming soggy.
If you want your potatoes extra crispy, you can even try a little trick I discovered. After the initial roast, sprinkle some more salt and even some herbs like rosemary or thyme over the potatoes. Then, pop them back into the oven for another 5 minutes. The extra herbs and seasoning give them an incredible flavor boost and will give your potatoes an extra layer of irresistible crispness.
Part 3: The Secrets of Chip Perfection
Ah, the humble chip. It's a true British staple, isn't it? But making perfect chips at home can feel like a bit of a challenge. Trust me, I’ve been there. However, with the right techniques, even you can achieve that golden, crispy perfection.
The Chip Masterclass
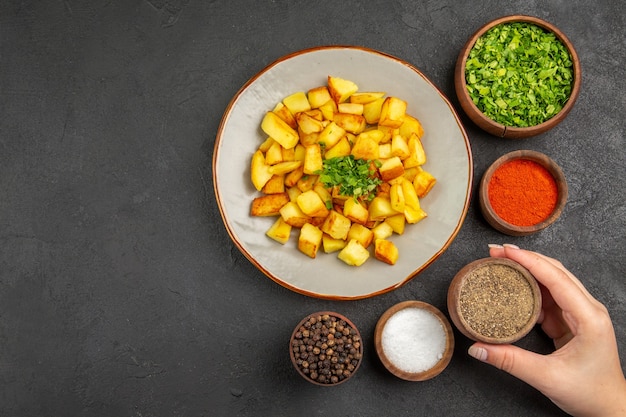
- Choosing the Right Spud: Not all potatoes are created equal. For chips, you need a variety that’s high in starch and holds its shape well during cooking. maris piper, king edward, or Desiree are good choices, varieties that have a reputation for producing crisp and delicious chips. Imagine a potato that’s like a tiny athlete, holding its form even when subjected to the intense heat of frying.
- The Chip Shape: When it comes to chips, there are two main approaches: thin and thick. Thin chips cook quickly and get wonderfully crispy, but can be a bit more prone to becoming dry. Thick chips take longer to cook but have a more substantial texture and hold their moisture better. Ultimately, it’s a matter of personal preference! Imagine a thin chip as a delicate lace, crisp and airy, while a thick chip is more like a sturdy ribbon, substantial and satisfying.
- Deep Frying: Deep frying is the traditional way to make chips, and for good reason! The hot oil creates a crisp, golden shell that’s simply irresistible. Imagine those chips swirling in a bath of hot oil, transforming into golden, crispy delights. Make sure your oil is at the right temperature – around 175 degrees Celsius (350 degrees fahrenheit) is ideal.
- The Double Fry: This technique is a bit more time-consuming, but it really makes a difference in the crispiness. Here’s how it works: first, fry your chips for about 3 minutes until they are just starting to soften. Then, remove them from the oil and let them cool for a few minutes. After they’ve cooled, fry them again for another 2-3 minutes until they are golden brown and crispy. Imagine a double baptism of hot oil, each fry intensifying the crispness and creating a chip that’s practically irresistible.
- Seasoning: Once your chips are cooked, drain them on some kitchen paper to remove any excess oil. Then, season them with salt and any other spices you like. I love a sprinkle of smoked paprika or a pinch of cayenne pepper for a bit of heat. Imagine those chips, crisp and golden, dusted with a sprinkle of spice, bringing a burst of flavor to your tastebuds.
Deep frying is a real skill, and it can take a bit of practice to get it right. But once you master it, there’s nothing quite like homemade chips!
Part 4: The Unexpected Crispy Potato: The potato salad
Now, you might be thinking, "Potato salad? Crispy? Come on!" But hear me out. A good potato salad can be surprisingly crispy, especially if you’re willing to think outside the box a little.
Crispy Potato Salad
Here’s my trick for adding that delightful crunch: use roasted potatoes instead of boiled potatoes. It sounds simple, but it makes a world of difference. The roasted potatoes bring a delicious flavor and texture that complements the other ingredients perfectly. And here’s a little secret: I like to add a generous handful of crunchy croutons to my potato salad for an extra layer of texture.
Here’s a basic recipe for a crispy potato salad that you can customize to your taste:
| Ingredients: | Quantity |
|---|---|
| Roasted Potatoes | 4 large potatoes, roasted as described above |
| Mayonnaise | 1/2 cup |
| Sour Cream | 1/4 cup |
| Dijon Mustard | 1 tablespoon |
| Chopped Celery | 1/2 cup |
| Chopped Red Onion | 1/4 cup |
| Salt and Pepper | to taste |
| Crusty Bread Croutons | 1/2 cup |
- Combine: In a large bowl, combine the roasted potatoes, mayonnaise, sour cream, Dijon mustard, celery, and red onion.
- Season: Season with salt and pepper to taste.
- Chill: Refrigerate for at least 30 minutes to allow the flavors to meld.
- Croutons: Just before serving, add the crunchy croutons to the salad.
I love to add a dollop of fresh dill or chives on top for a little extra flavor and freshness. It’s a delicious and surprisingly versatile dish that’s perfect for picnics, barbecues, or even just a casual weeknight dinner.
Part 5: Beyond the Basics: Crispy Potato Inspirations
Now that we've explored some classic crispy potato techniques, let’s dive into some more creative and delicious ways to enjoy these golden spuds. Get ready to be inspired!
Crispy Potato Hash
This is a hearty and satisfying dish that’s perfect for breakfast, brunch, or even dinner. It's basically a potato-based symphony of flavor!
- The Base: Start with some diced potatoes, cooked until crispy.
- The Extras: Then, add your favorite ingredients. I like to include onions, peppers, bacon, sausage, or even some leftover roast chicken.
- The Flavor: Season generously with salt, pepper, and a touch of paprika or cayenne pepper.
- The Finish: Once your hash is cooked, you can serve it with a fried egg, some avocado slices, or a dollop of sour cream.
Hash is all about letting your creativity run wild! Experiment with different ingredients and flavors to discover your own personal favorites.
Crispy potato fritters
These are so easy to make and absolutely delicious! They're a great way to use up leftover potatoes, and they’re perfect as a starter or side dish.
- The Base: Grate some leftover potatoes and add some flour, eggs, and a little milk to bind them together.
- The Flavor: Season with salt, pepper, and any other herbs or spices you like. I love to add a little chopped parsley or chives for extra flavor.
- The Fry: Heat up some oil in a frying pan and drop spoonfuls of the potato mixture into the hot oil. Cook until they are golden brown and crispy on both sides.
- The Serve: Serve with a dollop of sour cream or a drizzle of honey. They’re amazing!
Crispy Potato Skins
Who doesn't love potato skins? They’re the ultimate comfort food and a classic pub snack.
- The Prep: Bake your potatoes until they are cooked through and then slice them in half lengthwise.
- Scoop It Out: Scoop out some of the potato flesh and save it for later. You can use it to make mashed potatoes or potato soup!
- The Crisp: Place the potato skins back in the oven for another 10-15 minutes until they are crispy.
- The Fillings: Now for the fun part! Fill your crispy potato skins with whatever you like. Some popular choices include cheese and bacon, chili, or a simple sprinkle of grated cheese.
Potato skins are so versatile, you can create endless variations to suit your tastes. And they’re surprisingly easy to make. Give it a go!
Part 6: The Potato Side Dish: Beyond the Basics
Okay, let's face it: sometimes we need a bit more inspiration than just the usual roast potatoes or chips. Here are some other ideas for crispy potato side dishes that will take your dinner from ordinary to extraordinary.
Crispy Potato Wedges with Garlic and Herbs
These are a real crowd-pleaser. The garlic and herbs add a lovely flavor that complements so many dishes.
- The Wedges: Cut your potatoes into wedges and toss them with olive oil, garlic powder, dried oregano, and salt.
- The Roast: Roast them in a hot oven until they are golden brown and crispy.
- The Serve: Serve them alongside grilled meats, fish, or salads.
Crispy Potato Salad with Bacon and Blue Cheese
For those who love a bit of a kick, this salad is a real winner. The creamy blue cheese and smoky bacon create a flavor combination that’s simply irresistible.
- The Base: Start with your roasted potatoes, chopped into bite-sized pieces.
- The Extras: Add crumbled bacon, crumbled blue cheese, chopped red onion, and a good dose of mayonnaise.
- The Seasoning: Season with salt, pepper, and a pinch of red pepper flakes for a bit of heat.
- The Serve: Serve this salad alongside grilled chicken or steak.
Part 7: The Importance of Patience: A Lesson in Potato Cooking
I've learned a lot about crispy potatoes over the years. It's more than just a recipe, it's a process. It's about understanding the potato, respecting its time, and allowing it to reveal its full potential. And that takes patience.
Don't rush the process. Let those potatoes dry properly. Don’t be afraid to let them roast for a little longer than you think. The extra time is worth it for those golden, crispy results. And, of course, don't forget to experiment. Try different flavors, different techniques, and different cuts. The possibilities are endless, and the journey of discovering new potato delights is always exciting.
So, go forth and conquer!
Part 8: FAQs
I know what you're thinking: "I've got questions!" Don't worry, I've got you covered.
Q1: What happens if my potatoes are too wet?
If your potatoes are too wet, they won't crisp up properly. They'll likely steam instead of brown, and you'll end up with soft, soggy potatoes. The key is to thoroughly dry them after soaking, using a clean tea towel or kitchen paper to remove every last bit of moisture.
Q2: What if my potatoes are too crowded in the oven?
If your potatoes are too crowded, they won't cook evenly. Some will be overcooked while others are still undercooked. Make sure to spread them out in a single layer on the baking sheet to ensure they roast evenly and get nice and crispy all over.
Q3: What kind of oil is best for frying potatoes?
For frying potatoes, I recommend using a high-heat oil with a neutral flavor, like sunflower oil or vegetable oil. Avoid using olive oil, as it has a low smoke point and can burn easily at high temperatures.
Q4: What if my chips are soggy?
If your chips are soggy, it's likely because they weren't dried properly or the oil wasn't hot enough. Make sure to thoroughly dry your potatoes before frying, and ensure your oil is at the correct temperature – around 175 degrees Celsius (350 degrees Fahrenheit) is ideal. You can also try the double-fry method, which will help ensure extra crispness.
Q5: Can I freeze cooked potatoes?
Yes, you can freeze cooked potatoes. To freeze them, simply let them cool completely and then store them in an airtight container or freezer bag. When you're ready to use them, thaw them overnight in the refrigerator and then reheat them in the oven or microwave. Freezing can affect the texture a little bit, but they're still perfectly good for making things like potato soup or hash.
Everyone is watching

Corn on the Cob: The Ultimate Guide to Perfectly Cooked Ears
Healthy MealsAh, corn on the cob. Just the name evokes images of sunny days, barbecues, and that sweet, juicy flavour that ...

Scallops: The Ultimate Guide to Perfect Cooking
Healthy MealsAh, scallops. Those delicate, sweet, and utterly delicious morsels of the sea. They hold a special place in my...

Spaghetti Squash: The Ultimate Guide to Cooking and Serving
Healthy MealsRemember that time you saw spaghetti squash at the supermarket, looking all bumpy and strange, and thought, "W...

Salmon Cooking Times: Perfect Guide for Every Recipe
Healthy MealsLet me tell you, cooking salmon is an art form. It's all about getting that perfect balance: juicy and tender,...

Ham Cooking Time: How Long to Bake, Smoke, or Boil a Delicious Ham
Healthy MealsAh, ham. It's a classic, isn't it? A real crowd-pleaser, especially around holidays. And when done right, it'...