Ah, chocolate chip cookies. The scent of baking, the anticipation, the warm, gooey goodness – there's nothing quite like it. But let's be honest, sometimes getting that perfect cookie can feel like a mission impossible. You know the feeling – flat, crunchy cookies, or those chewy, underbaked disasters. We're aiming for that golden brown perfection, the kind that melts in your mouth and leaves you wanting more.
This isn't just another cookie recipe, folks. We're going to dive deep into the world of chocolate chip cookies, exploring every nook and cranny, from the science of ingredients to the art of a perfect bake. And trust me, after reading this, you'll be well on your way to creating cookies that will have everyone saying, "Wow, these are amazing!"
(Part 1) The Foundation: Ingredients That Matter

Think of ingredients as the building blocks of your cookies, and getting them right is absolutely crucial. Now, I'm a purist at heart, sticking to the classics for that timeless chocolate chip cookie taste. But that doesn't mean I'm against a little experimentation – I've tried all sorts of twists and turns, and learned a thing or two along the way.
Flour: The Backbone of a Cookie
Flour is the foundation. It's what gives the cookie structure, so choosing the right kind is important. Plain flour is my go-to, but you can experiment with a blend of plain and self-raising flour for a bit more lift. Just keep in mind that self-raising flour already contains baking powder, which might make the cookies less chewy.
Sugar: The Sweetness and Chewiness
Sugar is the star of the sweetness show, but it also plays a key role in creating that perfect chewy texture. I love using a mix of granulated and brown sugar – the brown sugar adds a lovely caramel flavour. But be mindful, too much sugar can make your cookies spread too much.
Butter: The Key to Softness and Richness
Ah, butter. The secret ingredient to that irresistible buttery flavour and soft, chewy texture. Always use unsalted butter and make sure it’s softened to room temperature before you start mixing. This ensures it blends smoothly with the sugar, creating a light and airy dough.
Eggs: The Binding Force
Don't underestimate the power of eggs! They're the glue that holds everything together, adding richness and color to your cookies. I usually use large eggs, but medium eggs will do the job too. Just adjust the amount of flour slightly if you're using smaller eggs.
Chocolate: The Heart of the Cookie
This is where you can really get creative. I love the classic milk chocolate chips, but why stop there? You can go for dark chocolate, white chocolate, or even chopped nuts. Just make sure you use good quality chocolate. It's the star of the show, so choose wisely!
The Extras: Flavor Twists
This is your chance to get creative and add your personal touch. A splash of vanilla extract is my go-to, bringing out the sweetness of the sugar and adding a warm, comforting touch. But cinnamon, a pinch of salt, or even a sprinkle of spices – feel free to experiment!
(Part 2) Mixing the Dough: A Delicate Dance
Now, let's get our hands dirty and start mixing. This is where things get a bit delicate. You want to combine the ingredients thoroughly, but overmixing is your enemy. Overmixing develops the gluten in the flour, leading to tough and chewy cookies.
The Creaming Method: Key to Lightness
We're using the creaming method, which means we'll be creaming the butter and sugar together until they are light and fluffy. You can use a stand mixer, a hand mixer, or even a wooden spoon. Just make sure it’s light and fluffy! It’s worth the extra effort.
Adding the Eggs: One at a Time
Next, we’ll add the eggs, one at a time. Scrape the bowl well after each addition to ensure everything is evenly combined.
Incorporating Flour: Gradually and Gently
Now, it’s time to add the flour, but do it gradually. I like to start by adding about half the flour, mixing until it’s just combined. Then add the rest of the flour, mixing until everything is incorporated.
The Finishing Touches: Adding Flavor
Finally, gently mix in the chocolate chips and any other extras. You can do this by hand or with a spoon, but just be sure not to overmix.
(Part 3) Chilling the Dough: A Step You Can't Skip
Hold your horses! Before we get to the baking, we need to chill the dough. This is a crucial step that many people overlook, but it's absolutely essential for getting those perfect cookies. Chilling the dough helps the cookies hold their shape, prevents them from spreading too much, and creates a more even texture.
The Science of Chilling: Why It Matters
Let's get a little scientific. When you chill the dough, the butter solidifies. This means it's less likely to melt quickly during baking. The result? Cookies that are less likely to spread, and more likely to have those lovely crisp edges and soft centres.
Chilling Time: How Long is Enough?
I typically chill my dough for at least 30 minutes, but you can chill it for up to 24 hours. Just make sure you wrap the dough tightly in plastic wrap to prevent it from drying out.
The Benefits of Chilling: A Recap
Let's recap why chilling is crucial:
- Prevents cookies from spreading too much
- Helps cookies hold their shape
- Creates a more even texture
- Enhances flavor
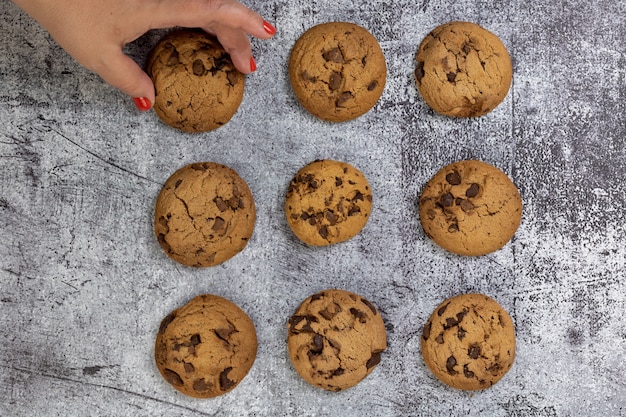
(Part 4) Baking Time: Achieving Golden Brown Perfection
Alright, the dough is chilled, so let's get baking! Preheat your oven to 190 degrees Celsius (375 degrees Fahrenheit). This is the usual temperature for chocolate chip cookies, but you can adjust it slightly depending on your oven and the size of your cookies.
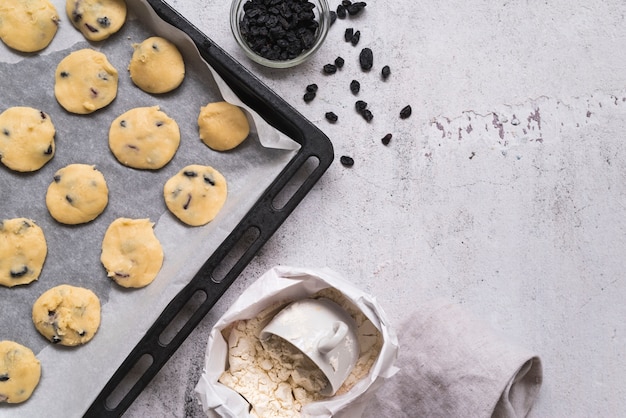
Preparing the Baking Sheets: Setting the Stage
Line your baking sheets with parchment paper or silicone baking mats. This prevents the cookies from sticking and makes cleaning a breeze.
Scooping the Dough: Even Cookies, Even Baking
Use a cookie scoop to portion out the dough. This ensures you get evenly-sized cookies, which is important for consistent baking. I usually use a 2-tablespoon scoop, which creates cookies that are just the right size.
Spacing the Cookies: Giving Them Room to Breathe
Place the cookie dough balls on the baking sheet, leaving about 2 inches between each one. This gives the cookies enough space to spread and bake evenly.
Baking Time: The Watchful Wait
Bake the cookies for 10-12 minutes, or until the edges are golden brown and the centres are just slightly soft. Don’t overbake the cookies! They will continue to cook for a few minutes after you take them out of the oven, so it’s better to slightly underbake them than to overbake.
(Part 5) Cooling and Storing: Preserving Cookie Bliss
The cookies are out of the oven! Now, let them cool on the baking sheet for a few minutes before transferring them to a wire rack to cool completely. This helps them set properly and prevents them from becoming soggy.
Cooling Time: Patience, Young Padawan
I know it’s hard to resist, but let those cookies cool completely before diving in. Allow them to firm up; otherwise, they’ll be too soft and crumbly.
Storing Your Cookies: Keeping Them Fresh
Once the cookies are completely cooled, you can store them in an airtight container at room temperature for up to 3 days. If you want to store them longer, freeze them for up to 2 months. Just make sure to thaw them at room temperature before enjoying.
(Part 6) Troubleshooting: Tackling Baking Challenges
Let's face it, we've all been there – those moments when our cookies don’t turn out the way we planned. But fear not! There are a few common baking problems you can easily solve.
Flat Cookies: Fixing the Spreading Issue
Flat cookies are a common sight, usually caused by using too much butter, too little flour, or not chilling the dough long enough. If your cookies are spreading too much, try using a little less butter next time, or adding a tablespoon or two of flour. And make sure you chill the dough for at least 30 minutes.
Tough Cookies: Preventing a Chewy Disaster
Tough cookies are a real bummer, often caused by overmixing the dough, overbaking the cookies, or using too much flour. If your cookies are too tough, try mixing the dough for less time next time, baking for a shorter period, or using a little less flour.
Underbaked Cookies: Getting That Perfect Center
Underbaked cookies are a real disappointment. This usually happens when you don’t bake the cookies long enough. If your cookies are underbaked, simply bake them for a few more minutes until they are golden brown and the centres are set.
(Part 7) Variations: A World of Cookie Flavours
Now that we’ve got the basics down, let’s explore some fun variations. The possibilities are endless when it comes to chocolate chip cookies – experiment with different flavours, textures, and add-ins to create your own signature cookie.
Chocolate Chip Cookie Recipes: Endless Inspiration
Here are some ideas to get you started:
- Double Chocolate Chip Cookies: Add more chocolate chips, or even use a mix of milk chocolate and dark chocolate chips.
- Oatmeal Chocolate Chip Cookies: Add a cup of rolled oats to the dough for a heartier and more chewy cookie.
- Peanut Butter Chocolate Chip Cookies: Add a few tablespoons of peanut butter to the dough for a sweet and salty treat.
- White Chocolate Macadamia Nut Cookies: Add white chocolate chips and chopped macadamia nuts to the dough for a luxurious and nutty cookie.
(Part 8) Tips and Tricks: Elevating Your Cookie Game
Here are a few tips and tricks to help you bake the best chocolate chip cookies ever:
- Use good quality ingredients: The quality of your ingredients will make a huge difference in the taste and texture of your cookies.
- Don't overmix the dough: Overmixing leads to tough and chewy cookies.
- Chill the dough for at least 30 minutes before baking: This helps the cookies hold their shape and prevents them from spreading too much.
- Don't overbake the cookies: Overbaking makes them dry and crumbly.
- Let the cookies cool completely before storing them: This helps them set properly and prevents them from becoming soggy.
- Experiment with different flavours and add-ins: The possibilities are endless!
(Part 9) FAQ: Your Cookie Baking Questions Answered
Now, let’s address those baking conundrums you might have. I'm here to guide you through your cookie-baking journey!
1. Can I use unsalted butter instead of salted butter?
Absolutely! If you're using unsalted butter, you'll need to add a pinch of salt to the dough. This enhances the flavour of the cookies and balances out the sweetness.
2. What if I don't have a cookie scoop?
No problem! You can use a tablespoon to portion out the dough. Just make sure you use a level tablespoon.
3. Can I freeze the cookie dough?
Yes, you can! Wrap the dough tightly in plastic wrap and store it in the freezer for up to 3 months. Just let the dough thaw in the refrigerator overnight before baking.
4. How can I tell if my cookies are done?
The edges of the cookies should be golden brown, and the centres should be just slightly soft. You can also test the cookies by gently pressing the centre. If it springs back, the cookie is done.
5. Why are my cookies so flat?
As I mentioned earlier, this could be due to several factors, including using too much butter, not chilling the dough long enough, or using too little flour.
(Part 10) The Final Word: Spreading the Cookie Love
And there you have it! The ultimate chocolate chip cookie baking journey, from the science of ingredients to troubleshooting your baking woes. Whether you’re a seasoned baker or just starting out, I hope this guide has given you the confidence to bake amazing cookies. Remember, it’s all about enjoying the process. So, gather your ingredients, put on some music, and let’s get baking! And once you’ve mastered those perfect cookies, share them with your loved ones. After all, what’s better than a warm, gooey, chocolate chip cookie, shared with the people you care about? Happy baking!
Everyone is watching

Corn on the Cob: The Ultimate Guide to Perfectly Cooked Ears
Healthy MealsAh, corn on the cob. Just the name evokes images of sunny days, barbecues, and that sweet, juicy flavour that ...

Perfect Pork Roast Oven Cooking Time: A Guide to Delicious Results
Healthy MealsThere's something truly satisfying about a perfectly roasted pork. The aroma alone is enough to make your mout...

Scallops: The Ultimate Guide to Perfect Cooking
Healthy MealsAh, scallops. Those delicate, sweet, and utterly delicious morsels of the sea. They hold a special place in my...

Ham Cooking Time: How Long to Bake, Smoke, or Boil a Delicious Ham
Healthy MealsAh, ham. It's a classic, isn't it? A real crowd-pleaser, especially around holidays. And when done right, it'...

Spaghetti Squash: The Ultimate Guide to Cooking and Serving
Healthy MealsRemember that time you saw spaghetti squash at the supermarket, looking all bumpy and strange, and thought, "W...