Ah, burgers. They conjure up childhood memories, the intoxicating aroma of char and smoky goodness filling the air, and the first bite bursting with flavor. These are the burgers I'm after, the kind that leave you craving more and questioning why you ever settled for anything less. And trust me, I've been there – I've had my fair share of underwhelming burger experiences. But then I discovered the magic of cast iron, and my burger game was forever transformed. So, grab a cold pint, get comfy, and let me share the secrets to crafting truly epic burgers—the kind that will have your mates begging for seconds (and maybe even the recipe!).
(Part 1) The Cast Iron Advantage: A Love Story
Why Cast Iron? Because It's a Game Changer
Let's be honest, it's not about some fancy, high-tech kitchen gizmo. It's about simplicity and pure, unadulterated flavour. A good cast iron skillet is like a loyal companion – always there for you, year after year, getting better with age. And when it comes to burgers, it's the secret weapon for achieving that perfect sear, the crispy edges, and the juicy, flavourful centre.
Cast iron distributes heat like a champion, ensuring your burger cooks evenly. It holds onto heat like a bulldog, guaranteeing a lovely, even sear. Plus, that gorgeous patina you build up over time? It adds another dimension of flavour to your burgers. Trust me, it's not just a gimmick – it's the real deal.
Prepping Your Cast Iron: A Little TLC
Okay, before we get to the burger action, let's set the stage. A well-seasoned cast iron is a dream to work with, but if you're starting fresh, don't sweat it – it's not rocket science. It's all about that good old-fashioned 'seasoning'.
Here's the deal:
- Give your brand-new skillet a good scrub with hot, soapy water. Yes, you heard me right! No fancy soap, just the everyday stuff you use for your dishes. Rinse it thoroughly and make sure it's bone dry.
- Now, it's time for a thin layer of oil – I usually go with grapeseed or avocado oil. Rub the whole thing with the oil, ensuring you coat the entire surface.
- Pop it into a preheated oven at 400°F (200°C) for about an hour. Let it cool down completely.
- Repeat the oil rub and pop it back in the oven for another hour.
- Let it cool down again, and you're ready to go.
This process builds up a lovely, non-stick layer. You might need to repeat this a few times to get that gorgeous dark patina, but it's totally worth the effort.
Keeping Your Cast Iron Happy: Simple Rules for a Long Life
Now that you've got your trusty skillet, let's keep it in tip-top shape.
- Wash it with hot water and a little soap if you need to. Don't be afraid to scrub off any stubborn bits, but be gentle.
- Dry it thoroughly. We don't want any rust creeping in, now do we?
- Rub a thin layer of oil over the entire surface, just like you did when you seasoned it.
- Store it in a dry place. A little bit of air circulation is good, so you might want to consider a cast iron rack.
See? Keeping your cast iron happy is a breeze.
(Part 2) Burger Basics: The Foundation of Flavor
The Perfect Patty: It's All About the Meat
Alright, let's talk about the heart of the matter: the patty. This is where many people go wrong. They think it's all about the beef, but it's so much more than that. It's about the texture, the fat content, and how you handle it.
Here's the lowdown:
- Get yourself some good quality ground beef. I usually go for an 80/20 blend – a good balance of lean and fat for a juicy burger.
- Don't overwork it. The less you handle the meat, the better. Gently form it into patties, about ??-inch thick, and don't press it down too hard. You want a loose, airy texture.
- Make a little indent in the centre of each patty. This helps prevent puffing up during cooking.
- Give them some time to chill out in the fridge for 30 minutes before you hit the skillet. A chilled patty will cook more evenly and hold its shape better.
Remember, a little patience goes a long way when it comes to burger perfection.
Beyond the Beef: Exploring Other Protein Options
You know, sometimes you just want to shake things up a bit. Don't be afraid to explore other protein options. Turkey, chicken, lamb, even veggie burgers – the possibilities are endless. Just keep in mind that different proteins have different cooking times, so adjust accordingly.
burger bun Bliss: The Perfect Canvas
The bun is the canvas for your culinary masterpiece, and it needs to be up to the task. I go for brioche buns – they're soft, pillowy, and just the right amount of sweetness. But if you prefer something else, go for it! The key is to have a bun that can hold its own against that juicy patty without crumbling.
Toppings That Rock: Elevate Your Burger to New Heights
Now, this is where things get fun. Toppings are the finishing touch, and they can take your burger from good to incredible. It's all about personal preference, but here are a few favourites that always hit the spot:
- Classic Cheese: Cheddar, American, Swiss, you name it. Just make sure it melts beautifully and adds a cheesy goodness.
- fresh greens: Crisp lettuce, juicy tomatoes, and crunchy onions are a must.
- Savoury Sauces: A dollop of mayonnaise, a bit of ketchup, or even some tangy barbecue sauce.
- Pickled Perfection: Pickles add a zingy bite that balances out the richness of the burger.
- Bacon, Bacon, Bacon: crispy bacon is a game changer – trust me.
- Spicy Kick: Jalapenos, chili peppers, or some spicy sauce for those who like a little heat.
(Part 3) Mastering the Cast Iron Burger Cook: Sizzle and Skill
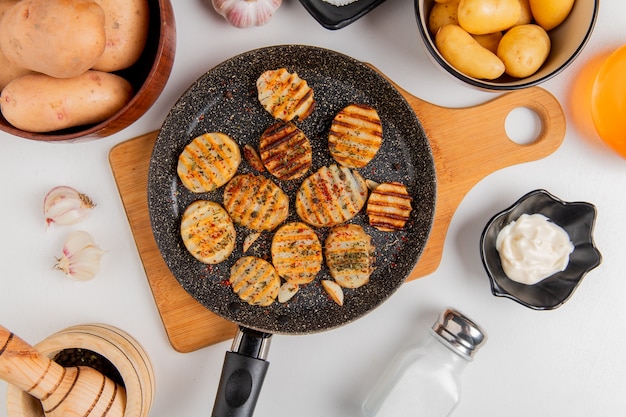
Getting the Sizzle Right: The Key to a Perfect Sear
Time to bring out your cast iron. It's about to work its magic.
- Get that skillet nice and hot. We're talking medium-high heat – about 400°F (200°C). You want a good sizzle when you drop that patty in.
- Add a little oil. I prefer grapeseed or avocado oil for their high smoke point. You don't want your oil smoking up the kitchen,
- Carefully place your patties in the skillet. Don't crowd them. You want to give each patty enough space to cook evenly.
The Art of the Flip: Patience Is Key
Okay, this is the moment of truth. Resist the urge to flip those patties every few seconds.
- Let them cook undisturbed for about 4-5 minutes. This allows for a beautiful, crispy crust to form. You know it's ready when the edges are nicely browned.
- Use a spatula to gently flip the patties. If they're stuck, don't force it – just give it a little nudge and they'll come loose.
- Cook for another 4-5 minutes on the other side, until your burgers are cooked to your liking.
The doneness test: Knowing When It's Just Right
How do you know when your burgers are cooked to perfection?
- The finger test: Press gently on the centre of the patty. If it feels soft and gives back a little, it's rare. If it feels firm and springy, it's medium-rare. If it feels very firm, it's medium.
- The thermometer test: For the most accurate results, use a meat thermometer. 125°F (52°C) for rare, 130°F (54°C) for medium-rare, 140°F (60°C) for medium, 150°F (65°C) for medium-well, and 160°F (71°C) for well-done.
The Resting Game: Let the Juices Redistribute
Don't be tempted to jump straight into assembling those burgers. Let them rest for a few minutes before you start building your masterpiece. This allows the juices to redistribute, resulting in a more juicy and flavorful burger.
(Part 4) Burger Assembly: Crafting a Culinary Masterpiece
Time to Get Creative: A Symphony of Flavors and Textures
Now, this is your moment to shine. This is where you unleash your inner burger artist. Remember, the key is to find a balance – a symphony of flavours and textures.
- Toast those buns. A quick toast adds a nice little crunch and brings out the flavour.
- Layer your toppings. Don't go overboard – less is more. Let each topping have its moment.
- Build your burger with care. Start with the bottom bun, add your patty, top it with cheese (if you're using it), and then layer on your other toppings.
- Don't forget the finishing touch – the top bun.
A Note on Cheese: Melty Goodness
If you're a cheese lover, get that melty goodness right.
- You can add cheese to your burger while it's cooking in the skillet. Just slice it thinly and place it on top of the patty for the last minute of cooking.
- Or, you can add it after the burgers are cooked. Just pop them under a broiler for a few minutes to melt the cheese.
(Part 5) burger sides: The Perfect Companions
Beyond the Bun: Complementary Flavors
Okay, we've got the star of the show, but what about the supporting cast? It's all about finding the right sides to complement your burgers.
- crispy fries: You can't go wrong with a classic side of fries.
- Creamy Coleslaw: A refreshing and tangy contrast to the richness of the burger.
- Onion Rings: A crunchy and flavorful addition.
- Mac and Cheese: A comforting and cheesy companion.
- grilled corn on the Cob: A summery and sweet side dish.
- Fresh Salad: For a lighter option.
(Part 6) Beyond the Basic Burger: Get Creative!
burger variations: A World of Flavors
Now that you've mastered the basics, let's get a little adventurous.
- The Cheeseburger: A classic for a reason.
- The Bacon Cheeseburger: Add crispy bacon for a flavour explosion.
- The Mushroom Swiss Burger: Earthy mushrooms and melty Swiss cheese – a delicious combination.
- The BBQ Burger: Smoky barbecue sauce, crispy onion rings, and a touch of coleslaw.
- The Avocado Burger: Creamy avocado, juicy tomato, and a drizzle of sriracha mayo.
- The Greek Burger: Feta cheese, red onion, tomato, and a drizzle of tzatziki sauce.
- The Spicy Burger: Jalapenos, sriracha mayo, and a touch of chili powder.
(Part 7) Cast Iron Burger Troubleshooting: Fixing Common Problems
Burger Mishaps: A Guide to Recovery
We all have those days when things don't go according to plan.
Sticky Burgers:
It's a common problem, especially if your cast iron hasn't been seasoned properly.
- Make sure your skillet is hot enough before you add the patties.
- Use a little more oil.
- Don't press down on the patties too hard.
- Let them cook undisturbed for a few minutes before you flip them.
Overcooked Burgers:
We've all been there.
- Reduce the heat if your skillet is too hot.
- Use a meat thermometer to check the temperature.
- Don't overcook them.
Undercooked Burgers:
It's best to be safe than sorry.
- Make sure your skillet is hot enough.
- Cook the patties for a longer time.
- Use a meat thermometer to check the temperature.
(Part 8) FAQs: Answers to Your Burning Questions
You've got questions, and I've got answers.
1. Can I use a regular skillet instead of a cast iron?
You can, but you won't get the same results. A cast iron skillet retains heat much better, resulting in a more even sear and crispy edges.
2. What's the best way to clean my cast iron skillet?
Just hot water and a little soap. Don't use abrasive cleaners or steel wool – they can damage the seasoning.
3. Can I cook multiple burgers at once?
You can, but make sure you don't crowd the skillet. Give each patty enough space to cook evenly.
4. What happens if I don't rest the burgers before assembling them?
They'll be less juicy and flavorful. The resting time allows the juices to redistribute, making for a more succulent burger.
5. What's the best way to reheat burgers?
You can reheat them in a skillet over medium heat, or you can pop them in the oven at 350°F (175°C) for about 10 minutes. Just make sure to heat them thoroughly.
(Part 9) The Ultimate Cast Iron Burger Experience: More Than Just a Meal
So, there you have it – the ultimate guide to cast iron burger perfection. It's about more than just the recipe. It's about the experience, the joy of creating something delicious with your own hands, and the satisfaction of knowing that you've created a burger that will leave everyone wanting more. Now go forth, fire up your cast iron, and make some magic!
Everyone is watching

Corn on the Cob: The Ultimate Guide to Perfectly Cooked Ears
Healthy MealsAh, corn on the cob. Just the name evokes images of sunny days, barbecues, and that sweet, juicy flavour that ...

Scallops: The Ultimate Guide to Perfect Cooking
Healthy MealsAh, scallops. Those delicate, sweet, and utterly delicious morsels of the sea. They hold a special place in my...

Spaghetti Squash: The Ultimate Guide to Cooking and Serving
Healthy MealsRemember that time you saw spaghetti squash at the supermarket, looking all bumpy and strange, and thought, "W...

Salmon Cooking Times: Perfect Guide for Every Recipe
Healthy MealsLet me tell you, cooking salmon is an art form. It's all about getting that perfect balance: juicy and tender,...

Ham Cooking Time: How Long to Bake, Smoke, or Boil a Delicious Ham
Healthy MealsAh, ham. It's a classic, isn't it? A real crowd-pleaser, especially around holidays. And when done right, it'...