There's something about the smell of barbecued chicken that just screams summer, doesn't there? It's a symphony of smoky aromas and juicy, tender meat that always hits the spot. Over the years, I've spent countless hours perfecting my own barbecue skills, trying out different rubs, sauces, and techniques. And I'm here to share all my secrets with you, so you can create mouthwatering, melt-in-your-mouth barbecued chicken that'll have everyone begging for more.
(Part 1) The Foundation: Choosing the Right Chicken
You can't just grab any old chicken and expect it to become a barbecue masterpiece. It's all about selecting the right cut, and I'm a firm believer in starting with a whole chicken. They're versatile, affordable, and offer a fantastic combination of juicy thighs and drumsticks alongside lean breasts. And let's not forget the skin! It's the key to that irresistible crispy exterior and a whole lot of flavour.
Why Whole Chickens are the Way to Go
Think about it, a whole chicken gives you the best of both worlds:
- Juicy Thighs and Drumsticks: These are the real stars of the show, packed with flavour and offering that melt-in-your-mouth texture that's synonymous with barbecue.
- Lean Breasts: They soak up the smoky goodness and cook up beautifully, adding a nice contrast to the richness of the dark meat.
- Delicious Skin: Don't shy away from the skin! It crisps up beautifully on the grill, adding a layer of texture and a burst of flavour that can't be matched.
Alternatives to Whole Chickens
I understand that sometimes a whole chicken can be a bit too much, especially if you're cooking for just a few people. In those cases, individual pieces like thighs, drumsticks, and even wings can be excellent choices. Just remember to always go for bone-in and skin-on pieces. The bone helps keep the meat moist during cooking, and that skin, as I mentioned before, is your secret weapon to achieving that irresistible crispy exterior.
(Part 2) Mastering the Rub: The Flavor Catalyst
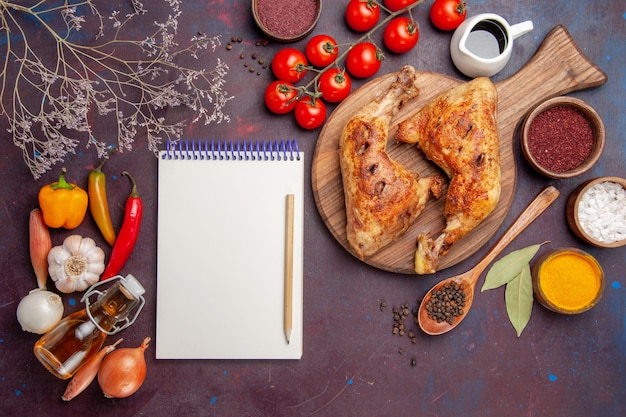
You've got your chicken sorted, now it's time to get your hands dirty, literally! Rubbing the chicken with a spice blend is like giving it a flavour massage. It's all about creating a layer of flavour that permeates the meat, giving it that irresistible barbecue character.
The Essential Elements of a Barbecue Rub
Think about it like building a flavour profile. You want a balance of sweet, smoky, and savoury. I've tried countless combinations, and here's what I consider the holy trinity of a barbecue rub:
- Sweetness: Brown sugar, maple syrup, honey. These add depth and a touch of caramelisation. I love the way brown sugar melts and creates that beautiful sticky glaze as the chicken cooks.
- Smokiness: Smoked paprika, chipotle powder, black pepper. You want that smoky depth, but not overpowering. I find that a good balance is key, and smoked paprika provides a subtle, yet delicious smoky flavour.
- Savoury: Garlic powder, onion powder, salt, pepper. These bring out the natural flavours of the chicken. Don't underestimate the power of salt! It draws out the moisture in the chicken and enhances the other flavours.
Creating Your Own Signature Rub
Remember, these are just starting points. Feel free to experiment, add your own flair, and discover what works best for you. You can even try incorporating other spices like cumin, coriander, or even a pinch of cayenne pepper for a little heat. I encourage you to get creative and develop your own signature barbecue rub. It's a fun process and you'll be amazed at the unique flavours you can create.
(Part 3) The Art of Brining: Unlock Moisture and Tenderness
Now, this is where things get really interesting. Brining your chicken isn't just a fancy chef's trick - it's a game-changer. You'll be surprised at the difference it makes in terms of moisture and tenderness. It's a simple technique that yields remarkable results.
What is Brining?
Brining is essentially soaking the chicken in a salty solution. It sounds simple, right? But the science behind it is fascinating. The salt draws out the water from the chicken, creating space for the salt to penetrate. Then, when the chicken is cooked, it absorbs that water back in, resulting in a juicier, more tender piece of meat.
How to Brine Your Chicken
Here's the simple recipe I swear by:
- Mix Your Brine: Combine 1 cup of kosher salt with 1 gallon of cold water in a large bowl or container. The cold water is crucial for keeping the chicken chilled, preventing bacteria growth.
- Submerge the Chicken: Carefully submerge the whole chicken in the brine solution, making sure it's fully covered. If you're using individual pieces, ensure they are completely submerged as well.
- Refrigerate: Place the container in the refrigerator and allow the chicken to brine for 2-4 hours, depending on the size of the chicken. You can also brine overnight for a more intense flavour.
- Rinse and Dry: After brining, remove the chicken from the brine and rinse it thoroughly under cold water. Pat it dry with paper towels before grilling. This will help remove any excess salt and ensure a nice, crispy skin.
Why Brining Makes a Difference
The results are worth the effort. Brining your chicken ensures that the meat stays incredibly moist and juicy during grilling. You'll notice a significant difference in the tenderness and overall flavour of your barbecued chicken.
(Part 4) Setting the Stage: The Perfect Grill
Now, you've got your perfectly seasoned, juicy chicken. It's time to fire up the grill! This is where the real fun begins.
The Importance of a Hot Grill
Let's be clear, we're not talking about a low and slow approach here. For a truly exceptional barbecued chicken, you need a hot grill. Aim for 400-450 degrees Fahrenheit. This high heat creates those beautiful grill marks, sears the chicken skin, and helps develop that irresistible smoky flavour. The intense heat creates a beautiful sear that locks in the juices and gives your chicken that signature barbecue flavour.
Gas or Charcoal? The Great Debate
That's the age-old question, isn't it? Both gas and charcoal grills have their own unique charms. Gas grills are known for their consistent heat and ease of use, making them perfect for busy weeknights. They also heat up quickly, so you can get grilling faster. On the other hand, charcoal grills offer that authentic smoky flavour that's simply irresistible. The charcoal imparts a unique depth of flavour that's hard to replicate.
Choosing the Right Grill for You
Ultimately, it comes down to personal preference and what you're looking for. If you're after convenience and speed, a gas grill might be the way to go. But if you're a purist who craves that authentic smoky taste, then a charcoal grill is the winner. No matter which type you choose, make sure your grill is clean and in good working order before you start cooking.
(Part 5) The Grilling Process: Getting It Right
Alright, you've got your chicken, your rub, your hot grill - now it's time to get down to business. This is where the magic happens, but remember, patience and a little know-how will make all the difference.
Prepping the Grill for Success
Before you even think about putting the chicken on the grill, make sure it's clean and preheated. If you're using charcoal, let those coals get nice and white-hot before you start. You can tell they're ready when they're covered in a thin layer of ash. If you're using a gas grill, make sure all the burners are lit and the grill is preheated to the desired temperature.
Mastering the Grilling Technique
Remember, we're aiming for that crispy skin and juicy meat. Here's the breakdown:
- Initial Sear: Place the chicken on the hot grill, ensuring that it's positioned over direct heat. Close the lid and allow the chicken to cook for about 5-7 minutes per side, or until it develops those beautiful grill marks. This initial sear is crucial for locking in the juices and developing a beautiful crust.
- Moving to Indirect Heat: Once the chicken has a nice sear on all sides, it's time to move it to indirect heat. You can achieve this by placing the chicken on the cooler part of the grill or by creating a "heat shield" using a foil packet or a metal pan. This will prevent the chicken from burning while it continues to cook through.
- Monitoring the internal temperature: Continue cooking, checking the internal temperature with a meat thermometer. Aim for an internal temperature of 165 degrees Fahrenheit for breasts and 175 degrees Fahrenheit for thighs. These are the safe temperatures to ensure the chicken is cooked through and safe to eat.
The Power of Patience
Don't rush the cooking process! It's better to cook the chicken a little longer at a lower temperature than to risk overcooking it. Patience is key to achieving perfectly cooked, juicy chicken.
(Part 6) The Sauce Situation: A Symphony of Flavours
Okay, now we're getting to the good stuff - sauce! This is where you can truly unleash your creativity and add that final touch of flavour to your barbecued chicken. It's the perfect opportunity to experiment and find your perfect sauce combination.
Types of barbecue sauce: A World of Flavors
Let's face it, there's a whole world of barbecue sauces out there, each with its own unique character. From smoky and tangy to sweet and spicy, the possibilities are endless. Here are some of the most popular types:
- Tomato-Based: The classic choice, these sauces are typically rich and tangy, with a balance of sweetness and smokiness. They often have a thicker consistency and are perfect for creating a beautiful glaze on your chicken.
- Vinegar-Based: Known for their tangy and sharp flavour, vinegar-based sauces are often lighter and more acidic than tomato-based sauces. They have a thinner consistency and are great for adding a bright, tangy flavour to your chicken.
- Mustard-Based: These sauces add a touch of heat and a distinctive mustard flavour, making them a unique and delicious choice. They often have a balance of sweetness, tanginess, and heat, making them a versatile option.
Applying the Sauce: Timing is Everything
Now, this is where things get tricky. Some people swear by applying the sauce during the last 10-15 minutes of cooking, allowing it to caramelize and develop that beautiful glaze. Others prefer to brush it on during the entire cooking process, creating a more intense flavour. I find that a combination of both works best, brushing on a light layer of sauce throughout the cooking process and then adding a generous amount during the final stages.
Ultimately, it's a matter of personal preference. Experiment with different timings and see what works best for you.
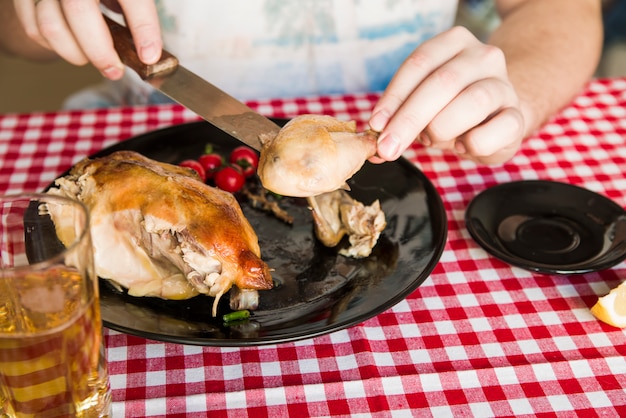
(Part 7) Resting: The Key to Tenderness
Hold your horses! You're not done yet. Once your chicken is cooked to perfection, don't jump straight in and start tearing into it. Give it a 10-minute rest, covered in foil. This allows the juices to redistribute throughout the meat, resulting in a more tender and flavourful chicken. You'll be amazed at how much juicier and more flavorful your chicken will be.
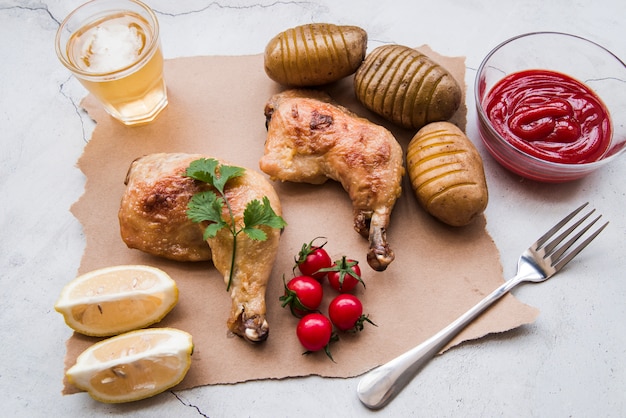
(Part 8) Serving Up Perfection: The Finishing Touches
Okay, you've done it! You've created a barbecue masterpiece. Now, it's time to serve it up in style.
The Perfect Sides for Barbecued Chicken
No barbecued chicken is complete without a selection of delicious sides. Here are some of my favourites that complement the smoky flavours beautifully:
- potato salad: Creamy, tangy, and a perfect foil to the smoky flavours of the chicken. I love the classic potato salad with a touch of mustard and dill.
- Coleslaw: Fresh, crunchy, and a welcome contrast to the richness of the chicken. A simple coleslaw with vinegar and a little bit of sugar is all you need.
- corn on the cob: Sweet, juicy, and a summertime staple. grilled corn on the cob is the perfect accompaniment to barbecued chicken.
- Baked Beans: Sweet, smoky, and incredibly satisfying. Baked beans add a hearty and flavorful element to your barbecue spread.
- Green Salad: A refreshing and healthy addition to your meal. A simple green salad with a light vinaigrette dressing provides a nice contrast to the heavier dishes.
Presentation is Key
Don't forget, presentation matters! Slice that chicken beautifully, arrange it on a platter, and drizzle a generous amount of that delicious sauce over the top. A few sprigs of fresh herbs, a squeeze of lemon juice, or even a sprinkle of smoked paprika add a touch of elegance.
(Part 9) FAQs: Your Barbecue Questions Answered
You've got questions, I've got answers. Let's dive into the most common barbecue chicken queries.
1. How can I tell if my chicken is cooked through?
The best way to ensure your chicken is cooked to perfection is to use a meat thermometer. Aim for an internal temperature of 165 degrees Fahrenheit for breasts and 175 degrees Fahrenheit for thighs. You can also check the chicken by cutting into the thickest part of the thigh. If the juices run clear and the meat is no longer pink, it's cooked through.
2. Can I use boneless, skinless chicken thighs?
Absolutely! Bone-in, skin-on thighs are the traditional choice, but boneless, skinless thighs can still work. Just make sure to cook them over medium heat and keep a close eye on them to prevent them from drying out. You can also try using a marinade to keep them moist and flavorful.
3. What are some good alternatives to barbecue sauce?
While barbecue sauce is the classic choice, you can get creative with other flavour profiles. A simple lemon-herb butter, a spicy sriracha glaze, or even a tangy honey mustard sauce can be delicious on barbecued chicken. Experiment with different flavour combinations and see what you like best.
4. How do I prevent the chicken from sticking to the grill?
The trick is to make sure your grill grates are clean and lightly oiled. You can use a grill brush to clean them, and then apply a thin layer of oil using a paper towel or a spray bottle. If you're using a charcoal grill, you can also sprinkle a few drops of water on the coals to create a light layer of steam, which will help prevent sticking.
5. What should I do if my chicken gets overcooked?
Don't fret! While overcooked chicken can be a little dry, it's not the end of the world. You can try to salvage it by adding a bit of sauce or some moisture-rich ingredients like chopped tomatoes or onions. You can also try shredding the overcooked chicken and using it in a salad or sandwich.
6. What is the best way to store leftover barbecued chicken?
Once it's cooled down, store your leftover barbecued chicken in an airtight container in the refrigerator for up to 3-4 days. You can also freeze it for up to 2-3 months. When reheating, you can use the oven, microwave, or grill.
And that, my friend, is your ultimate guide to creating mouthwatering barbecued chicken. Remember, it's all about practice, experimentation, and having fun with it. So, fire up the grill, grab your chicken, and let's get grilling!
Everyone is watching

Corn on the Cob: The Ultimate Guide to Perfectly Cooked Ears
Healthy MealsAh, corn on the cob. Just the name evokes images of sunny days, barbecues, and that sweet, juicy flavour that ...

Scallops: The Ultimate Guide to Perfect Cooking
Healthy MealsAh, scallops. Those delicate, sweet, and utterly delicious morsels of the sea. They hold a special place in my...

Spaghetti Squash: The Ultimate Guide to Cooking and Serving
Healthy MealsRemember that time you saw spaghetti squash at the supermarket, looking all bumpy and strange, and thought, "W...

Salmon Cooking Times: Perfect Guide for Every Recipe
Healthy MealsLet me tell you, cooking salmon is an art form. It's all about getting that perfect balance: juicy and tender,...

Ham Cooking Time: How Long to Bake, Smoke, or Boil a Delicious Ham
Healthy MealsAh, ham. It's a classic, isn't it? A real crowd-pleaser, especially around holidays. And when done right, it'...