Let's talk artichokes, folks! I know, I know, they can seem a bit intimidating. Those spiky leaves, the weird prickly bits – it all looks a bit daunting, doesn't it? But trust me, once you get the hang of them, artichokes are a real treat! They're incredibly versatile, can be enjoyed in a variety of ways, and they're packed with vitamins and minerals. They're not just a fancy restaurant dish, either – artichokes are something you can easily enjoy at home. So, grab a sharp knife, put on your apron, and let's dive into the world of artichoke cooking!
Part 1: Choosing the Perfect Artichokes
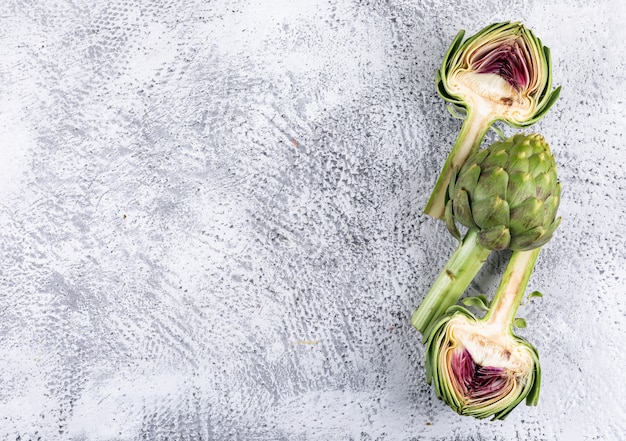
The first step to delicious artichoke cooking is choosing the right ones. You want artichokes that are firm, with tightly closed buds and a vibrant green colour. Think of them like a tightly packed bouquet – you don't want any floppy, limp leaves! You should also avoid any that have brown or yellow spots, as these could be signs of spoilage.
Tip 1: Size Matters
Generally, you'll want to choose artichokes that are medium in size. If they're too small, they'll be tough and chewy – imagine trying to eat a tiny, hard ball of artichoke! If they're too big, they'll be too tough to eat and might have tough, woody hearts – no one wants to bite into that!
Tip 2: The Leaf Test
A good way to gauge the freshness of an artichoke is to gently press the outer leaves. If they feel firm and springy, you're good to go. They should bounce back, like a good, firm pillow! If they feel mushy or limp, it's best to leave that artichoke on the shelf – it's probably seen better days!
Tip 3: Look for the "Choke"
At the base of the artichoke, you'll find a hairy, fuzzy bit called the "choke." It's edible, but it can be quite bitter. When choosing your artichoke, you want to make sure the choke is still relatively small, as this indicates the artichoke is fresh. The choke should be a tiny, fuzzy patch, not a big, hairy beast!
Part 2: Preparing the Artichokes
Now that you've chosen your perfect artichokes, it's time to prep them. This is the part that can seem a bit daunting, but I promise it's easier than you think. Think of it like giving your artichoke a little makeover – it'll be ready to shine!
Step 1: Trimming the Spiky Leaves
First, snip off the pointy tips of the outer leaves. You can do this with a sharp knife or kitchen shears. Just be careful not to cut yourself! We don't want any artichoke-related injuries!
Step 2: Removing the Tough Outer Leaves
Once you've trimmed the tips, you need to remove the tough outer leaves. You can do this by snapping them off, or by using a sharp knife to cut them off. I find snapping them off is the easiest way. It's like giving the artichoke a little hair cut! You'll want to remove at least 2-3 layers of leaves, depending on the size of your artichoke.
Step 3: Cleaning the Bottom
Next, you need to trim the bottom of the artichoke. This is the pointy, hard part that can be tough and unpleasant to eat. Use a sharp knife to cut off the base, about an inch or two below the leaves. Think of it as a little foot spa for your artichoke!
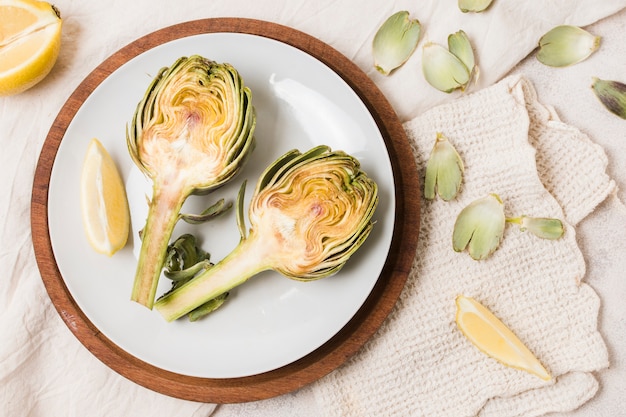
Step 4: Cleaning the Choke
Finally, you need to clean the choke. You can do this by scooping it out with a spoon, or by using a sharp knife to cut it out. I prefer using a spoon, it's less messy! You don't have to remove all of the choke, just the most hairy parts.
Step 5: Adding Lemon Juice
Once your artichokes are prepped, you can add some lemon juice. This will help to prevent them from turning brown, and it will also add a lovely tang to the final dish. Simply squeeze some lemon juice over the cut surfaces of the artichoke. It's like giving your artichoke a little splash of sunshine!
Part 3: Cooking the Artichokes
Now for the fun part: cooking! There are lots of different ways to cook artichokes, but here are a few of my favourites:
Method 1: Steaming
Steaming is a great way to cook artichokes because it preserves their flavour and texture. They'll be light, fluffy, and absolutely delicious!
- Bring a pot of water to a boil. This is the most important step, it's all about that steam!
- Place a steamer basket in the pot, and add your prepped artichokes. Make sure they're snug and comfy in their steamer basket.
- Cover the pot and steam the artichokes for 30-45 minutes, or until the leaves are tender. You'll know they're ready when they pull apart easily.
- Serve with a squeeze of lemon juice and a drizzle of olive oil. A little squeeze of lemon and a drizzle of oil will really make your artichokes sing!
Method 2: Boiling
Boiling is another simple way to cook artichokes. It's a great option if you're short on time or don't have a steamer.
- Bring a large pot of salted water to a boil. The salt will help season the artichokes as they cook.
- Add your prepped artichokes to the boiling water and reduce the heat to a simmer. Give them a little gentle stir to make sure they're all submerged.
- Cook for 30-45 minutes, or until the leaves are tender. Again, you'll know they're ready when they pull apart easily.
- Serve with a squeeze of lemon juice and a drizzle of olive oil. This is a great way to brighten up the flavors of your boiled artichokes.
Method 3: Roasting
Roasting brings out the natural sweetness of artichokes. It's a great way to give them a little crispy edge, too!
- Preheat your oven to 400°F (200°C). Get that oven nice and hot!
- Place your prepped artichokes in a baking dish. Don't overcrowd them, give them some room to breathe.
- Drizzle with olive oil, season with salt and pepper, and add a squeeze of lemon juice. This will add a lovely flavor to the artichokes as they roast.
- Roast for 30-45 minutes, or until the leaves are tender. They'll be nice and soft, but not mushy.
- Serve with a drizzle of olive oil and a sprinkle of Parmesan cheese. This will make your roasted artichokes even more decadent!
Method 4: Grilling
Grilling adds a smoky flavour to artichokes. They'll have a lovely char and a hint of smoky goodness!
- Preheat your grill to medium heat. Make sure your grill is nice and hot!
- Brush your prepped artichokes with olive oil, season with salt and pepper, and add a squeeze of lemon juice. This will help them cook evenly and keep them moist.
- Grill for 15-20 minutes, turning occasionally, until the leaves are tender and lightly charred. They'll have beautiful grill marks!
- Serve with aioli, chimichurri, or another dipping sauce. This will give your grilled artichokes a real boost of flavor.
Part 4: Serving and Eating Artichokes
Now comes the part everyone looks forward to – enjoying your delicious artichokes! It's time to get your hands dirty!
Tip 1: Dip, Dip, Dip
Artichokes are traditionally served with a dipping sauce. It's a great way to add extra flavor and enhance their deliciousness! Some popular choices include:
- Aioli (garlic mayonnaise) – a classic choice, with a creamy, garlicky flavor.
- Lemon butter – a light and refreshing option, perfect for highlighting the natural flavors of the artichoke.
- hollandaise sauce – a rich and decadent sauce, perfect for a special occasion.
- Olive oil and balsamic vinegar – a simple but delicious option, perfect for bringing out the sweetness of the artichoke.
Tip 2: The Right Technique
To eat your artichoke, simply pull off a leaf, dip it in your chosen sauce, and scrape the tender part against your teeth. You want to discard the tougher outer part of the leaf and eat the soft, fleshy part. Think of it like a little artichoke game!
Tip 3: The Heart
Once you've eaten all the leaves, you'll reach the heart of the artichoke. This is the most tender part and can be eaten with a fork or spoon. It's like the hidden treasure inside the artichoke!
Tip 4: Don't Forget the Choke!
Remember the fuzzy choke we removed earlier? Well, it's actually edible! The choke can be a bit hairy and bitter, so it's best to scrape off the fuzzy part and eat the tender core. If you're not a fan of the choke, simply discard it. No judgment here!
Part 5: Creative artichoke recipes
Now, let's get creative! While artichokes are delicious on their own, they can be incorporated into a variety of dishes. Here are a few ideas to get your culinary juices flowing:
Recipe 1: artichoke dip
This is a classic party appetizer and it's surprisingly easy to make. It's warm, cheesy, and dippable – what's not to love?
- In a food processor, combine cooked artichoke hearts, cream cheese, mayonnaise, Parmesan cheese, garlic, and lemon juice. Make sure the artichokes are well-drained before you add them in.
- Pulse until smooth. You want it to be creamy and smooth, but not completely pasty.
- Transfer the mixture to a baking dish and bake at 350°F (175°C) for 15-20 minutes, or until heated through and bubbly. Let it get nice and melty!
- Serve with crackers, bread, or vegetables. It's great with anything!
Recipe 2: Artichoke and Spinach Quiche
This is a satisfying and flavorful dish that's perfect for brunch or lunch. It's a great way to use up leftover artichokes!
- Preheat your oven to 375°F (190°C). Get that oven nice and toasty!
- In a pie crust, combine cooked artichoke hearts, spinach, eggs, milk, cream, cheese, salt, and pepper. Use your favorite pie crust recipe, or buy one from the store.
- Bake for 30-40 minutes, or until the quiche is set. It should be golden brown on top and firm to the touch.
- Serve hot or cold. This is a great dish to make ahead of time.
Recipe 3: artichoke pasta Salad
This is a light and refreshing pasta salad that's perfect for a summer picnic. It's a great way to use up leftover cooked pasta!
- Cook your favorite pasta according to package directions. Use any pasta you like, from penne to rotini to even angel hair.
- Combine the cooked pasta with cooked artichoke hearts, cherry tomatoes, red onion, feta cheese, and a lemon vinaigrette. Use any type of feta you like, from traditional Greek feta to a milder feta blend.
- Chill for at least 30 minutes before serving. This will let the flavors meld together and make the pasta salad nice and chilled.
Recipe 4: artichoke pizza
A tasty twist on the classic pizza, this is sure to be a crowd-pleaser. It's a great way to use up leftover artichoke hearts!
- Prepare your pizza dough and sauce as you normally would. Use your favorite pizza dough recipe, or buy one from the store.
- Top the pizza with cooked artichoke hearts, mozzarella cheese, and your choice of other toppings, such as mushrooms, olives, or pepperoni. Get creative with your toppings!
- Bake according to your preferred pizza method. Use a pizza stone for the best results.
Part 6: The Benefits of Eating Artichokes
Besides being delicious, artichokes are packed with nutrients! They're a good source of fiber, vitamin C, and folate. They're also a good source of antioxidants, which can help protect your body from damage. So, not only do they taste good, but they're good for you too!
Benefit 1: Heart Health
Artichokes are a good source of potassium, which helps to regulate blood pressure and reduce the risk of heart disease. So, eating artichokes can be a great way to give your heart a little boost.
Benefit 2: Digestive Health
The fiber in artichokes can help to regulate digestion and prevent constipation. So, if you're looking for a way to keep things moving, artichokes are a great option!
Benefit 3: Brain Health
Artichokes contain choline, which is essential for brain function and memory. So, if you're looking for a way to keep your brain sharp, artichokes can be a great addition to your diet.
Benefit 4: Weight Management
Artichokes are low in calories and high in fiber, which can help you feel full and satisfied. So, if you're trying to lose weight or maintain a healthy weight, artichokes are a great choice!
Part 7: Storing Artichokes
If you don't plan to use your artichokes right away, you can store them in the refrigerator. This will help them stay fresh and delicious for a few days.
Tip 1: Wrap Them Up
Wrap the artichokes in plastic wrap or store them in a plastic bag. This will help to prevent them from drying out.
Tip 2: Don't Forget the Lemon
To prevent them from browning, add a little lemon juice to the plastic wrap or bag before storing. The lemon juice will help to keep them looking bright and fresh.
Tip 3: How Long Can You Keep Them?
Stored properly, artichokes will last for 3-5 days in the refrigerator. After that, they may start to lose their freshness and become a bit tough.
Part 8: FAQs
I know you might have some questions about artichokes. Here are a few answers to frequently asked questions:
Q1: Are artichokes difficult to cook?
Not at all! Once you understand the basic prep, artichokes are surprisingly easy to cook. The most important thing is to choose fresh artichokes and follow the instructions carefully.
Q2: What does an artichoke taste like?
Artichokes have a unique flavour that's both sweet and slightly earthy. The texture is tender and slightly chewy. It's a flavor that's hard to describe, you just have to try it!
Q3: What happens if I eat the tough outer leaves?
You can eat the tough outer leaves, but they'll be quite fibrous and unpleasant. It's best to remove them before eating. No one wants to chew on a tough, stringy leaf!
Q4: What happens if I eat the choke?
You can eat the choke, but it can be quite hairy and bitter. You can try to scrape off the fuzzy part and eat the tender core, but if you're not a fan, simply discard it. No judgment here!
Q5: Can I freeze artichokes?
Yes, you can freeze artichokes. The best way to freeze them is to blanch them first. Blanching involves briefly cooking the artichokes in boiling water, then quickly cooling them in ice water. This will help to preserve their colour and texture. Then, you can freeze them in a freezer-safe bag for up to 3 months.
Part 9: The Final Word on Artichoke Cooking
So there you have it – a complete guide to artichoke cooking! I hope this has inspired you to give these wonderful vegetables a try. They're delicious, versatile, and good for you!
Remember, cooking is all about experimenting and having fun. Don't be afraid to try different methods and recipes.
Now go forth and enjoy those delicious artichokes!
Part 10: A Visual Guide to Artichoke Prep
To help you visualize the steps, here is a simple table showing how to prep your artichoke for cooking:
| Step | Description | Image |
|---|---|---|
| 1 | Trim the spiky tips of the outer leaves. | [Image of an artichoke with trimmed tips] |
| 2 | Remove the tough outer leaves. | [Image of an artichoke with removed outer leaves] |
| 3 | Trim the bottom of the artichoke. | [Image of an artichoke with trimmed bottom] |
| 4 | Clean the choke. | [Image of an artichoke with cleaned choke] |
| 5 | Add lemon juice. | [Image of an artichoke with lemon juice] |
I hope this visual guide makes the process of preparing artichokes even clearer. Now you're ready to tackle any artichoke recipe with confidence!
Everyone is watching

Corn on the Cob: The Ultimate Guide to Perfectly Cooked Ears
Healthy MealsAh, corn on the cob. Just the name evokes images of sunny days, barbecues, and that sweet, juicy flavour that ...

Scallops: The Ultimate Guide to Perfect Cooking
Healthy MealsAh, scallops. Those delicate, sweet, and utterly delicious morsels of the sea. They hold a special place in my...

Spaghetti Squash: The Ultimate Guide to Cooking and Serving
Healthy MealsRemember that time you saw spaghetti squash at the supermarket, looking all bumpy and strange, and thought, "W...

Salmon Cooking Times: Perfect Guide for Every Recipe
Healthy MealsLet me tell you, cooking salmon is an art form. It's all about getting that perfect balance: juicy and tender,...

Ham Cooking Time: How Long to Bake, Smoke, or Boil a Delicious Ham
Healthy MealsAh, ham. It's a classic, isn't it? A real crowd-pleaser, especially around holidays. And when done right, it'...