Right, let’s talk cornish hens. You know, those adorable little birds that are just begging to be roasted to golden perfection? I've always had a bit of a soft spot for them. They're the perfect size for a cosy dinner for two, or a delightful addition to a larger feast.
But listen, roasting a Cornish hen isn't just about throwing it in the oven and hoping for the best. There's a bit of an art to it, and believe me, it's worth mastering. So, grab a cuppa, settle in, and let's delve into the juicy world of roasted cornish hens!
(Part 1) Choosing the Right Cornish Hen
Finding the Perfect Bird
First things first, you need a good Cornish hen. You know what I'm talking about, those plump little birds with their glistening skin and that unmistakeable aroma of roasted chicken. Now, you might be tempted to grab the first one you see, but trust me, a little bit of patience goes a long way.
What to Look For
Plumpness: The hen should feel substantial in your hand, not skinny or bony. You want a good balance of meat to bone, which will ensure a juicy and flavorful meal.
Skin: The skin should be smooth and taut, free of any tears or bruises. This indicates a well-handled bird that's been properly cared for.
Color: The colour should be a healthy pale yellow, not too pale or too dark. A pale colour might suggest the bird wasn't properly cared for, while a dark colour might indicate it's been frozen for too long.
Smell: A fresh cornish hen should have a clean, pleasant smell, nothing too pungent. Any strong odors might indicate that the bird wasn't stored properly.
The Importance of Freshness
You know I'm a firm believer in using the freshest ingredients possible. If you're buying your Cornish hens from a local butcher, they'll likely be fresh and ready to roast. But if you're buying them from a supermarket, make sure to check the use-by date. And remember, the sooner you roast your hen after buying it, the tastier it'll be.
(Part 2) Preparing the Cornish Hen for Roasting
Prepping the Bird
Now that you've got your perfect cornish hen, it's time to get down to the nitty-gritty of prepping. Let me tell you, this is where the magic happens.
Removing the Innards
Firstly, you'll need to remove the innards. Most Cornish hens come with their innards removed, but if not, don't worry. Simply locate the small opening at the back of the bird, and carefully remove the innards. If you’re not sure how to do this, a quick search online will provide you with detailed instructions.
Pat It Dry
After that, give your hen a good pat dry with some kitchen paper. This is essential for achieving crispy skin. And remember, we want that crispy skin! A dry surface helps the skin to brown more evenly and develop that lovely golden-brown color we all crave.
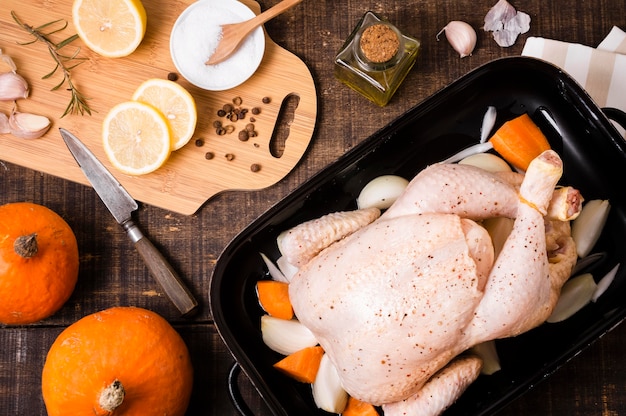
Seasoning
Now comes the fun part, seasoning! You can go for a classic salt and pepper mix, or get adventurous with herbs and spices. I like to use a blend of rosemary, thyme, and sage, with a good pinch of salt and pepper. But hey, feel free to experiment and find what tickles your fancy! You can even try a citrusy rub with lemon zest and garlic powder, or a spicy blend with paprika and cayenne pepper.
(Part 3) Stuffing Options
A Little Something Extra
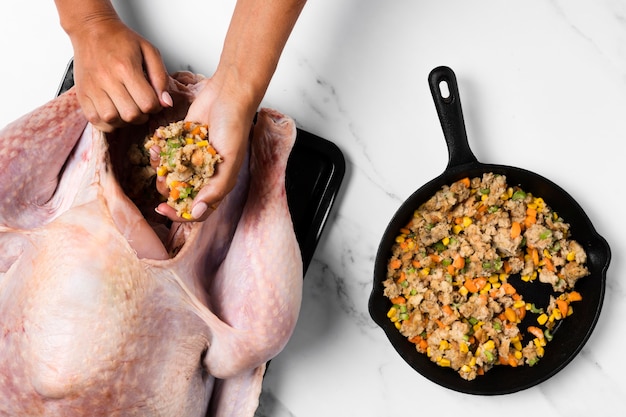
So, you've got your perfectly seasoned Cornish hen, ready to go. But you know what would make it even more irresistible? A delicious stuffing. I'm not talking about a dense, bread-based stuffing here, but rather a simple, flavourful mixture that adds a burst of flavour to your bird.
My Favourite Stuffing
I'm partial to a stuffing made with chopped apples, onions, and sage, all mixed with a little butter and salt and pepper. But you can use whatever you fancy, maybe some chopped herbs, dried fruit, or even a bit of crumbled sausage. Remember, stuffing is a matter of personal preference, so feel free to get creative!
Stuffing Tips
Don't overstuff the bird: Overstuffing will make it difficult to cook evenly and might result in a raw or undercooked stuffing.
Stuff the hen loosely: Leave some space for the stuffing to expand as it cooks. This will ensure that the stuffing cooks through properly.
Secure the stuffing: If you're worried about stuffing spilling out, you can tie the legs together with kitchen twine or use skewers. This will keep the stuffing in place and ensure a more even cook.
(Part 4) roasting techniques
The Oven is Your Canvas
Right, now we're getting into the heart of the matter. Roasting a Cornish hen is a pretty straightforward process, but there are a few tricks of the trade that can make all the difference.
The Ideal Temperature
You want to roast your hen in a preheated oven at 375°F (190°C). This heat ensures that the bird cooks evenly and gets that lovely golden brown colour.
The Timing
Now, here's the thing, the cooking time for a Cornish hen can vary depending on its size. A good rule of thumb is to roast for 45-55 minutes, or until the internal temperature reaches 165°F (74°C). However, a meat thermometer is your best friend here. It’s the most accurate way to determine doneness.
roasting tips
Basting: For extra juicy and tender meat, baste the hen with pan drippings every 15 minutes. This helps to keep the bird moist and flavorful. Use a spoon or a baster to pour the drippings over the hen.
Resting: Once the hen is cooked, let it rest for 10 minutes before carving. This will allow the juices to redistribute and make the meat even more tender. It also helps to prevent the meat from being dry when you cut into it.
(Part 5) Choosing the Right Pan
The Importance of the Right Pan
You might think any old pan will do, but trust me, the right pan can make all the difference in the world.
My Go-to Pans
roasting pan: A classic roasting pan is a must-have for roasting cornish hens. It's large enough to accommodate the bird and its drippings, and the deep sides help to prevent any splattering. This is a versatile pan that can be used for many different types of roasting.
dutch oven: A Dutch oven is a versatile pan that can be used for both braising and roasting. It's perfect for keeping the hen moist and tender. The lid traps moisture, which helps to create a more tender and flavorful bird.
Pan Prep
No matter what pan you choose, remember to grease it well before adding the Cornish hen. This will help to prevent sticking and ensure that the skin gets crispy. You can use a non-stick cooking spray or butter to grease the pan.
(Part 6) Serving Your Roasted Cornish Hen
The Grand Finale
You've done it! You've roasted a Cornish hen to absolute perfection. Now it's time to enjoy the fruits of your labour.
A Feast for the Senses
The scent of roasted chicken wafting through the air is intoxicating, and the sight of the golden-brown bird, glistening with pan drippings, is a real treat for the eyes.
The Perfect Accompaniments
No Cornish hen is complete without the right accompaniments. I like to serve mine with a side of roasted vegetables, like carrots, potatoes, and asparagus. A simple green salad also makes a refreshing addition to the meal.
You can also consider serving your Cornish hen with a side of creamy mashed potatoes, a vibrant green bean casserole, or a tangy cranberry sauce.
The Finishing Touch
And for the finishing touch, drizzle the hen with some pan drippings, and add a sprig of rosemary or thyme for a touch of elegance. This is the perfect way to bring out the flavors of the dish.
(Part 7) Beyond the Basic Roast
Getting Creative
While the classic roast is a timeless favourite, there are endless possibilities when it comes to Cornish hens. Let's explore some exciting variations!
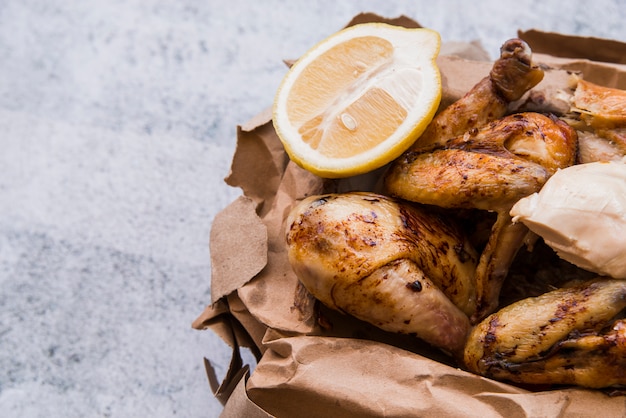
Lemon and Herb Roast
For a citrusy twist, try roasting your Cornish hen with lemon and herbs. Simply stuff the bird with slices of lemon, fresh rosemary, and thyme, and roast as usual. This adds a refreshing and aromatic touch to the dish.
Honey-Glazed Cornish Hen
For a sweet and savoury delight, try a honey-glazed Cornish hen. Mix honey with soy sauce, ginger, and garlic, and brush the mixture over the bird before roasting. The honey glaze will create a beautiful caramelized crust and add a lovely depth of flavor.
Spicy Cornish Hen
If you like a little heat, try a spicy Cornish hen. Rub the bird with a mixture of chili powder, paprika, and cumin before roasting. This will give your dish a satisfying kick. You can adjust the spice level to your liking.
Cornish Hen with Dijon Mustard
For a tangy and flavorful dish, try a Cornish hen with Dijon mustard. Mix Dijon mustard with a little honey and lemon juice, and spread the mixture over the hen before roasting.
(Part 8) FAQs
Frequently Asked Questions
You've got questions, I've got answers! Let's clear up any doubts about roasting those lovely Cornish hens.
1. Can I freeze Cornish hens?
Absolutely! You can freeze Cornish hens for up to 3 months. Just make sure to wrap them tightly in freezer-safe plastic wrap or foil. This will prevent freezer burn and keep the hens fresh for longer.
2. How long do I cook a Cornish hen for?
The cooking time will vary depending on the size of the bird, but generally, you'll need to roast it for 45-55 minutes at 375°F (190°C). However, always check the internal temperature to ensure it reaches 165°F (74°C).
3. How do I know when the Cornish hen is cooked?
The best way to tell if the hen is cooked is to check the internal temperature. It should reach 165°F (74°C) in the thickest part of the thigh. You can also check the juices, which should run clear when the hen is pierced.
4. What can I do with leftover Cornish hen?
Leftover Cornish hen can be used in a variety of dishes. You can make sandwiches, salads, or even a hearty soup.
Sandwiches: Slice the leftover hen and use it to make delicious sandwiches with your favorite bread, cheese, and vegetables.
Salads: Add shredded hen to salads for a boost of protein and flavor.
Soup: Use leftover hen to make a flavorful chicken noodle soup or a creamy chicken pot pie.
5. Is Cornish hen healthy?
Cornish hens are a good source of protein and other nutrients, making them a healthy option for a meal. However, they can be high in fat, so it's best to cook them without too much added fat.
Conclusion
There you have it, folks! A complete guide to roasting delicious Cornish hens. So next time you're craving a simple, elegant meal, give this a try. You won't regret it. Trust me, I wouldn't steer you wrong. And remember, if you have any more questions or tips to share, feel free to drop a comment below! Happy roasting!
Everyone is watching

Perfect Rice Every Time: The Ultimate Guide to Cooking Rice
Cooking TipsAs a self-proclaimed foodie, I've always been a bit obsessed with rice. It's the foundation of countless cuisi...

Prime Rib Roast Cooking Time Chart: Per Pound Guide
Cooking TipsPrime rib roast. Just the name conjures images of lavish dinners, crackling fires, and hearty laughter. It’s ...

The Ultimate Guide to Cooking Asparagus: Tips, Techniques, and Recipes
Cooking TipsAsparagus. The mere mention of this spring delicacy conjures up images of vibrant green spears, crisp and burs...

Ultimate Guide to Cooking the Perfect Thanksgiving Turkey
Cooking TipsThanksgiving. Just the word conjures up images of overflowing tables laden with delicious food, the scent of r...

How Long to Bake Potatoes in the Oven (Perfect Every Time)
Cooking TipsBaked potatoes are a staple in my kitchen. They're incredibly versatile, delicious, and surprisingly easy to m...