(Part 1) Choosing Your Chicken: The Foundation of Flavor
The Importance of Freshness
Always opt for fresh chicken whenever possible. It simply tastes better. Look for chicken that has a plump, even appearance, with a slight sheen to its skin. It should have a mild, pleasant chicken smell – anything else is a red flag.Chicken Cuts: Exploring the Options
Now, the world of chicken cuts can be a bit overwhelming. Each cut has its own unique qualities and cooking times.Let's break down the most popular choices:
- Chicken Breast: The classic choice, especially for pan-searing. Look for bone-in, skin-on breasts for maximum flavor and juiciness.
- Chicken Thigh: A more forgiving cut that stays tender even if cooked slightly longer. Perfect for beginners and anyone who prefers a richer, more flavorful chicken.
- Chicken Leg Quarters: These are great for roasting, but you can also pan-sear them for a rustic and hearty meal. They're incredibly flavorful thanks to the bone and dark meat.
- chicken wings: These versatile cuts are perfect for everything from buffalo wings to pan-seared drumsticks.
- chicken drumsticks: My personal favorite! These little gems are packed with flavor and juicy, thanks to the combination of dark meat and bone. They pan-sear beautifully and are great for finger-licking meals.
For this guide, we'll be focusing on chicken breasts, but the principles we cover are adaptable to any cut. Don't hesitate to experiment with different cuts to discover your favorites.
(Part 2) Preparing Your Chicken: Unleashing the Flavor
The Pat-Down: Preventing Dryness with a Simple Technique
First, pat your chicken dry with paper towels. This simple step is crucial for achieving a crispy sear. Moisture on the chicken surface can steam instead of sear, leaving you with a bland, pale dish.Seasoning: A Symphony of Flavors
Seasoning is where your creativity shines. A simple salt and pepper combo is a classic, but let's explore some exciting options:- Paprika: This smoky, sweet, and slightly spicy flavor adds depth and warmth to chicken.
- Garlic Powder: An essential for any chicken dish, garlic powder adds a rich, savory flavor that everyone loves.
- Onion Powder: A fantastic way to boost the flavor without having to chop onions.
- Herbs: Fresh herbs are always the best, but dried herbs are a great option if you're in a pinch. I adore rosemary, thyme, and oregano with chicken.
Feel free to experiment with different combinations! You might even create your own signature chicken seasoning blend.
The Secret Weapon: Brine Your Way to Juiciness
For super juicy chicken, brining is a game-changer. This simple technique involves soaking the chicken in a salt water solution, which draws moisture into the meat, leaving it incredibly tender and flavorful.Here's how to brine your chicken:
- Prepare the Brine: In a large bowl, combine 1 cup of kosher salt with 4 cups of cold water. Stir until the salt dissolves completely.
- Submerge the Chicken: Gently place the chicken into the brine, ensuring it's fully submerged. Cover the bowl and refrigerate for at least 30 minutes, or up to 2 hours.
- Rinse and Dry: Remove the chicken from the brine and rinse it thoroughly under cold water. Pat it dry with paper towels.
I always brine my chicken whenever possible. The difference in juiciness and flavor is truly remarkable.
(Part 3) Setting Up the Stage for Perfection: Tools and Techniques
Choose Your Pan Wisely: The Foundation of a Great Sear
A good pan is essential for pan-searing. It needs to be heavy-bottomed to distribute heat evenly and retain it well.Here are my top recommendations:
- cast iron skillet: The classic choice for pan-searing. Cast iron heats up evenly, retains heat exceptionally well, and develops a beautiful, crispy crust on your chicken.
- Stainless Steel Skillet: A durable and versatile option. Stainless steel heats up quickly and efficiently.
- Non-Stick Skillet: Great if you're concerned about sticking, but the results won't be as crispy as with a cast iron or stainless steel skillet.
The Heat is On: Mastering the Temperature
High heat is crucial for achieving a perfect sear. If the heat is too low, the chicken will steam instead of sear, resulting in a pale, bland dish. Aim for medium-high heat, around 400°F (200°C).Here's a simple test: flick a few drops of water into the pan. If they sizzle and evaporate quickly, it's ready. If they just sit there, the pan needs to get hotter.
The Oil Factor: Choosing the Right Lubricant
Don't skip the oil! It prevents the chicken from sticking to the pan and helps create that irresistible crispy crust.Here are my go-to options:
- Olive Oil: A classic choice with a lovely flavor and a high smoke point.
- avocado oil: This oil has an even higher smoke point than olive oil, making it ideal for high-heat cooking.
- Grapeseed Oil: A neutral-tasting oil with a high smoke point, perfect for pan-searing.
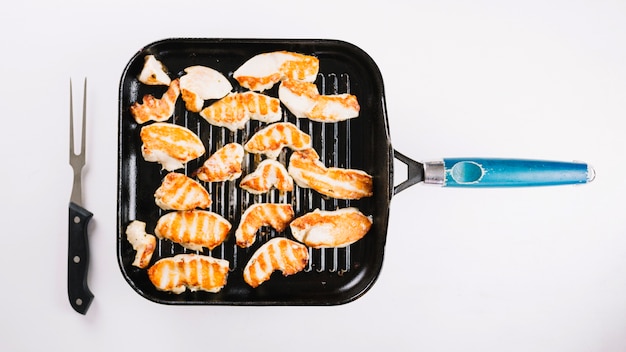
(Part 4) The Art of the Sear: Creating a Culinary Masterpiece
Alright, we've got our seasoned chicken, our hot pan, and our oil. It's time for the magic to happen!Laying Down the Foundation: Chicken Placement
Get that pan scorching hot, then add your oil and let it heat up for a minute. Now, carefully lay down your chicken breasts, skin side down. Don't overcrowd the pan – cook in batches if necessary to ensure proper searing.The Patience Game: Let the Chicken Do its Thing
Resist the urge to touch the chicken for at least 3-5 minutes! Allow the chicken to develop that beautiful golden brown crust without disruption.The Flipside: It’s Time for the Other Side
Once the bottom is beautifully browned, use tongs to gently flip the chicken over. Cook for another 3-5 minutes on the other side.Here's a tip: Use your tongs to tilt the chicken slightly while it's cooking. This will help ensure that the sides get a nice sear too.
Checking for Doneness: Avoiding Overcooked Chicken
You want your chicken to be cooked through but still juicy and tender. The best way to check for doneness is with a meat thermometer. Insert it into the thickest part of the chicken. It should register 165°F (74°C).If you don't have a thermometer, check for doneness by gently pressing on the chicken. It should be firm to the touch and the juices should run clear, not pink.
(Part 5) Finishing Touches for a Flavorful Feast: Elevating Your Dish
You've got your beautifully seared chicken, but it's not quite ready to be served yet. Let's add those finishing touches that will transform it into a culinary masterpiece.Resting Time: A Crucial Step for Juiciness
Allow the chicken to rest for 5-10 minutes before slicing and serving. This gives the juices time to redistribute throughout the meat, ensuring a juicy and tender piece of chicken.Sauce It Up: Elevate Your Chicken with Flavor
Now, let's add some flavor! You can create a quick sauce right in the pan where you seared the chicken.Here are a few delicious ideas:
- Lemon-Butter Sauce: Add a knob of butter and the zest of a lemon to the pan. Let the butter melt and stir to combine. Spoon the sauce over the chicken.
- Garlic-Herb Sauce: Add a tablespoon of minced garlic to the pan and cook for 30 seconds, or until fragrant. Add a tablespoon of chopped herbs (such as rosemary, thyme, or oregano) and a splash of white wine or chicken broth. Let it simmer for a few minutes, then spoon the sauce over the chicken.
- Pan Sauce with Dijon: Add a tablespoon of Dijon mustard and a tablespoon of white wine or chicken broth to the pan. Stir to combine and let it simmer for a few minutes, then spoon the sauce over the chicken.
These are just a few ideas – feel free to get creative and experiment with your favorite sauces.
(Part 6) Serving Your Masterpiece: Completing the culinary journey
You've done it! You've created pan-seared chicken perfection. Now it's time to enjoy your creation.side dish Inspiration: Complementing Your Chicken
A good side dish completes the culinary experience. Here are a few suggestions to complement your pan-seared chicken:- Roasted Vegetables: Roasting vegetables brings out their natural sweetness, making them a delicious side for chicken.
- mashed potatoes: A classic side dish that always goes well with chicken.
- Rice: A simple and versatile side dish that can be seasoned to your taste.
- Salad: A fresh and light salad balances out a rich chicken dish.
Don't forget to add a touch of greenery to your plate – a sprig of fresh parsley or a few slices of lemon add a touch of elegance and freshness.
(Part 7) Cleaning Up: From Pan to Perfection
Now, let's talk about the aftermath of a delicious meal. You've cooked a masterpiece, and now it's time to clean up.Dealing with the Pan: Tackling Stuck-on Bits
Don't let those delicious bits stick to the pan! While the pan is still hot, add a splash of water or broth and let it simmer for a few minutes. The stuck-on bits will loosen up and you can easily wipe them away with a paper towel.Washing the Dishes: Making Clean-up a Breeze
If your pan is still a bit sticky, wash it with hot water and a little bit of dish soap. Just be sure to use a non-abrasive sponge to avoid scratching the surface of your pan.(Part 8) Going Beyond the Basics: Mastering the Art of Pan-Searing Chicken
You've got the basics down, but there's always room for improvement! Here are some extra tips and techniques to take your pan-searing skills to the next level:Searing Techniques: Getting Creative with Your Cook
- reverse searing: This technique involves cooking the chicken low and slow in the oven, then searing it quickly on the stovetop to create a crispy crust. The result is incredibly juicy and tender chicken.
- Sous Vide Searing: Sous vide is a method of cooking food in a water bath to ensure even cooking. You can sous vide chicken to perfection, then sear it on the stovetop for a beautifully crispy crust.
- Skin-On vs. Skin-Off: cooking chicken with the skin on creates a protective barrier that helps keep the meat moist. The skin also crisps up beautifully and adds flavor to the dish. However, if you prefer skinless chicken, cook it over medium heat to avoid drying it out.
Troubleshooting: Common Challenges and Solutions
We've all encountered cooking challenges. Here's how to tackle some common pan-searing problems:
- Dry Chicken: Overcooking is usually the culprit behind dry chicken. Check the internal temperature with a meat thermometer to ensure it's cooked through but not overcooked. In the future, try brining the chicken or cooking it at a lower temperature.
- Sticking Chicken: If your chicken is sticking to the pan, make sure it's completely dry before you add it to the pan. You can also add a little more oil to the pan.
- Uneven Browning: If your chicken is not browning evenly, the pan might not be hot enough. Ensure the pan is very hot before you add the chicken. You can also try tilting the pan slightly to ensure that all sides of the chicken get a good sear.
FAQs
Let's address some common questions about pan-searing chicken:
| Question | Answer |
|---|---|
| How long should I pan-sear chicken breasts? | The cooking time for chicken breasts will vary depending on their thickness. Generally, it takes about 3-5 minutes per side for a medium-thick breast. Use a meat thermometer to ensure the internal temperature reaches 165°F (74°C). |
| Can I pan-sear frozen chicken? | It's best to avoid pan-searing frozen chicken as it won't brown properly. Thaw the chicken completely before searing. |
| What can I do with leftover pan-seared chicken? | Leftover pan-seared chicken is fantastic in salads, sandwiches, or wraps. You can also use it in pasta dishes or soups. |
| What kind of pan is best for pan-searing chicken? | cast iron skillets are ideal for pan-searing chicken as they distribute heat evenly and create a crispy crust. Stainless steel skillets are a good alternative. |
| What are some tips for preventing chicken from sticking to the pan? | Make sure the chicken is completely dry before searing. Use a high-heat oil with a high smoke point. Don't overcrowd the pan. And don't move the chicken around too much while it's searing. |
There you have it – your ultimate guide to pan-seared chicken perfection. Now go forth, embrace your inner chef, and enjoy a delicious meal!
Everyone is watching

Prime Rib Roast Cooking Time Chart: Per Pound Guide
Cooking TipsPrime rib roast. Just the name conjures images of lavish dinners, crackling fires, and hearty laughter. It’s ...

How Long to Bake Potatoes in the Oven (Perfect Every Time)
Cooking TipsBaked potatoes are a staple in my kitchen. They're incredibly versatile, delicious, and surprisingly easy to m...

Perfect Rice Every Time: The Ultimate Guide to Cooking Rice
Cooking TipsAs a self-proclaimed foodie, I've always been a bit obsessed with rice. It's the foundation of countless cuisi...

The Ultimate Guide to Cooking Asparagus: Tips, Techniques, and Recipes
Cooking TipsAsparagus. The mere mention of this spring delicacy conjures up images of vibrant green spears, crisp and burs...

Ultimate Guide to Cooking the Perfect Thanksgiving Turkey
Cooking TipsThanksgiving. Just the word conjures up images of overflowing tables laden with delicious food, the scent of r...