There's something undeniably satisfying about a perfectly cooked steak, isn't there? The aroma that fills the kitchen, the satisfying sizzle as it hits the hot pan, and the glorious sear – it's all part of the experience. But let's be honest, we've all had our fair share of steak mishaps – dry, tough, overcooked...you name it! But fear not! After years of trial and error, I've finally cracked the code to achieving that mouthwatering, pan-seared porterhouse steak that'll have you begging for more.
Today, I'm taking you on a culinary adventure, sharing my secrets and techniques to create a steak that's juicy, tender, and bursting with flavour. So grab a notepad, gather your ingredients, and let's get started!
Part 1: The Essential Ingredients
You can't expect to whip up a culinary masterpiece without the right tools, can you? So, before we dive into the sizzling action, let's lay the groundwork with the essential ingredients.
1.1. The Star of the Show: The Porterhouse Steak
First things first, let's talk about the star of the show – the magnificent porterhouse steak. Now, you might be wondering, what makes this cut so special? Well, think of it as a T-bone steak on steroids. It boasts a larger, more substantial piece of meat, offering a truly decadent dining experience. The best part? It combines the lean, tenderloin with the flavorful, marbled strip, creating a delightful interplay of textures and tastes.
When choosing your porterhouse, size matters. Aim for a steak that's about 1.5 inches thick. This thickness is crucial for achieving that beautiful, even sear and locking in the juices. Now, I'm a firm believer in quality over quantity, and that's why I always opt for a high-quality, grass-fed porterhouse. It's not just about the taste – it's about supporting sustainable farming practices and enjoying the full, rich flavor that comes with it.
1.2. Seasoning: The Flavor Powerhouse
Next up, we need to unleash the flavour potential of our steak with some carefully chosen seasonings. You can keep it simple with just salt and pepper, or get creative with your favourite steak seasoning blend. Personally, I'm a huge fan of a mix that incorporates smoked paprika, garlic powder, onion powder, and just a touch of cayenne pepper. It adds a delightful smoky depth and a subtle kick that's simply irresistible.
Here's a little trick I've learned over the years: don't season your steak too early! Wait until just before you sear it. This allows the seasoning to adhere to the steak better, creating a more flavourful crust. Trust me, it's a game-changer.
1.3. The Fat: The Secret to Juiciness
Now, let's talk about the unsung hero of a delicious steak – fat. I'm not talking about those greasy, unhealthy fats – we're talking about high-quality olive oil or even a knob of butter. The fat is essential for creating that beautiful sear and locking in those precious juices, resulting in a steak that's juicy and tender. When searing, use enough fat to coat the pan, but not so much that it overwhelms the flavour of the steak. It's all about finding that perfect balance.
Part 2: The Art of Preparation
Now that we have our ingredients ready, it's time to get our hands dirty and prep our steak for the sizzling adventure ahead. This is where a bit of technique and patience come into play.
2.1. Pat It Dry: The Key to a perfect sear
First things first, grab those paper towels and pat your steak dry. This might seem like a trivial step, but it's absolutely crucial! A wet steak won't sear properly. The moisture will steam, creating a bland, grey surface instead of the golden brown crust we're after. So, take the time to ensure your steak is completely dry before we move on to the next step.
2.2. Rest It Up: Let It Chill
Next, give your steak a little time to chill out. Take it out of the refrigerator about 30 minutes before you plan to cook it. This allows the steak to come to room temperature, ensuring that it cooks evenly. Imagine trying to heat a cold piece of metal – it takes a lot longer than heating something that's already at room temperature. The same principle applies to your steak. Allowing it to warm up a bit will make a huge difference in the final result.
Part 3: The Masterful Sear

Now, get ready for the most exciting part of the process – the sear! This is where we create that delicious crust that not only looks beautiful but also locks in the juices and elevates the flavor of the steak.
3.1. The Pan: A Heavy-Duty Companion
You'll need a pan that can handle the heat and withstand the sizzling action. My go-to choice is a cast iron pan. It retains heat beautifully, ensuring even cooking and a glorious sear. If you don't have a cast iron pan, a good quality stainless steel pan will do the trick. Just make sure it's heavy-duty and heats evenly.
3.2. Get It Hot: The Heat is On
Now, here's where we crank up the heat. Get your pan screaming hot! It should be so hot that it almost smokes when you add the fat. We're talking medium-high to high heat – don't be afraid to turn up the dial! This intense heat is what creates that crispy, flavorful crust.
3.3. Add the Fat: A Slippery Slope to Deliciousness
Once your pan is scorching hot, add your chosen fat – olive oil or butter. Make sure it coats the entire surface, creating a shimmering pool of heat. Now, take a deep breath, because it's about to get exciting.
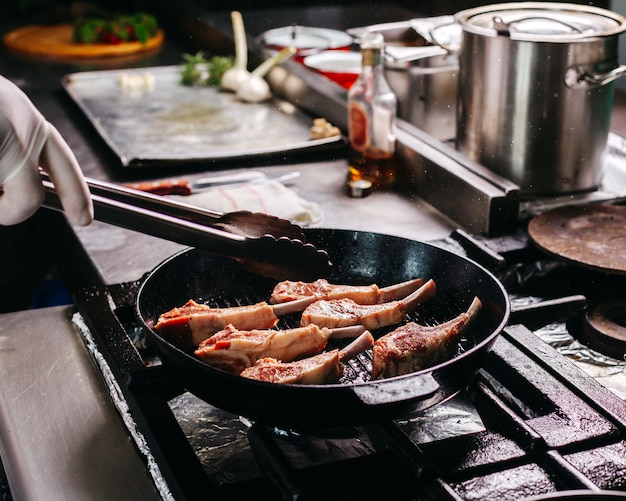
3.4. Time to Sear: The Moment of Truth
Gently place your steak in the hot pan. Now, resist the urge to move it around! Let it sit undisturbed for a couple of minutes. This allows the bottom to develop a beautiful, crispy crust. You'll hear that satisfying sizzle as the steak releases its juices – that's the sound of deliciousness being created!
3.5. Flip It: A Dance with Fire
After a couple of minutes, it's time to flip the steak. This time, you can give it a slight nudge to ensure the fat is evenly distributed. Repeat the searing process on the other side. You're aiming for a nice, even brown crust on both sides. Remember, we're not fully cooking the steak yet; we're just building the foundation for juicy, flavorful perfection.
Part 4: The Art of Rest
Now that your steak has undergone its sizzling transformation, give it a well-deserved rest. This is an essential step that many people overlook, but trust me, it's crucial for achieving a tender, juicy steak.
4.1. The Resting Time: Patience is a Virtue
Transfer your steak to a cutting board and let it rest for at least 5-10 minutes. This allows the juices to redistribute throughout the steak, creating a more tender and flavorful bite. Patience is key here, so resist the urge to cut into it right away.
4.2. Cover It Up: Keeping it Warm
Cover the steak with a piece of foil. This will help keep it warm and prevent it from drying out while it rests.
Part 5: The Finishing Touches
Now that the steak has had a good rest, it's time to add those final touches that will take your steak from good to absolutely incredible.
5.1. The internal temperature: It's All About Preference
Use a meat thermometer to check the internal temperature of the steak. Here's where personal preference comes in. For a medium-rare steak, you want an internal temperature of 130-135°F (54-57°C). For a medium steak, aim for 140-145°F (60-63°C). If you prefer it well-done, shoot for 160°F (71°C). Don't be afraid to experiment and find your perfect level of doneness.
5.2. The Finishing Touch: Adding Flavor
While the steak is resting, you can add a little finishing touch to enhance the flavour. Some folks like to add a knob of butter to the hot pan, letting it melt and baste the steak. You can even add some herbs like thyme or rosemary for extra flavour. This is where you can unleash your creativity and add your personal touch to your steak masterpiece.
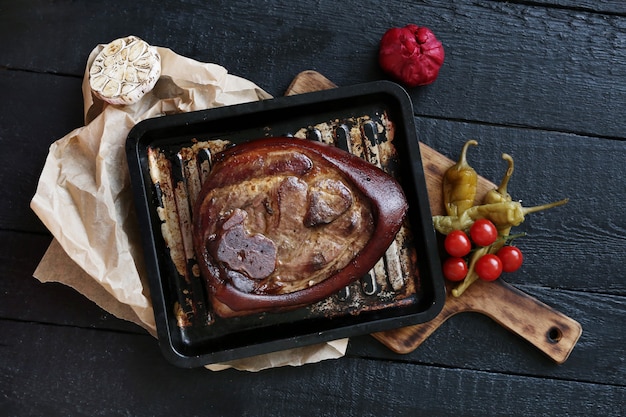
Part 6: The Grand Finale: Slicing and Serving
Finally, the moment you've been waiting for – it's time to slice and serve your pan-seared porterhouse steak.
6.1. Slicing It Up: Cutting with Precision
Slice your steak against the grain. This means cutting across the muscle fibers, which will result in a more tender bite. If you're feeling fancy, you can also use a meat cleaver. The result is a stunning presentation with perfectly uniform slices.
6.2. The Plate: A Feast for the Eyes
Arrange your steak slices beautifully on a plate. You can add some side dishes to complete the meal. Some classic pairings include mashed potatoes, asparagus, or a simple salad.
Part 7: The Importance of Quality
One thing I've learned over the years is that the quality of your steak matters. A good quality steak, from a reputable butcher or a sustainable source, will make a huge difference in taste and tenderness. I've tried cheaper options in the past, and let's just say, it wasn't the same experience. Don't settle for mediocrity! Invest in a good quality porterhouse and let its flavor shine through.
Part 8: The Art of Experimentation
Don't be afraid to get creative and experiment with different seasonings, sauces, and side dishes. Try adding a touch of garlic to your seasoning mix, or adding a drizzle of balsamic glaze before serving. There are endless possibilities when it comes to flavour combinations! The key is to be bold and creative.
FAQs
You've got questions, I've got answers. Here are some common questions about pan-searing porterhouse steaks:
Q1: What is the best way to check if the pan is hot enough?
A: The best way to check is to add a drop of water to the pan. If it sizzles and evaporates immediately, your pan is hot enough.
Q2: How do I prevent my steak from sticking to the pan?
A: Make sure your pan is properly seasoned. For a cast iron pan, you want to have a layer of oil or fat that coats the surface. This creates a non-stick surface. You can also use a high-heat cooking spray.
Q3: What is the best way to sear a steak if I don't have a cast iron pan?
A: A good quality stainless steel pan will do the trick. Just make sure it's heavy-duty and heats evenly.
Q4: Can I use a grill pan instead of a skillet?
A: Absolutely! A grill pan is a great option for getting those lovely grill marks. Just make sure it's hot enough and you follow the same searing technique.
Q5: What happens if I overcook my steak?
A: If you overcook your steak, it will be dry and tough. The best way to avoid this is to use a meat thermometer and cook your steak to the desired internal temperature.
Conclusion
There you have it, my guide to pan-searing the perfect porterhouse steak. It's a culinary journey that combines skill, technique, and a touch of passion. Remember, practice makes perfect. Don't be afraid to experiment and find what works best for you. With a little patience and attention to detail, you'll be grilling up mouthwatering steaks in no time. So, gather your ingredients, crank up the heat, and get ready to impress your taste buds!
Everyone is watching

Prime Rib Roast Cooking Time Chart: Per Pound Guide
Cooking TipsPrime rib roast. Just the name conjures images of lavish dinners, crackling fires, and hearty laughter. It’s ...

How Long to Bake Potatoes in the Oven (Perfect Every Time)
Cooking TipsBaked potatoes are a staple in my kitchen. They're incredibly versatile, delicious, and surprisingly easy to m...

Perfect Rice Every Time: The Ultimate Guide to Cooking Rice
Cooking TipsAs a self-proclaimed foodie, I've always been a bit obsessed with rice. It's the foundation of countless cuisi...

The Ultimate Guide to Cooking Asparagus: Tips, Techniques, and Recipes
Cooking TipsAsparagus. The mere mention of this spring delicacy conjures up images of vibrant green spears, crisp and burs...

Ultimate Guide to Cooking the Perfect Thanksgiving Turkey
Cooking TipsThanksgiving. Just the word conjures up images of overflowing tables laden with delicious food, the scent of r...