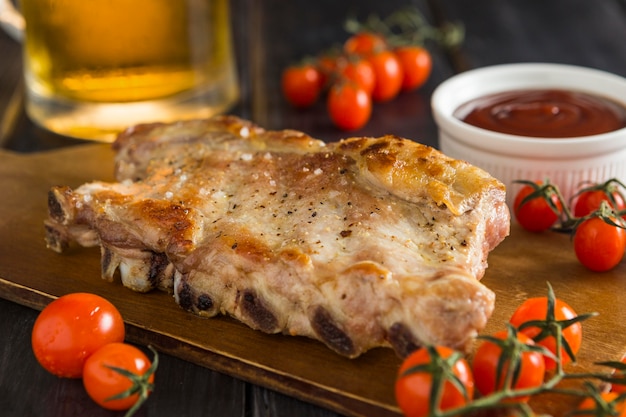
Ah, ribs. Just the thought of those tender, succulent morsels falling off the bone makes my mouth water. Whether you're a seasoned grill master or a kitchen newbie, tackling ribs can seem a bit daunting. But fear not, my fellow food enthusiasts! I'm here to guide you through the art of roasting ribs in the oven, sharing my years of experience and a few insider tips to ensure a truly memorable meal. So grab your apron, gather your ingredients, and let's get cookin'!
Part 1: A Journey Through Rib Basics
The Rib Family: Baby Backs vs. spare ribs
Before we dive into cooking times, let's talk about the stars of the show: ribs. There are two main contenders: baby back ribs and spare ribs. Think of them like siblings with distinct personalities. Baby backs are the petite, flavorful siblings. They’re smaller, meatier, and often considered the more tender option, making them a crowd-pleaser. Spare ribs, on the other hand, are the larger, more robust siblings. They have more fat, offering a richer flavor, but they tend to require a bit more cooking time. It all comes down to personal preference, but I've always been partial to baby backs for their delicate flavour and melt-in-your-mouth texture.
Prepping for Rib-liciousness: Removing the Membrane
Now, imagine you’re about to tuck into a delicious rib, but there’s this pesky, tough membrane clinging to the back. Not exactly a mouthwatering experience, right? That’s where the membrane removal comes in. This thin, tough layer can prevent the ribs from tenderizing properly. Don’t worry, it’s not rocket science. You can use a sharp knife to carefully score the membrane or even just your trusty paper towel to pull it off. Trust me, this little step makes a world of difference!
Seasoning Secrets: Unleashing the Flavor
Once your ribs are membrane-free, it's time to unleash the flavor! Seasoning is where you truly get to personalize your ribs. I tend to keep it classic with a simple rub of salt, pepper, and paprika, but there’s a whole world of flavor waiting to be explored. You can go bold with chili powder and smoked paprika, or embrace a sweeter side with brown sugar and garlic powder. The possibilities are endless, and each experiment is a delicious journey of discovery.
Part 2: The Low and Slow Rib Revelation: Unveiling the Magic of Patience
Ah, the slow and low method. It's my personal favourite for ribs, and for good reason! This method is all about embracing patience. By cooking ribs at a low temperature for a longer period, you allow the meat to break down, revealing an unbelievably tender texture. It’s a bit like a slow-cooked symphony, where the heat and time harmonize to create a culinary masterpiece.
Setting the Stage: Slow and Low Oven Preparation
First, preheat your oven to 250 degrees Fahrenheit (120 degrees Celsius). Think of it as setting the mood for the ribs to relax and tenderize. Next, place your ribs in a roasting pan. To ensure they stay moist and juicy, I like to add a splash of liquid to the bottom of the pan, like apple juice or broth. This creates a little steam bath, making those ribs sing with flavor.
Timing the perfect roast: Patience and a meat thermometer
Now, for the crucial part – timing. The cooking time will depend on the type of ribs and their size, but generally, you can expect to roast them for around 3 to 4 hours. To ensure perfect doneness, grab your trusty meat thermometer. The ribs are ready when they reach an internal temperature of 190-195 degrees Fahrenheit (88-91 degrees Celsius). However, you can also check for tenderness by gently tugging on a rib bone. If it gives way easily, those ribs are ready to impress!
The Smoking Finale: Elevating the Flavor
After the long, slow cook, it's time to crank up the heat and give those ribs a smoky kiss. Remove them from the oven and turn the heat up to 350 degrees fahrenheit (175 degrees Celsius). Uncover the ribs and let them cook for another 30-60 minutes, or until the surface is beautifully caramelized. This final touch gives them an irresistible smoky aroma and a crisp outer layer that's simply divine.
Part 3: The High Heat Approach: A Quick and Crispy Journey
Life happens, and sometimes you need a delicious rib dinner in a flash. That's where the high heat method comes in. It's perfect for those who crave a crispy outer layer and can embrace a slightly tougher texture.
High Heat, Fast Results: A Time-Saving Technique
Preheat your oven to 400 degrees Fahrenheit (200 degrees Celsius). Place your ribs in a roasting pan, cover them with foil, and let them cook for about 1 to 1.5 hours. They'll be heated through, but not quite ready for the finale. Next, remove the foil and continue cooking for another 30-45 minutes, or until the surface is gloriously caramelized.
Temperature Check: Staying Vigilant
It's important to stay vigilant with the high heat method. Ribs can dry out quickly, so keep a close eye on them and consider adding some liquid to the pan during cooking. Your trusty meat thermometer is essential here, to ensure those ribs are cooked through without drying out.
Part 4: The Sauce Symphony: Adding the Final Touch
Ribs are like a blank canvas waiting for the perfect sauce. There are countless sauce options out there, each adding its own symphony of flavour. From sweet and tangy to smoky and spicy, the choice is yours! I tend to stick with homemade barbecue sauce, but store-bought sauces are a fantastic shortcut if time is short.
Homemade Barbecue Bliss: A Recipe for Flavor
To whip up a simple homemade barbecue sauce, you'll need:
- 1 cup ketchup - the classic base
- 1/2 cup apple cider vinegar - for that tangy bite
- 1/4 cup brown sugar - for a hint of sweetness
- 1 tablespoon Worcestershire sauce - adding a depth of savory flavor
- 1 teaspoon garlic powder - a hint of earthy aroma
- 1/2 teaspoon onion powder - a touch of oniony goodness
- 1/4 teaspoon black pepper - for a touch of spice
Combine all the ingredients in a saucepan and bring to a simmer. Cook for 10-15 minutes, stirring occasionally, until the sauce reaches your desired thickness. You can customize the sweetness and spice by adjusting the sugar and pepper.
Glazing for Glory: Adding the Final Touch
As your ribs approach their final moments, it's time to give them a glorious glaze. Slather them with your favorite barbecue sauce about 30 minutes before they’re done or even after they come out of the oven. The sauce will caramelize as it cooks, giving your ribs a beautiful finish and an irresistible shine.
Part 5: The Grand Finale: Serving Rib Perfection
Now that your ribs are cooked to perfection, it’s time for the grand finale! Let them rest for 10-15 minutes before slicing and serving. This allows the juices to redistribute throughout the meat, resulting in even more tender, flavorful ribs.
side dish Symphony: Complementing the Star
To complete your rib feast, pair those incredible ribs with some equally delicious side dishes. Here are a few suggestions:
- Coleslaw - the classic creamy accompaniment
- Macaroni and cheese - the ultimate comfort food
- Baked beans - sweet and smoky goodness
- Cornbread - a Southern classic
- potato salad - a tangy and refreshing option
Part 6: Troubleshooting Tips for Rib Success
Even the most seasoned cook can encounter a few hiccups in the kitchen. Don't fret! I've been there too. Here are some tips to help you conquer any rib roasting challenges:
Ribs Too Dry: Restoring Moisture
If your ribs are a bit dry, you can add some liquid to the roasting pan during cooking. You can also use a meat thermometer to check for doneness and pull them out of the oven when they reach the desired internal temperature. If they're still a bit dry, wrap them in foil and let them rest for a few minutes. This will help them reabsorb some of the moisture.
Ribs Too Tough: Tenderizing Techniques
If your ribs are a bit tough, it's likely that they haven't had enough time to tenderize. Try cooking them a bit longer, or opt for the slow and low method for extra tenderness. You can also add a splash of apple cider vinegar to the roasting pan, which will help break down those tough fibers.
Ribs Falling Apart: Avoiding Overcooking
If your ribs are falling apart, they’ve likely been in the oven for a little too long. Remove them from the oven a bit earlier and let them rest for a few minutes. This will give them a chance to cool and firm up slightly.
Part 7: Embrace the Experimentation: A culinary journey
Remember, rib cooking is a journey, not a destination. There are countless ways to prepare ribs, and discovering your personal favorites is part of the fun. Don't be afraid to try different seasonings, sauces, and cooking methods. And if your first attempt isn't perfect, don't be discouraged! Every time you cook ribs, you learn something new, and your skills will continue to grow.
My Rib Journey: A culinary adventure
I've spent years exploring the world of rib cooking, trying every method and sauce combination imaginable. I've had my fair share of triumphs and a few missteps along the way, but it's been a delicious journey. My personal favorite remains the slow and low method, but I also appreciate the crispy finish of the high heat approach. I've learned that there's no right or wrong way to cook ribs, as long as they taste amazing and make you happy.
Part 8: FAQ (Frequently Asked Questions)
Now, let's address some common questions about rib cooking:
1. What if I Don't Have a Meat Thermometer?
While a meat thermometer is a fantastic tool for precise cooking, you can also use other methods to check for doneness. Look for these telltale signs:
- Tenderness: The ribs should be tender enough to easily pull away from the bone.
- Caramelization: The surface of the ribs should be caramelized and slightly crispy.
- Clear Juices: The juices should run clear when you poke a hole in the meat.
However, these methods are less precise than using a thermometer. If you're unsure, it's always better to err on the side of caution and cook the ribs a little longer.
2. Can I Marinate Ribs Before Cooking?
Absolutely! Marinating ribs before cooking is a fantastic way to tenderize the meat and infuse it with flavour. I love a simple marinade of soy sauce, honey, garlic, and ginger. Let the ribs marinate for at least 2-3 hours, or even overnight, in the fridge.
3. What Happens If I Overcook My Ribs?
Overcooked ribs will be dry and tough. If you've overcooked your ribs, try wrapping them in foil and letting them rest for a few minutes. This will help them reabsorb some of the moisture. You can also add some liquid to the roasting pan, like apple cider vinegar or broth, and continue cooking for a little longer.
4. What's the Best Way to Store Leftover Ribs?
Leftover ribs are a delicious treat! They can be stored in an airtight container in the fridge for up to 3-4 days. You can also freeze them for up to 3 months. When you're ready to enjoy them, reheat them in the oven at a low temperature until heated through. You can also reheat them in the microwave or on the stovetop.
5. Is There a Good Substitute for Ribs?
If you're looking for a rib alternative, try cooking a pork shoulder. It's a similar cut of meat, known for its tenderness and juiciness. You can cook pork shoulder using the same methods as ribs, and it's often a more budget-friendly option.
Part 9: A Final Bite of Wisdom
So there you have it! My tips and tricks for cooking ribs in the oven. Remember, the key is to be patient, have fun, and embrace experimentation! And most importantly, enjoy those delicious ribs!
Everyone is watching

Prime Rib Roast Cooking Time Chart: Per Pound Guide
Cooking TipsPrime rib roast. Just the name conjures images of lavish dinners, crackling fires, and hearty laughter. It’s ...

How Long to Bake Potatoes in the Oven (Perfect Every Time)
Cooking TipsBaked potatoes are a staple in my kitchen. They're incredibly versatile, delicious, and surprisingly easy to m...

Perfect Rice Every Time: The Ultimate Guide to Cooking Rice
Cooking TipsAs a self-proclaimed foodie, I've always been a bit obsessed with rice. It's the foundation of countless cuisi...

The Ultimate Guide to Cooking Asparagus: Tips, Techniques, and Recipes
Cooking TipsAsparagus. The mere mention of this spring delicacy conjures up images of vibrant green spears, crisp and burs...

Ultimate Guide to Cooking the Perfect Thanksgiving Turkey
Cooking TipsThanksgiving. Just the word conjures up images of overflowing tables laden with delicious food, the scent of r...