There’s something about a perfectly cooked steak that just screams indulgence. It’s a dish that feels special, whether you’re whipping it up for a romantic dinner for two or a family feast. But, let's be honest, we’ve all had those moments of disappointment with a dry, tough piece of meat that leaves you questioning your culinary skills. Don’t worry, you’re not alone! I’ve been there too, but over time, I’ve learned a thing or two about mastering the art of stovetop steak.
This guide is all about demystifying the process and giving you the confidence to create juicy, flavorful steak that will have your tastebuds singing. We’ll cover everything from picking the right cut to nailing that perfect sear, all the way to the resting technique that unlocks the secret to tender, juicy results. So, grab your trusty pan, gather your ingredients, and let’s embark on this culinary adventure together!
(Part 1) The Right Cut Makes All the Difference

It’s like building a house. You can’t expect a masterpiece without the right foundation. The same goes for a great steak. choosing the right cut is crucial to achieving that desired tenderness and flavor. Now, I’m not talking about fancy, expensive cuts here. We're talking about everyday steaks, readily available at your local butcher or supermarket, that we can elevate with a few simple tricks.
The Steak Lineup: My Go-To Cuts
Here are some of my personal favorites for stovetop cooking, each offering a unique flavor profile and texture:
- Rib-eye: This cut is a classic for a reason. It’s known for its generous marbling, which adds incredible flavor and keeps the steak incredibly juicy. It’s a bit pricier, but totally worth it for a special occasion or when you want to treat yourself. Imagine biting into a tender, melt-in-your-mouth steak with a rich, buttery flavor. That's the magic of the rib-eye.
- new york strip: This cut is a bit leaner than the rib-eye but still delivers fantastic flavor. It’s a great choice for grilling too, but it’s equally delicious when cooked on the stovetop. You'll find a firm texture with a slightly more pronounced beefy flavor than the rib-eye. It’s a great all-around cut.
- Sirloin: A versatile and budget-friendly option. It’s a lean cut, so it’s important to cook it properly to achieve that perfect tenderness. This is a great option for weeknight dinners. While it might not be as luxurious as the rib-eye, it still delivers satisfying flavor and a good texture when cooked correctly.
- flank steak: This cut is known for its intense flavor and lean profile. It's a great choice for stir-fries, fajitas, or even thinly sliced for a steak salad. It’s often grilled or pan-seared to create a tender, flavorful dish.
Remember, these are just suggestions. Don’t be afraid to experiment with other cuts! Just make sure you choose a steak that's about 1 inch thick. This ensures even cooking and helps retain the precious juices.
(Part 2) Prepping for Perfection: A Few Essential Steps
Before you even think about firing up the stove, there are a few crucial steps you need to take. These simple preparations make all the difference in achieving that beautiful crust and juicy interior.
1. Pat it Dry: The Key to a Crisp Sear
You might think this is a minor detail, but patting your steak dry with paper towels is essential. Any moisture on the surface can prevent that gorgeous, crispy sear we’re aiming for. You want that steak to sizzle beautifully when it hits the pan! Imagine the sound of that sizzle, a symphony of deliciousness.
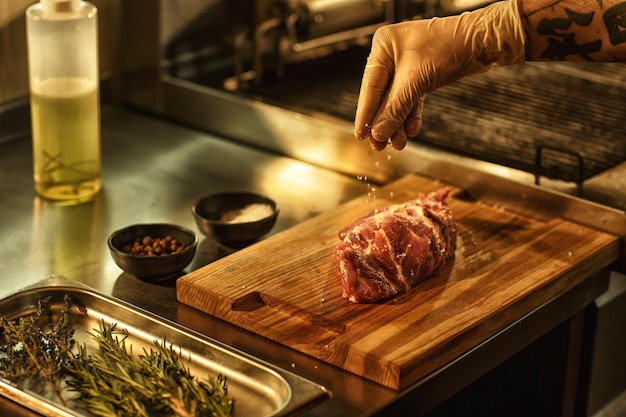
2. Seasoning: A Simple Yet Powerful Step
This is your chance to add your personal touch. I like to keep it simple with just salt and pepper. It’s a classic combination for a reason. But feel free to add your favourite herbs or spices! A pinch of garlic powder or onion powder adds a lovely depth of flavour. Even a sprinkle of paprika can add warmth and a touch of color.
Just remember to season generously, but not too much. You want the seasoning to enhance the steak, not overpower it. And try to season evenly on both sides, including the edges.
3. Let it Rest: Bringing the Steak to Room Temperature
This is a crucial step that many people overlook. Letting your steak rest at room temperature for about 30 minutes before cooking allows it to come to a more even temperature. This is key for ensuring that it cooks evenly, preventing the center from becoming cold while the outside is cooked.
Just make sure to keep your steak out of direct sunlight or heat, as this could cause it to spoil. You can even place a small plate over it to prevent it from drying out too much.
(Part 3) Stovetop Magic: Searing, Cooking, and Mastering the Heat
This is where the magic happens. The stovetop is your canvas, and we're about to transform that ordinary steak into a culinary masterpiece.
1. Choosing the Right Pan: A Foundation for Success
The pan you choose is key. You want one that heats evenly and retains heat well. Cast iron is my absolute favorite. It gets incredibly hot, which is ideal for creating that fantastic sear. A heavy-bottomed stainless steel pan also works great. But, avoid thin, non-stick pans. They won’t get hot enough for a proper sear.
2. Get Your Pan Screaming Hot: The Key to a Perfect Crust
This is crucial, my friends. You want your pan scorching hot. Heat it over medium-high heat for 5 to 7 minutes, or until it’s shimmering. If you’re unsure, put a drop of water in the pan; if it sizzles and evaporates immediately, you're ready to go.
3. Time for the Sear: A Symphony of Sizzling
With your pan hot and ready, it’s time to create that beautiful, flavorful crust. This is what transforms the steak from ordinary to extraordinary. Add your steak to the pan and cook for 2-3 minutes per side. Aim for a nice, dark brown crust with a crispy texture.
Resist the urge to move it around too much! Let it sit undisturbed so it can form a good crust. If you find that the steak is sticking, give it a gentle nudge, but don’t try to pry it loose. Once it’s released, it will move freely.
4. Reduce the Heat: Ensuring Even Cooking
After your initial sear, you want to reduce the heat to medium or even low. This is essential for cooking the steak evenly without burning the outside. Cover the pan with a lid to trap the heat and steam.
5. cooking time: Achieving Your Desired Doneness
The cooking time depends on the thickness of your steak and your desired level of doneness. Use a meat thermometer to check the internal temperature. Insert it into the thickest part of the steak to ensure accuracy.
| Doneness | Internal Temperature (°F) | Cooking Time (per side, after sear) |
|---|---|---|
| Rare | 125-130 | 2-3 minutes |
| Medium-Rare | 130-135 | 3-4 minutes |
| Medium | 140-145 | 4-5 minutes |
| Medium-Well | 150-155 | 5-6 minutes |
| Well-Done | 160 | 6 minutes |
Remember, steak continues to cook even after you remove it from the heat, a process called carryover cooking. So, take it off the stove a few degrees below your desired level of doneness.
(Part 4) The Rest is Golden: Unlocking Tenderness and Flavor
You’ve seared, cooked, and are ready to enjoy your masterpiece, right? Hold your horses! This is the part that many people rush, but it’s crucial for achieving ultimate tenderness and flavor. Let your steak rest for 5 to 10 minutes. This allows the juices to redistribute throughout the steak, resulting in a much more tender and flavorful outcome.
Transfer your steak to a cutting board and loosely cover it with foil. While you wait, this is a great time to prepare your sides. I like to keep things simple with a side of roasted vegetables, a salad, or even a bowl of mashed potatoes.
(Part 5) Slicing and Serving: The Grand Finale
After your steak has rested, it’s time to slice and serve. Using a sharp knife, slice your steak against the grain. This means slicing perpendicular to the muscle fibers. This will make the steak more tender and easier to chew.
Now, this is the moment we’ve all been waiting for. Serve your beautiful steak with your favorite sides and enjoy!
(Part 6) Tips and Tricks for Stovetop Steak Success
Here are a few extra tips and tricks that I’ve learned over the years. These little details can make a big difference in your steak-cooking journey.
1. Don’t Overcrowd the Pan: Giving Each Steak its Space
If you’re cooking multiple steaks, don’t overcrowd the pan. This will lower the temperature and prevent a proper sear. Cook them in batches if necessary.
2. Use a Meat Thermometer: Ensuring Precise Doneness
I can't stress this enough. A meat thermometer is the best way to ensure that your steak is cooked to your desired level of doneness. It takes the guesswork out of cooking.
3. Don’t Salt Too Early: Unlocking Flavor
Salt draws out moisture from the meat, which can make it tough. If you salt too early, you’re actually working against yourself. It’s best to salt your steak just before cooking. This allows the salt to penetrate the meat properly, enhancing the flavor without compromising tenderness.
4. Add a Bit of Butter: A Touch of Indulgence
In the last minute of cooking, add a pat of butter to the pan. As the butter melts, it will baste the steak, adding flavour and richness. The golden brown crust will take on a delightful sheen, adding a touch of luxury to your dish.
5. Experiment with Herbs and Spices: Your Personal Touch
Don't be afraid to experiment with different seasonings and marinades. There’s no right or wrong way to season your steak. Try different herbs, spices, and even sauces to create your signature steak experience.
(Part 7) Beyond the Basics: Elevate Your Steak Game
Now, let’s take things to the next level! We’ve mastered the basics, but there are some extra techniques that can elevate your steak game even further.
1. reverse searing: slow cooking for a tender steak
This technique involves cooking the steak slowly in the oven to achieve even doneness, then finishing it with a quick sear on the stovetop to create that beautiful crust. It's a great method for thicker steaks and ensures a juicy and tender result. Imagine a steak that is perfectly cooked throughout, with a succulent center and a gloriously crispy exterior. That's the beauty of reverse searing.
2. pan-seared steak with a Sauce: A Symphony of Flavor
This is where you can get creative. After you sear your steak, you can deglaze the pan with wine or stock to create a delicious sauce to drizzle over the top. This is my favorite way to add an extra layer of flavor to my steak. The sauce adds a touch of complexity and richness, taking your dish to the next level.
(Part 8) FAQs: Addressing Your steak cooking Questions
Let’s address some common questions you might have about cooking steak on the stovetop.
1. What’s the Best Way to Cook a Steak to Medium-Rare?
To cook a steak to medium-rare, you want to achieve an internal temperature of 130-135°F. This will result in a tender, juicy steak with a pink center. The ideal medium-rare steak is a perfect balance of tenderness, juiciness, and flavor.
2. How Do I Know When My Steak is Done?
The best way to determine doneness is with a meat thermometer. But if you don’t have one, you can use the “finger test.” Press the center of the steak. If it feels firm and springs back slightly, it’s medium-rare. It's a little less precise but can be helpful in a pinch.
3. How Do I Avoid Overcooking My Steak?
Overcooking is a common mistake, but you can avoid it by using a meat thermometer and watching the cooking time carefully. Remember that the steak will continue to cook after you remove it from the heat, so take it off the stove a few degrees below your desired level of doneness.
4. Can I Cook a Steak in a Non-Stick Pan?
While you can technically cook a steak in a non-stick pan, it won’t get hot enough for a proper sear. This will result in a steak that’s not as flavorful and crispy.
5. What’s the Best Way to Reheat Leftover Steak?
Reheating steak is best done in the oven. Preheat your oven to 350°F and bake the steak for 10-15 minutes. This will reheat the steak evenly without drying it out.
(Part 9) Final Thoughts: Embrace the Journey
So there you have it, folks! You've got all the tools and knowledge to create the perfect stovetop steak. Don't be afraid to experiment and find your own signature method. Most importantly, have fun and enjoy the journey!
Now, go out there and impress your friends and family with your culinary skills. You've got this!
Everyone is watching

Prime Rib Roast Cooking Time Chart: Per Pound Guide
Cooking TipsPrime rib roast. Just the name conjures images of lavish dinners, crackling fires, and hearty laughter. It’s ...

How Long to Bake Potatoes in the Oven (Perfect Every Time)
Cooking TipsBaked potatoes are a staple in my kitchen. They're incredibly versatile, delicious, and surprisingly easy to m...

Perfect Rice Every Time: The Ultimate Guide to Cooking Rice
Cooking TipsAs a self-proclaimed foodie, I've always been a bit obsessed with rice. It's the foundation of countless cuisi...

The Ultimate Guide to Cooking Asparagus: Tips, Techniques, and Recipes
Cooking TipsAsparagus. The mere mention of this spring delicacy conjures up images of vibrant green spears, crisp and burs...

Ultimate Guide to Cooking the Perfect Thanksgiving Turkey
Cooking TipsThanksgiving. Just the word conjures up images of overflowing tables laden with delicious food, the scent of r...