Pierogi, those delightful little dumplings filled with savoury goodness, have always held a special place in my heart. There's a certain magic to them, a comforting warmth that comes from the pillowy dough, the rich, flavourful fillings, and the simple joy of a steaming plate of these little parcels of deliciousness. For years, I was content with the frozen ones from the supermarket, those perfectly acceptable but somewhat lacking in that homemade magic. Then, one day, I decided to take the plunge and make my own. And let me tell you, it was a revelation! It's a bit more effort, sure, but the taste and satisfaction of making them from scratch are absolutely worth it.
So, if you're looking to try something new in the kitchen or simply want to level up your pierogi game, I'm here to share my secret recipe. I'll guide you through every step, from the perfect dough to the most delicious fillings. You'll be surprised at how easy it is, and the results are simply divine. Trust me, once you've tasted homemade pierogi, you'll never go back.
Part 1: The Dough: The Foundation of a Perfect Pierogi
The dough is the foundation of a great pierogi, so it’s crucial to get it right. A good pierogi dough should be pliable but not sticky, yielding enough to roll out easily but firm enough to hold its shape. And, let's be honest, who doesn't love the satisfying sound of rolling out dough? It's like a little symphony of kitchen magic, a gentle rhythmic sound that signals the start of something delicious.
1.1 The Ingredients: The Building Blocks of a Wonderful Dough
Here's what you'll need to create that perfect, pliable dough:
- 2 cups all-purpose flour: This is the base of our dough, providing the structure and texture.
- 1 teaspoon salt: A pinch of salt enhances the flavour and balances the sweetness of the filling.
- 1 egg: The egg adds richness and helps bind the dough together, giving it that lovely elasticity.
- 1 cup warm water: The warm water activates the gluten in the flour, making the dough pliable and easy to work with.
1.2 The Process: Bringing the Dough to Life
Time to get your hands dirty! Here's how to create the dough that will hold all those delicious fillings:
- Combine the dry ingredients: In a large bowl, whisk together the flour and salt. This ensures that the salt is evenly distributed throughout the dough.
- Make a well: Create a well in the centre of the flour mixture. This is where you'll add the wet ingredients.
- Add the wet ingredients: Crack the egg into the well and add the warm water.
- Initial mixing: Using a spoon, gently mix the wet and dry ingredients together until they start to combine. You'll be forming a shaggy dough at this point.
- Kneading time: Turn the dough out onto a lightly floured surface. Here's where the real magic happens. Knead the dough for about 5-7 minutes, until it becomes smooth and elastic. You'll notice it become more pliable and less sticky as you knead. The gluten in the flour is developing, giving the dough its strength and structure.
- Rest time: Once the dough is smooth and elastic, form it into a ball and wrap it in plastic wrap. Let it rest for at least 30 minutes at room temperature. This allows the gluten to relax, making the dough even more pliable and easier to roll out. This step is crucial for ensuring a smooth and even dough.
1.3 Tips and Tricks: Mastering the Dough
Over the years, I've picked up a few tricks to ensure perfect dough every time. These little details make a big difference:
- Don't overwork the dough: You want it to be smooth and elastic, but kneading too long will make it tough and rubbery. Aim for that perfect balance of strength and pliability.
- Adjusting for consistency: If the dough is too sticky, add a little more flour, a tablespoon at a time. If it's too dry, add a little more water, a teaspoon at a time. You're looking for a dough that is neither sticky nor dry, but just right, like Goldilocks and her porridge.
- Patience is key: Let the dough rest for at least 30 minutes. This allows the gluten to relax, making the dough more pliable and easier to roll out. Patience is a virtue in the kitchen, and in this case, it will lead to a more delicious result.
Part 2: The Filling: The Heart and Soul of the Pierogi
The filling is the heart and soul of your pierogi. This is where you can truly express your culinary creativity. It's like a blank canvas, waiting for you to paint your flavours and textures. I've experimented with a variety of fillings over the years, and here are a few favourites that are sure to impress your taste buds and leave you craving more.
2.1 The Classics: Tried and True Flavours
Sometimes you just want those classic flavours that never disappoint. Here are a few traditional fillings that are sure to satisfy:
- Potato and Cheese: This is a classic for a reason. It's simple, comforting, and always satisfying. Imagine the creamy potato, the sharpness of the cheese, all enveloped in that pillowy dough. I like to add some sautéed onions for extra flavour, adding a touch of sweetness and a hint of caramelisation.
- Sauerkraut and Mushrooms: A tangy and earthy filling that pairs well with the rich dough. The sauerkraut brings a welcome acidity, while the mushrooms add a depth of flavour. Sautéed onions and garlic are essential here, adding their own unique aromas and flavours to the mix.
- Cheese and Spinach: A light and flavourful option that's perfect for vegetarians. Imagine the creamy ricotta cheese, the earthy spinach, all blended together and enveloped in the dough. Add some chopped garlic for extra richness, bringing a touch of warmth and complexity to this classic combination.
2.2 Getting Creative: Taking Pierogi Fillings to the Next Level
If you're feeling adventurous, try these unique fillings that go beyond the traditional:
- Mushroom and wild rice: This filling is hearty and earthy, perfect for a satisfying meal. The earthy mushrooms and nutty wild rice create a symphony of textures and flavours. I add a touch of dried cranberries for a hint of sweetness, bringing a delightful contrast to the earthy base.
- Apricot and Almond: A sweet and nutty filling that's surprisingly delicious. Imagine the juicy apricot, the crunchy almond, all combined in a sweet and savoury harmony. I like to use fresh apricots for their vibrant flavour and toasted almonds for that extra crunch, enhancing the flavour profile with a hint of smoky sweetness.
- Beef and Cabbage: This filling is reminiscent of a hearty stew, and it's perfect for a wintery meal. The ground beef adds richness, while the sautéed cabbage brings a touch of sweetness and a pleasing texture. I use a splash of beef broth for extra flavour, adding a depth of umami that will have you coming back for more.
2.3 Making the Filling: Transforming Ingredients into Deliciousness
Once you've chosen your filling, it's time to prepare it. The exact instructions will vary depending on the filling you've chosen, but here are some general tips to make sure your filling is perfect:
- Sauté your vegetables: Sauté your vegetables until they are tender and slightly caramelized. This adds depth of flavour to your filling. The caramelized onions and garlic add a touch of sweetness and a complex depth of flavour.
- Season generously: Don't be afraid to add salt, pepper, and other spices to taste. The spices awaken the flavours of the ingredients, creating a harmonious blend of aromas and tastes.
- Let it cool: Let your filling cool completely before assembling the pierogi. This will make it easier to work with and prevent the dough from becoming soggy. The heat from the filling can soften the dough, making it difficult to work with. Allowing it to cool ensures a smooth assembly process.
Part 3: Assembling the Pierogi: Creating Little Parcels of Goodness
This is the fun part, where you get to shape your little parcels of deliciousness. It's a bit like a culinary origami, folding and shaping the dough to contain the delicious filling.
3.1 The Preparation: Gathering the Tools
Here's what you'll need to assemble your pierogi with precision and ease:
- Rolling pin: The rolling pin is your tool for transforming the dough into thin, pliable circles.
- Round cookie cutter: A round cookie cutter (approximately 3-4 inches in diameter) will help you cut out perfectly shaped circles of dough, ensuring even and beautiful pierogi.
- Large bowl of water: You'll need a large bowl of water for sealing the pierogi. The water acts as an adhesive, sealing the edges of the dough and preventing the filling from escaping.
- Large pot of boiling water: This is where the magic happens. You'll need a large pot of boiling water for cooking the pierogi, transforming them from raw dough to fluffy, delicious dumplings.
3.2 The Steps: Assembling the Pierogi
Here's how to assemble your pierogi, transforming your dough and filling into beautiful and delicious dumplings:
- Divide the dough: Divide the dough into 8 equal pieces. This will give you a manageable amount of dough to work with.
- Roll out the dough: On a lightly floured surface, roll out each piece of dough into a thin circle, about 1/8 inch thick. You want the dough to be thin enough to be translucent but strong enough to hold its shape.
- Cut out circles: Using your round cookie cutter, cut out circles of dough. These will be the bases for your pierogi.
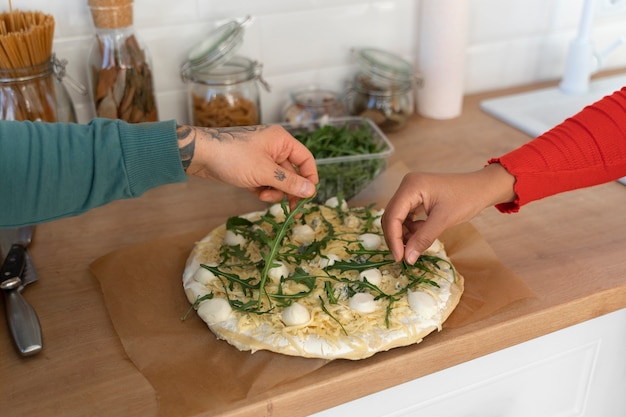
- Fill the circles: Place a spoonful of filling in the centre of each circle of dough. Don't overfill the pierogi. Too much filling will make them difficult to seal and could burst open during cooking.
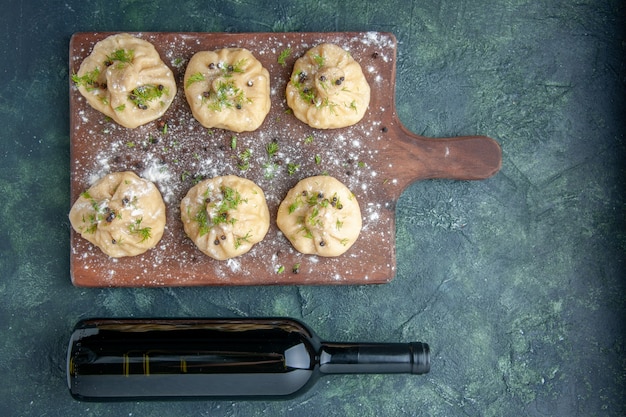
- Fold and seal: Fold the dough in half, forming a half-moon shape. Press the edges together to seal. You can use your fingers or the edge of a fork to press the edges together.
- Create a decorative seal: To make a more decorative and secure seal, use a fork to crimp the edges. This not only adds a decorative touch but also ensures a secure seal, preventing the filling from escaping during cooking.
- Repeat: Repeat with the remaining dough and filling until you have a beautiful pile of pierogi ready for cooking.
3.3 A Little Extra: Tips and Tricks
Here are a few extra things to keep in mind to ensure successful and beautiful pierogi:
- Avoid overfilling: Don't overfill your pierogi. Too much filling will make them difficult to seal and could burst open during cooking. Aim for a generous spoonful of filling, leaving enough room for the dough to fold and seal properly.
- Keep it moving: If the dough is sticking to your rolling pin or cookie cutter, sprinkle a little flour on them. This will help prevent sticking and ensure smooth rolling and cutting.
- A little moisture goes a long way: If you find that the dough is becoming too dry while you're assembling the pierogi, lightly mist it with water. This will help the dough remain pliable and prevent it from cracking.
Part 4: Cooking the Pierogi: Transforming Dough into Deliciousness
Now comes the moment of truth! Time to cook those beauties and see all your hard work come together. It's like watching a culinary transformation unfold, as the pierogi cook and become fluffy, delicious dumplings.
4.1 The Process: Cooking the Pierogi to Perfection
Here's how to cook your pierogi, transforming them from raw dough to fluffy, delicious dumplings:
- Boiling water is key: Bring a large pot of salted water to a rolling boil. The salt adds flavour to the pierogi and helps them cook evenly.
- Gently add the pierogi: Carefully drop the pierogi into the boiling water, a few at a time. Be sure to give them a little space so they don't stick together.
- Simmer and cook: Reduce the heat to a gentle simmer and cook for about 5-7 minutes, or until the pierogi float to the surface. This means they're cooked through and ready to be enjoyed.
- Remove and drain: Using a slotted spoon, carefully remove the pierogi from the pot and drain them on a wire rack or paper towels. This will allow the excess water to drain, preventing them from becoming soggy.
4.2 The Options: Serving Your Pierogi
You can serve your pierogi immediately or refrigerate them for later. Here are a few options for serving them, each adding a unique texture and flavour to the experience:
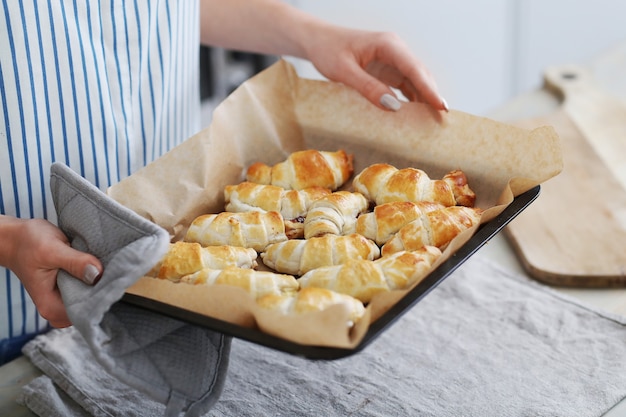
- Pan-fried: Heat some butter or oil in a large skillet over medium heat. Add the cooked pierogi and cook for about 2-3 minutes per side, until golden brown and crispy. The pan-frying gives the pierogi a beautiful golden crust and a satisfying crunch.
- Baked: Preheat your oven to 350°F (175°C). Place the cooked pierogi on a baking sheet lined with parchment paper. Brush them with melted butter or oil and bake for about 15-20 minutes, or until heated through and slightly crispy. Baking adds a touch of warmth and a slightly crispier texture.
Part 5: The Finishing Touches: Elevating Pierogi to New Heights
Your pierogi are almost ready to be devoured! Now it's time to add those final touches that will elevate them from good to extraordinary. These finishing touches are like the final brushstrokes of a masterpiece, adding depth and dimension to the culinary experience.
5.1 The Sauces: A Symphony of Flavours
Here are a few classic and delicious sauces that pair perfectly with pierogi, each adding a unique element of flavour and texture:
- Sour Cream: A classic and simple choice that adds a tangy and creamy element. It brings a refreshing acidity that balances the richness of the filling.
- Fried Onions: A simple yet delicious topping that adds a touch of sweetness and crunch. The fried onions add a delightful contrast in texture and a hint of caramelized sweetness.
- Caramelized Onions: A more complex topping that adds a depth of flavour. The caramelized onions bring a depth of sweetness and a complex, savory flavour that elevates the dish.
- Butter: A simple yet effective way to add richness and flavour. The butter adds a smooth, creamy texture and a hint of richness, enhancing the overall taste.
- Bacon Bits: A salty and smoky topping that adds a satisfying crunch. The bacon bits add a salty and smoky element, bringing a delightful contrast to the sweetness and richness of the pierogi.
5.2 The Sides: Complementary Delights
Here are a few side dishes that complement your pierogi perfectly, adding a touch of freshness and balance to the meal:
- Green Salad: A refreshing and light side dish that balances the richness of the pierogi. The crispness of the salad provides a refreshing contrast to the richness of the pierogi.
- Sauerkraut: A traditional accompaniment that adds a tangy and flavorful element. The sauerkraut brings a tangy, fermented flavour that pairs well with the richness of the pierogi.
- mashed potatoes: A comforting and satisfying side dish that pairs well with any filling. The creamy mashed potatoes provide a comforting and satisfying base for the pierogi.
- Pickled Vegetables: A colourful and tangy addition that adds a burst of flavour. The pickled vegetables bring a vibrant burst of colour and tangy flavour that adds a delightful complexity to the meal.
Part 6: Enjoy! Savor Your Culinary Achievement
And there you have it! Your homemade pierogi are ready to be enjoyed. Take a moment to appreciate your culinary achievement, and savour the deliciousness of your creation. You've worked hard, and now it's time to relax and enjoy the fruits of your labour.
Part 7: Variations and Experimentation: Taking Pierogi to New Horizons
This recipe is just a starting point. Once you've mastered the basics, feel free to experiment with different fillings, sauces, and sides. The possibilities are endless!
7.1 Filling Ideas: Exploring a World of Flavours
- Sweet Fillings: Try fillings like blueberry, strawberry, or apple for a sweet treat. The sweet fillings will transform the pierogi into delightful desserts.
- Spicy Fillings: Add some chili flakes or hot sauce to your fillings for a spicy kick. The spicy fillings will bring a touch of heat to your pierogi, adding an exciting dimension to the flavour profile.
- Vegetarian Fillings: Explore different types of vegetables, cheeses, and grains for vegetarian options. The vegetarian fillings are a great way to create delicious and satisfying pierogi without using meat.
7.2 Sauce Ideas: A Spectrum of Flavors
- Tomato Sauce: A simple and flavorful sauce that pairs well with savory fillings. The tomato sauce brings a bright, tangy flavour that complements the savoury fillings.
- Mushroom Sauce: A rich and earthy sauce that complements vegetarian and meaty fillings. The mushroom sauce adds a rich, earthy flavour that pairs well with both vegetarian and meaty fillings.
- Creamy Pesto Sauce: A vibrant and aromatic sauce that adds a burst of flavour. The pesto sauce brings a fresh, vibrant flavour that adds a burst of aromatic complexity to the dish.
7.3 Side Dish Ideas: Complementary Delights
- Roasted Vegetables: A healthy and flavorful option that adds a touch of colour and crunch. The roasted vegetables bring a touch of sweetness, a hint of char, and a delightful crunch that complements the pierogi.
- Steamed Vegetables: A simple and healthy option that complements any filling. The steamed vegetables provide a light and refreshing contrast to the richness of the pierogi.
- fruit salad: A refreshing and light side dish that balances the richness of the pierogi. The fruit salad brings a refreshing burst of sweetness and colour, providing a delightful balance to the rich and savory pierogi.
Part 8: FAQs: Addressing Common Questions
8.1 What if the dough is too sticky?
If the dough is too sticky, add a little more flour, a tablespoon at a time, until it becomes more manageable. Just be careful not to add too much flour, as this can make the dough dry and difficult to work with. You want to find that perfect balance of moisture and pliability.
8.2 What if the dough is too dry?
If the dough is too dry, add a little more water, a teaspoon at a time, until it becomes more pliable. Again, be careful not to add too much water, as this can make the dough sticky. You want to achieve that smooth, elastic texture that's easy to work with.
8.3 What if the pierogi are sticking together while cooking?
To prevent the pierogi from sticking together while cooking, make sure there is enough space between them in the pot. You can also add a little oil or butter to the pot of boiling water. The oil or butter will create a barrier between the pierogi, preventing them from sticking together.
8.4 What can I do with leftover pierogi?
Leftover pierogi can be stored in the refrigerator for up to 3 days. They can be reheated in the microwave, oven, or pan-fried. The microwave is the quickest option, while the oven and pan-frying methods will give you a crispier texture.
8.5 How can I freeze pierogi?
To freeze pierogi, place them on a baking sheet lined with parchment paper and freeze until solid. Once frozen, transfer them to a freezer-safe bag or container. Frozen pierogi can be cooked directly from frozen. This allows you to prepare a batch of pierogi in advance and enjoy them whenever you like.
Now, go forth and create your own pierogi masterpieces. Remember, it's about the journey, the satisfaction of creating something delicious from scratch, and the joy of sharing your creations with loved ones.
Everyone is watching

Prime Rib Roast Cooking Time Chart: Per Pound Guide
Cooking TipsPrime rib roast. Just the name conjures images of lavish dinners, crackling fires, and hearty laughter. It’s ...

How Long to Bake Potatoes in the Oven (Perfect Every Time)
Cooking TipsBaked potatoes are a staple in my kitchen. They're incredibly versatile, delicious, and surprisingly easy to m...

Perfect Rice Every Time: The Ultimate Guide to Cooking Rice
Cooking TipsAs a self-proclaimed foodie, I've always been a bit obsessed with rice. It's the foundation of countless cuisi...

The Ultimate Guide to Cooking Asparagus: Tips, Techniques, and Recipes
Cooking TipsAsparagus. The mere mention of this spring delicacy conjures up images of vibrant green spears, crisp and burs...

Ultimate Guide to Cooking the Perfect Thanksgiving Turkey
Cooking TipsThanksgiving. Just the word conjures up images of overflowing tables laden with delicious food, the scent of r...