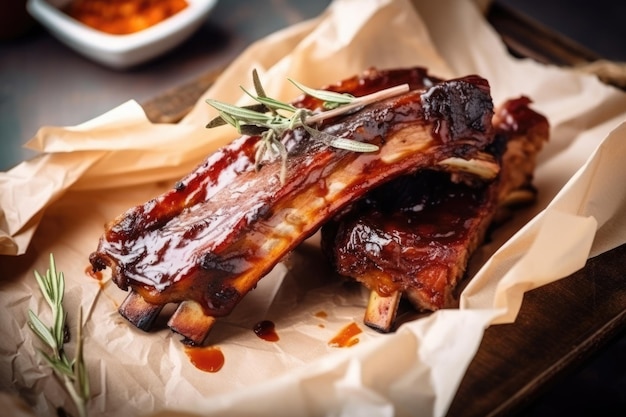
Let’s talk ribs, folks! I'm not talking about those dry, tough, disappointing ribs you might find at a pub. I’m talking about melt-in-your-mouth, fall-off-the-bone ribs that make you want to lick the plate clean. The kind of ribs that leave you wondering if you’ve ever actually tasted ribs before. The secret to achieving this rib nirvana isn't some fancy recipe or expensive ingredient – it's all about nailing the cooking time.
For years, I've been on a bit of a rib quest. I’ve tried all sorts of methods, from slow cooking to grilling, but nothing quite compares to the magic of the oven. And the key to the oven method, you ask? It's all about the cooking time. So, buckle up, my fellow rib enthusiasts, because we're about to delve into the world of oven-baked ribs and discover the perfect recipe for tender, juicy ribs that'll leave you absolutely smitten.
Part 1: Choosing the Right Ribs

First things first, you need to pick the right ribs. Now, I'm a big fan of baby back ribs for their tender meat and good amount of fat. They're often the preferred choice for those who want a more manageable size. But spare ribs are also fantastic, especially for those who prefer a meatier rib. It's really a matter of personal preference. But whichever you choose, make sure they’re fresh and have a good amount of marbling for flavor and tenderness. You want to see those streaks of fat running through the meat – they’re what make the ribs juicy and flavorful.
What to Look for in Your Ribs
- Freshness: You want your ribs to be firm, with a slightly pink colour. Avoid ribs that are discoloured or have a slimy texture. These are signs that the ribs aren't as fresh as they should be.
- Marbling: Look for ribs that have a good amount of marbling, which is the fat that runs through the meat. Marbling adds flavour and helps to keep the ribs juicy and tender. The more marbling, the more flavorful and moist your ribs will be.
- Thickness: The thickness of the ribs will affect the cooking time. For baby back ribs, a thickness of 1.5 to 2 inches is ideal. Spare ribs tend to be thicker, so you'll need to adjust the cooking time accordingly.
Buying ribs can feel a bit like a gamble, I won’t lie. You’re essentially investing in a large slab of meat that you’re hoping will turn out delicious. But trust me, with the right cooking technique, you can transform even the most unassuming ribs into a feast.
Part 2: Preparing the Ribs

Once you’ve got your ribs, it’s time to prep them for the oven. This part is all about getting that gorgeous, crispy bark and ensuring those ribs are perfectly seasoned. So, grab your knife, a little bit of salt and pepper, and maybe a few other spices, and let’s get started.
Removing the Membrane
This is the most important step, and one that many people skip, which is a huge mistake! That thin membrane on the back of the rib rack is tough and rubbery. It'll prevent the rub from penetrating the meat properly and will make your ribs chewy. The good news is it's easy to remove. Grab a paper towel and slide it under the membrane, then use your knife to loosen it. Once it's loosened, you can simply peel it off. You’ll feel like a real rib-master after that, I promise!
Seasoning with Rubs
Now, the fun part! I’ve tried so many different spice rubs over the years, and it’s really a matter of personal preference. Some people like a simple salt and pepper rub, while others go all out with paprika, garlic powder, onion powder, chili powder, and even brown sugar. I personally love a rub with a little bit of sweetness and heat. It brings out the best in the ribs and gives them a beautiful color.
Here's a classic rib rub recipe:
| Ingredient | Quantity |
|---|---|
| Salt | 2 tablespoons |
| Black pepper | 1 tablespoon |
| Paprika | 1 tablespoon |
| Garlic powder | 1 tablespoon |
| Onion powder | 1 tablespoon |
| Brown sugar | 1 tablespoon |
| Chili powder | 1 teaspoon |
Just rub that mixture all over your ribs, making sure to get it into every nook and cranny. You want that rub to be really well-incorporated. Then, you can let those ribs sit in the fridge for at least an hour, or even overnight. This will help the flavors penetrate the meat, and you’ll be rewarded with a taste sensation.
Part 3: The Oven-Baked Ribs Method

Alright, it’s showtime! Now we're going to get those ribs into the oven and let them work their magic. I’ve tried all sorts of different temperatures and times, and what I’ve learned is that low and slow is the way to go for tender, juicy ribs. You want to cook them at a low temperature for a long period of time to allow the fat to render out and the connective tissues to break down. This creates that melt-in-your-mouth texture we’re all after.
The Magic of Low and Slow
I’ve found that cooking ribs at 250 degrees Fahrenheit for 3-4 hours is the sweet spot. Now, I know that might sound like a long time, but trust me, the wait is worth it. Those ribs will be so tender and flavorful, you’ll be wondering why you ever cooked them any other way.
Wrapping for Tenderness
Here’s where it gets interesting. After about 2 hours of cooking, you’ll want to wrap those ribs in foil. This is a crucial step because it helps to trap the steam and moisture, leading to ultra-tender ribs. I like to use a mixture of apple cider vinegar and water to create a flavorful steam bath. It helps to break down the tough connective tissues and makes those ribs unbelievably tender. This is where the magic truly happens!
Unwrapping for Crispiness
After another hour or so, take the ribs out of the oven and unwrap them. You're ready for the final stage, which is all about achieving that perfect, crispy bark. Crank up the oven to 400 degrees Fahrenheit and let those ribs bake uncovered for another 30 minutes to an hour, until they’re nice and crispy. This will give them that irresistible texture that everyone loves.
Checking for Doneness
Now, you’re probably wondering how you know when those ribs are done. Well, the best way to check is by using a meat thermometer. You want to make sure the internal temperature of the ribs reaches at least 190 degrees Fahrenheit. They should be fall-off-the-bone tender at this point.
And you know what, if you’re still not convinced, just try to pull a rib off the bone. If it comes off easily, then you’re good to go. But if it’s still clinging to the bone, give it a little bit more time in the oven.
Part 4: Sauce It Up!
Okay, we’re in the home stretch now! You've got your ribs all cooked, tender, and juicy, and they’re practically begging for a sauce. This is the moment to put your finishing touches on your rib masterpiece.
The Power of the Sauce
There are so many different sauces out there, and the possibilities are endless! You can go for a classic bbq sauce, a sweet and smoky sauce, a spicy sauce, or even a tangy vinegar-based sauce. It’s really up to you! I like to use a homemade sauce that’s a combination of ketchup, brown sugar, apple cider vinegar, and Worcestershire sauce. But you can definitely find a sauce that suits your taste buds.
How to Apply the Sauce
Now, you can apply the sauce in a few different ways. You can brush it on the ribs during the last 30 minutes of cooking, or you can simply serve it on the side and let your guests choose how much they want.
Personally, I like to glaze the ribs with sauce during the last 15 minutes of cooking. It creates a beautiful, sticky glaze that really makes those ribs shine. It’s also a good way to prevent the sauce from burning because it’s only on the ribs for a short period of time.
Part 5: Ribs for Every Occasion
You know what? Ribs aren’t just for special occasions. They can be a part of your everyday life! And I’m not talking about those dry, tough ribs from the supermarket. I’m talking about those melt-in-your-mouth, fall-off-the-bone ribs you can make at home, with the right technique and a little bit of love. So go ahead, unleash your inner rib master and try this recipe. I promise you won't regret it.
Ribs for Dinner
Ribs are a perfect weeknight meal. Just pop them in the oven and let them cook while you relax with a glass of wine. They're also great for entertaining guests. Think of all the happy faces you’ll see when you bring out a plate of these incredible ribs! There’s nothing like a good rib dinner to bring people together.
Ribs for a Picnic
Now, I’m not going to lie, ribs can be a bit messy, but that’s all part of the fun! They’re also a perfect picnic food. Just wrap them up in foil and take them to the park. They’re a crowd-pleaser, and they’ll certainly make your picnic a memorable one.
Ribs for Game Day
What’s a game day without a plate of ribs? They’re the perfect game-day food, and they’ll definitely keep everyone happy while you watch the big game. Just make sure you have enough for everyone!
Part 6: Tips for Rib Perfection
Alright, let’s talk tips! Now that you've got the basics down, here are a few extra things to keep in mind that will elevate your rib game to the next level.
Use a Meat Thermometer
I can’t stress this enough. It’s the best way to ensure that your ribs are cooked through and safe to eat. If you don’t have a meat thermometer, get one! It’s one of the best investments you can make in your kitchen.
Don’t Overcook the Ribs
Yes, you want those ribs to be tender, but you don’t want to overcook them. Overcooked ribs will be dry and tough. So, keep a close eye on them and take them out of the oven when they reach the desired internal temperature.
Let the Ribs Rest
Once the ribs are out of the oven, let them rest for at least 15 minutes before slicing and serving. This will allow the juices to redistribute, resulting in even more tender and flavorful ribs. Think of it as a little extra time to develop that incredible tenderness.
Experiment with Different Flavors
Don’t be afraid to experiment with different rubs and sauces. It’s part of the fun of cooking ribs! You can try adding different herbs, spices, or even fruits to your rubs. The possibilities are endless!
Part 7: FAQs
What if my ribs are too dry?
If your ribs are too dry, it’s likely because they were overcooked. Try adding a little bit of moisture to the ribs by wrapping them in foil with some apple cider vinegar and water, and then cooking them for another 30 minutes. This will help to rehydrate the ribs and make them more tender.
What if my ribs are too tough?
If your ribs are too tough, it’s likely because they weren’t cooked long enough. Try cooking them for another hour or two at a low temperature. You can also use a meat mallet to tenderize the ribs before cooking. This is a great technique for breaking down those tough fibers, but it's important to be careful not to make them too thin.
Can I cook ribs in a slow cooker?
Absolutely! Slow cookers are great for ribs. Simply follow the same instructions as for oven-baked ribs, but cook them on low for 6-8 hours. The slow cooker will provide that low and slow environment that's perfect for tenderizing ribs.
What can I serve with ribs?
Ribs are delicious with a variety of sides, including baked beans, coleslaw, potato salad, and cornbread. You can also serve them with a simple green salad or a side of vegetables.
Can I make ribs ahead of time?
Yes, you can definitely make ribs ahead of time. Simply cook them according to the instructions, then let them cool completely. You can then store them in the refrigerator for up to 3 days. When you're ready to serve, reheat them in the oven at 350 degrees fahrenheit for about 30 minutes. This is a great time-saving tip for busy weeknights or weekend entertaining.
Part 8: The Final Word
And there you have it! My ultimate guide to making perfect oven-baked ribs. Now, I know it might seem like a lot of work, but I promise you, it’s worth it. You'll be rewarded with the most tender, juicy, flavorful ribs you've ever tasted. So, gather your ingredients, get your oven preheated, and get ready for a rib-tastic experience. You can thank me later!
Everyone is watching

Prime Rib Roast Cooking Time Chart: Per Pound Guide
Cooking TipsPrime rib roast. Just the name conjures images of lavish dinners, crackling fires, and hearty laughter. It’s ...

How Long to Bake Potatoes in the Oven (Perfect Every Time)
Cooking TipsBaked potatoes are a staple in my kitchen. They're incredibly versatile, delicious, and surprisingly easy to m...

Perfect Rice Every Time: The Ultimate Guide to Cooking Rice
Cooking TipsAs a self-proclaimed foodie, I've always been a bit obsessed with rice. It's the foundation of countless cuisi...

The Ultimate Guide to Cooking Asparagus: Tips, Techniques, and Recipes
Cooking TipsAsparagus. The mere mention of this spring delicacy conjures up images of vibrant green spears, crisp and burs...

Ultimate Guide to Cooking the Perfect Thanksgiving Turkey
Cooking TipsThanksgiving. Just the word conjures up images of overflowing tables laden with delicious food, the scent of r...
