You’ve got the game on, the mates are coming over, and you’re ready to fire up the grill. But hold on, mate! What about the star of the show? Those delicious, crispy chicken wings that are guaranteed to disappear in a flash.
Getting those wings perfectly cooked is the real key to a successful wing party. We're talking crispy on the outside, juicy on the inside, and bursting with flavour – those are the wings that keep everyone coming back for more.
I’ve been baking chicken wings for years now, testing out different techniques and timings. I've had my fair share of dry, rubbery wings (a culinary crime, I tell you!), but I've also created wings so good they've had my mates begging for seconds.
So, let's dive into the world of oven-baked chicken wings and uncover the secrets to achieving that perfect cooking time. I’m going to share some of my hard-earned wisdom with you, along with some handy tips and tricks I’ve picked up along the way. Get ready, because we’re going to wing it!
(Part 1) Understanding the Anatomy of a Chicken Wing

Dissecting the Wing: Drumette, Wingette, and Tip
Before we get into the nitty-gritty of cooking, let's take a closer look at the structure of a chicken wing. It’s actually pretty simple, mate. You've got the drumette (that thick, drumstick-like part), the wingette (the middle section), and the tip (the small, pointed end).
Now, you can cook the whole wing, but for the best results, I recommend separating them into drumettes and wingettes. Why? Because each part cooks at a slightly different rate.
Why Separate the Parts? Even Cooking and Preventing Dryness
Drumettes are the meatiest, taking a bit longer to cook through. Wingettes, on the other hand, are smaller and cook faster. By separating them, you can ensure even cooking and prevent the wingettes from becoming overcooked and dry.
Beyond Parts: The Importance of Size and Thickness
Another important factor to consider is the size and thickness of the wings. Those small, skinny wings will cook much faster than those big, plump ones. So, keep that in mind when setting your oven temperature and cooking time.
Don't worry, we'll be getting into the specifics later on. For now, just remember that understanding the anatomy of a chicken wing is the first step towards wing perfection.
(Part 2) Finding the Ideal Oven Temperature
The Goldilocks Principle: Not Too Hot, Not Too Cold
Oven temperature is crucial. Too low, and your wings will take forever to cook and might not get crispy. Too high, and you risk burning them before they're cooked through. It's all about finding that "just right" temperature.
The 400-degree Fahrenheit (200-degree Celsius) Sweet Spot
My go-to temperature for baking chicken wings is 400 degrees Fahrenheit (200 degrees Celsius). This temperature is a great starting point for most wings, allowing for a crispy exterior and juicy interior.
Adjusting the Temperature Based on Size
Remember what we talked about with size and thickness? For those extra-large wings, I’ll bump the temperature up a bit to 425 degrees Fahrenheit (220 degrees Celsius). And for smaller, skinnier wings, I’ll drop it down to 375 degrees Fahrenheit (190 degrees Celsius).
Preheating: The Essential First Step
Preheating your oven is a non-negotiable, mate. It's absolutely crucial. Preheating ensures that the oven reaches the desired temperature before the wings go in, leading to a more even cook. I usually give my oven about 10-15 minutes to heat up.
(Part 3) The Art of Seasoning: Bringing Out the Flavour
Seasoning Your Wings: More than Just Salt and Pepper
Seasoning is where the real magic happens, mate. It's about adding those delicious flavours that elevate your wings to the next level. There are endless possibilities when it comes to seasoning, but here are some of my favourites.
Simple and Classic: Salt, Pepper, and Garlic Powder
Let's start with the basics: salt, pepper, and garlic powder. This simple trio works wonders on chicken wings, adding depth and flavour without being overpowering. Just a sprinkle of each, and you're good to go. I like to use a combination of coarse salt and fine salt for that extra crunch.
Spice It Up: Paprika, Chilli Powder, and Cayenne
For those who like a bit of heat, add some paprika, chilli powder, and cayenne pepper. These spices will give your wings a kick, but don't go overboard. Start with a small amount and adjust to your taste. You can also use smoked paprika for a smoky, earthy flavour.
The Power of Herbs: Rosemary, Thyme, and Oregano
Herbs add a touch of freshness and complexity to your seasoning. I love using rosemary, thyme, and oregano, especially for a Mediterranean-inspired twist. You can use fresh or dried herbs, but I find fresh ones give a more vibrant flavour.
Beyond the Basics: Onion Powder, Celery Salt, and Lemon Pepper
There are endless other seasonings you can experiment with. Onion powder, celery salt, and lemon pepper are great options for adding more depth and complexity to your wings. Don't be afraid to get creative and try new things!
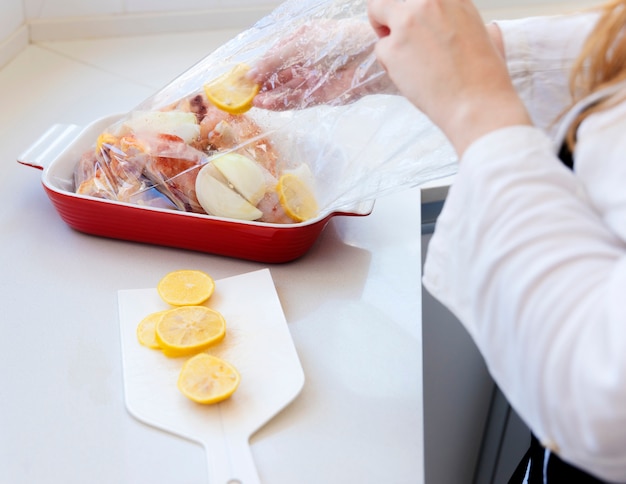
(Part 4) Prepping Your Wings for Baking: Getting Ready for the Oven
Patting Dry: The Key to crispy skin
Before you pop those wings in the oven, make sure they're patted dry. This is a crucial step, mate. Excess moisture will steam the wings instead of crisping them up. So, grab a clean paper towel and give those wings a good pat-down.
Choosing the Right Baking Dish: Size Matters
Now, let's talk about the baking dish. I usually use a rimmed baking sheet, but you can also use a roasting pan or a casserole dish. The important thing is to make sure it's large enough to accommodate the wings without overcrowding them.
Spreading Them Out: Space for Even Cooking
Don’t cram those wings together. You want them to have enough space so they can cook evenly. If they're touching, they’ll steam rather than crisp up. Spread them out in a single layer, ensuring they aren’t overlapping.
The Magic of a Baking Rack: Maximizing Crispness
For extra crispiness, I recommend placing a wire rack inside the baking dish. This will help to lift the wings off the bottom of the dish, allowing for better airflow and even cooking.
(Part 5) The Baking Time: Turning Wings into Delights
The Initial Bake: Building a Foundation for Flavor
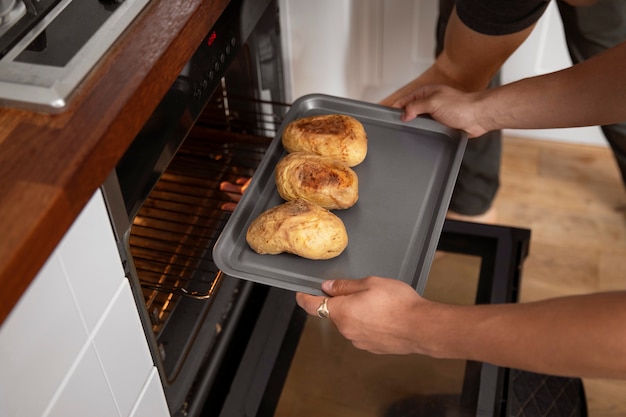
Alright, now you're ready to bake those wings. Place the baking sheet in the preheated oven and set a timer for 30-40 minutes. This initial bake will get the wings started, allowing them to cook through and develop a bit of crispiness.
Flipping the Wings: Ensuring Even Browning
After 30-40 minutes, remove the baking sheet from the oven. Carefully flip the wings over, ensuring that each side gets a chance to brown and crisp. You can use tongs or a spatula to flip them, but be careful, they will be hot!
Back in the Oven: Finishing the Transformation
Return the wings to the oven and continue baking for another 15-20 minutes. During this time, check them periodically to make sure they're not burning. You want them to be golden brown and crispy on the outside, and fully cooked through.
The internal temperature Test: Safety First
You can use a meat thermometer to check the internal temperature of the wings. They should reach an internal temperature of 165 degrees Fahrenheit (74 degrees Celsius). This ensures they're cooked through and safe to eat.
(Part 6) The Art of Saucing: Flavor Explosions for Your Wings
The Sauce: The Finishing Touch
Now, for the grand finale: the sauce. This is the moment when your wings get that extra punch of flavour, making them irresistible. There are endless possibilities when it comes to sauces, but here are a few favourites:
The Classic Buffalo Sauce: A Hot and Tangy Favorite
Let's start with the classic buffalo sauce, mate. It's a mix of hot sauce, butter, and vinegar, and it's a real crowd-pleaser. You can make your own buffalo sauce from scratch, or you can grab some from the store.
bbq sauce: A Sweet and Smoky Delight
For those who prefer a sweeter, smokier flavour, BBQ sauce is the way to go. There are so many varieties of BBQ sauce, from mild and tangy to spicy and smoky. Experiment with different brands and flavours to find your perfect match.
Teriyaki Sauce: A Sweet and Savoury Asian Infusion
Teriyaki sauce adds a sweet and savoury flavour with a touch of umami. It’s a fantastic option if you want something different from the traditional buffalo or BBQ. You can find pre-made teriyaki sauce at most supermarkets, or you can make your own with soy sauce, mirin, and sugar.
Garlic Parmesan Sauce: A Creamy and Savoury Treat
If you're craving something a bit more sophisticated, garlic Parmesan sauce is a great choice. It's made with garlic, Parmesan cheese, and cream, and it creates a creamy, savoury sauce that complements the chicken wings perfectly.
The Dipping Technique: Ensuring Even Coating
Once your wings are cooked, you can toss them in your chosen sauce or dip them individually. If you're tossing them, I recommend using a large bowl and tossing gently to ensure even coating. If you're dipping, make sure to coat them generously.
Serving Up the Goodness
Serve those saucy wings hot and enjoy! I love to serve them with a side of celery sticks and blue cheese dressing for dipping. And don't forget the beer, mate! You've earned it after all that hard work.
(Part 7) Tips and Tricks for Perfect Wings: Elevating Your Wing Game
The Secret to Crispy Skin: A Crispy Exterior
Okay, let's talk about that crispy skin, mate. It's the holy grail of oven-baked chicken wings, and there are a few tricks to achieving it.
The Airflow Advantage: Crucial for Crispness
One key is to ensure good airflow in the oven. This helps to evaporate moisture and create that crispy, crackling texture. If you’re using a baking sheet, make sure it's not overloaded, and if possible, use a wire rack to lift the wings off the bottom.
The Skin-on Secret: Maximizing Crispness
Another tip is to bake your wings with the skin on. The skin acts as a barrier, preventing moisture from escaping and helping to create a crispy exterior. If you remove the skin, you'll likely end up with dry wings.
The Cooling Down Trick: Letting the Skin Set
Here's a trick that I've learned over the years: let your wings cool down a bit after baking. This will allow the skin to crisp up even further as it cools.
The No-Touching Rule: Minimizing Oven Door Openings
And one final tip, mate: don't touch those wings too much! Every time you open the oven door to check on them, you're letting out heat and moisture. This can make it harder to get that perfect crispy skin.
(Part 8) FAQs: The Wing Wisdom
FAQs
- How long do I bake chicken wings at 400 degrees Fahrenheit? The general rule of thumb is 30-40 minutes for the initial bake, flipping them halfway through. Then, bake for another 15-20 minutes, depending on their size and thickness. Remember, you want the wings to be golden brown and crispy, and cooked through.
- What if my wings are frozen? If you're using frozen wings, you'll need to thaw them completely before baking. You can thaw them in the refrigerator overnight, or you can thaw them in cold water for a few hours.
- What are some good wing sauces? There are endless possibilities when it comes to wing sauces. Some popular options include buffalo sauce, BBQ sauce, teriyaki sauce, and garlic Parmesan sauce. Experiment with different flavours to find your favourites.
- Can I bake chicken wings in a toaster oven? Yes, you can bake chicken wings in a toaster oven. Just follow the same baking time and temperature guidelines as you would for a regular oven.
- How do I store leftover wings? You can store leftover wings in an airtight container in the refrigerator for up to 3 days. To reheat them, you can bake them in the oven, microwave them, or air fry them.
(Part 9) The Wing Master's Journey: A Personal Tale of Wing Triumphs
You know, mate, my journey to becoming a wing master wasn’t always smooth sailing. I’ve had my fair share of wing disasters. There was that time I overcooked them and they were dry as sandpaper. And then there was that time I forgot to flip them and they were burnt on one side.
But through those mistakes, I learned. I learned to pay attention to the size and thickness of the wings. I learned the importance of preheating the oven. I learned that patience is key, and that a little extra time can make all the difference.
Now, I take pride in my wing-making skills. My friends and family know they can always count on me for a delicious batch of oven-baked wings. And, mate, the best part? It’s not about being a master, it’s about sharing those delicious wings with the people you care about.
(Part 10) A Table of Wing Cooking Times: A Handy Guide
Oven Baked Chicken Wing Cooking Times
Here's a handy table summarizing the oven-baked chicken wing cooking times based on wing size and thickness:
| Wing Size | Oven Temperature | Baking Time |
|---|---|---|
| Small, Skinny Wings | 375°F (190°C) | 30-40 minutes |
| Medium Wings | 400°F (200°C) | 30-40 minutes |
| Large, Thick Wings | 425°F (220°C) | 40-50 minutes |
(Part 11) The Takeaway: Wing Your Way to Victory
Right, mate, so there you have it. The secrets to oven-baked chicken wings that are crispy on the outside, juicy on the inside, and absolutely bursting with flavour.
Remember, it's all about finding that perfect balance of temperature, time, and seasoning. And don’t be afraid to experiment! Try different sauces, seasonings, and techniques to find what works best for you.
Most importantly, have fun with it, mate. Cooking should be a joy, and there’s nothing more satisfying than creating a delicious feast for your mates.
So, next time you're planning a gathering, ditch the takeout and whip up a batch of oven-baked chicken wings. You won't regret it.
Everyone is watching

Perfect Rice Every Time: The Ultimate Guide to Cooking Rice
Cooking TipsAs a self-proclaimed foodie, I've always been a bit obsessed with rice. It's the foundation of countless cuisi...

The Ultimate Guide to Cooking Asparagus: Tips, Techniques, and Recipes
Cooking TipsAsparagus. The mere mention of this spring delicacy conjures up images of vibrant green spears, crisp and burs...

Ultimate Guide to Cooking the Perfect Thanksgiving Turkey
Cooking TipsThanksgiving. Just the word conjures up images of overflowing tables laden with delicious food, the scent of r...

Prime Rib Roast Cooking Time Chart: Per Pound Guide
Cooking TipsPrime rib roast. Just the name conjures images of lavish dinners, crackling fires, and hearty laughter. It’s ...

Can You Cook Spaghetti with Gasoline? (The Shocking Truth)
Cooking TipsWe've all seen those crazy internet trends. You know, the ones that make you wonder, "Did someone actually try...