Let’s be honest, pork belly is the ultimate comfort food. That glorious, fatty, flavour-bomb of a cut just begs to be roasted, braised, or, dare I say, crisped up to a golden, crackling perfection. It’s a journey I’ve been on for years, experimenting with countless recipes and techniques, and now, I’m ready to share my hard-earned wisdom with you. Grab your favourite beverage, settle in, and let’s embark on this delicious adventure together.
(Part 1) The Pork Belly Basics: Understanding Your Canvas
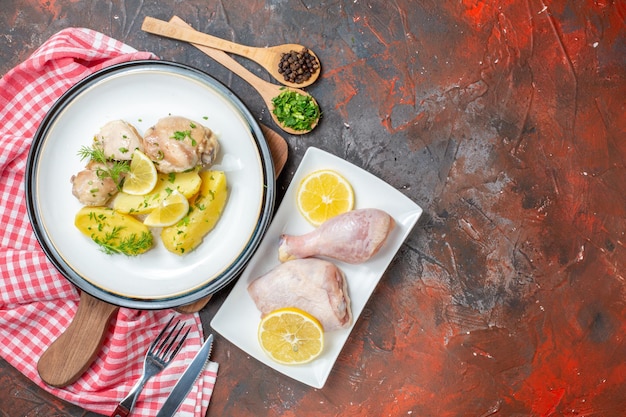
Before we dive into the cooking techniques, let’s talk about the star of the show: the pork belly itself. We’re not talking about some generic supermarket slab here – we're going for the good stuff, the kind with a generous layer of fat, because that’s where the magic truly happens. You want that fat to render down, transforming into a symphony of flavour and texture – and trust me, it’s worth the effort.
Choosing the Right Pork Belly
Picking the perfect pork belly is like finding the ideal canvas for a masterpiece. You want a piece with a nice layer of fat, around an inch or so, beautifully marbled with lean meat. This ensures plenty of fat to render down for that divine crackling, but also enough lean meat to keep things interesting.
When you’re at the butcher’s, don’t be shy – ask for advice! Tell them you’re after a piece perfect for roasting or crisping up, and they’ll guide you to the best option. If you're shopping at a supermarket, look for a pork belly with a good colour, free from any discoloration or strange smells.
Skin On or Skin Off?
This is a big debate – skin on or skin off? Honestly, it comes down to personal preference. I'm a huge fan of skin-on pork belly because that crackling is absolutely heavenly, but if you're worried about fat, skinless will work just fine.
If you're going skin-on, make sure the skin is intact. Any tears or holes can lead to uneven crackling, so give it a good look-over before you buy it.
(Part 2) Preparing the Pork Belly: It's All About the Fat
Okay, you've got your beautiful piece of pork belly. Now it’s time to get it ready for cooking. This is where the real magic happens, and it all revolves around prepping that fat. We’re not talking about a quick rub – we’re going for a method that’ll give you crackling so good, it’ll make your head spin.
The Salt Cure: A Simple Trick for Amazing Results
Here’s the secret weapon in my arsenal: salt curing. This simple trick transforms that pork belly fat into the most glorious crackling. It works by drawing moisture out of the fat, making it crisp up even more when it hits the oven. It’s a game-changer, I tell you!
Here’s how it’s done:
- Rinse your pork belly under cold water and pat it dry with paper towels.
- Place the pork belly in a large, shallow dish or baking tray.
- Liberally salt the entire surface of the pork belly, making sure to cover both the skin and the meat. You can use coarse sea salt, kosher salt, or even table salt – it’s up to you.
- Cover the dish with cling film and refrigerate for at least 12 hours, up to 24 hours.
- Remove the pork belly from the refrigerator and gently rinse off the excess salt.
- Pat it dry with paper towels, and you're ready to cook!
Alternative Prepping Techniques: When You're Short on Time
I know, sometimes you don’t have a whole day to salt cure your pork belly. But don’t worry, there are alternative prepping techniques that’ll still give you amazing results.
If you're short on time, you can simply score the skin of the pork belly with a sharp knife. This helps the fat to render down more evenly, and will result in some nice crackling. Just be careful not to cut too deep!
(Part 3) Cooking the Pork Belly: The Crispy Journey Begins
Finally, the moment we’ve all been waiting for! You’ve got your perfectly prepped pork belly, and now it’s time to cook it up to crackling perfection. I’ve tried countless methods, from roasting to braising, but for that ultimate crispy goodness, nothing beats a combination of low and high heat.
Low and Slow: The Rendering Stage
The key to crispy pork belly is rendering that fat down. We’re going to start by cooking it low and slow, allowing the fat to melt away and infuse the meat with flavour. Preheat your oven to 325°F (160°C).
Place your pork belly in a roasting pan, skin side up. Add a little bit of water to the bottom of the pan – just enough to create a bit of steam. Cover the pan with foil and roast for 2 hours. This will help to keep the meat moist and tender.
High Heat: Achieving That Crackling
After those 2 hours, we’re going to crank up the heat and turn those fat cells into crispy perfection. Remove the foil and increase the oven temperature to 400°F (200°C). Roast the pork belly for another 30 to 45 minutes, or until the skin is golden brown and crispy.
Keep an eye on it! You don’t want to burn the skin, so check it frequently and adjust the cooking time as needed.
The Resting Stage: Letting the Flavour Sink In
Once the skin is golden and crispy, remove the pork belly from the oven and let it rest for 10 to 15 minutes before carving. This gives the juices a chance to redistribute, ensuring that the meat is tender and juicy.
(Part 4) Enhancing the Flavour: The Power of Seasonings and Marinades
Okay, so now you’ve got a perfectly cooked pork belly. But let’s take it to the next level with some flavour-boosting techniques. Here’s where you can really let your creativity shine.
Seasoning the Meat: A Simple Yet Effective Technique
Even before you start cooking, you can add a layer of flavour by seasoning the pork belly. My go-to combination is a simple mixture of salt, pepper, garlic powder, and onion powder. You can also add other spices like paprika, cumin, or chili powder to create your own unique blend.
For extra flavour, try rubbing a honey-soy glaze on the meat before roasting. This will caramelise beautifully and create a sticky, sweet glaze that’s irresistible.
Marinating for Deeper Flavour: Letting the Taste Sink In
If you’ve got a little more time, marinating the pork belly can add a whole new dimension of flavour. You can use a store-bought marinade or create your own with ingredients like soy sauce, honey, garlic, ginger, or your favourite herbs and spices.
Place the pork belly in a large zip-top bag, pour in the marinade, and refrigerate for at least 4 hours, or overnight. This allows the flavours to penetrate the meat, resulting in a more intense taste.
(Part 5) Serving Suggestions: Taking Your Crispy Pork Belly to the Next Level
You’ve put in the effort, now it’s time to reap the rewards! Crispy pork belly is so versatile; it can be the star of any meal, from a casual family dinner to a fancy feast. Let’s explore some serving ideas to tantalise your taste buds.
The Classic: Pork Belly with Roasted Vegetables
This is a winning combination that never disappoints. Roast some seasonal vegetables like sweet potatoes, carrots, and onions alongside your pork belly. The vegetables will absorb all the delicious drippings, and the crispy pork belly will add a satisfying crunch to each bite.
A Lighter Twist: Pork Belly Salad
For a more light and refreshing meal, try serving your pork belly with a salad. Slice the pork belly thinly and toss it with a mix of fresh greens, crunchy vegetables, and a tangy dressing. You can also add a sprinkle of toasted sesame seeds for extra flavour and texture.
The Asian Influence: Pork Belly with Noodles
For a taste of Asia, pair your pork belly with noodles. Serve it over a bed of rice noodles, stir-fried with your favourite vegetables and a tangy sauce. The crispy pork belly will add a satisfying textural contrast to the soft noodles.
The Comfort Food Classic: Pork Belly Tacos
For a fun and casual meal, try making pork belly tacos. Slice the pork belly into bite-sized pieces and serve them in warm tortillas with your favourite toppings. You can go for traditional Mexican flavours like salsa, guacamole, and sour cream, or get creative with your own topping combinations.
(Part 6) The Importance of Resting: A Must-Do Step
Now, I know you’re probably eager to dig in, but hold your horses! Resting the pork belly is a crucial step in the process, ensuring a tender and juicy result. Just like a fine wine, it needs a bit of time to breathe.
After you’ve taken the pork belly out of the oven, let it rest for at least 10 minutes before carving. This allows the juices to redistribute throughout the meat, resulting in a more flavorful and tender bite.
Resting also helps the crackling to crisp up even further. So, be patient and let your pork belly rest for a little while – trust me, it’s worth the wait!
(Part 7) Tips and Tricks: Mastering the Art of Crispy Pork Belly
Alright, you’ve got the basics down, but let’s delve into some tips and tricks that’ll take your crispy pork belly skills to the next level. Think of them as secret weapons in your culinary arsenal.
1. The Skin-Scoring Trick: Maximising Crackling
Scoring the skin of the pork belly before cooking helps to render the fat more evenly and creates that beautiful, crispy crackling. Use a sharp knife to make shallow cuts across the skin, about 1/4 inch apart. Just be careful not to cut into the meat!
2. The Baking Sheet Trick: Avoiding Soggy Crackling
To ensure that your crackling stays perfectly crispy, avoid placing the pork belly directly on the oven rack. Instead, place it on a baking sheet lined with parchment paper. This allows air to circulate around the pork belly, preventing the skin from becoming soggy.
3. The water bath Technique: Keeping It Moist
To prevent the meat from drying out during the low-and-slow cooking phase, consider adding a little water to the bottom of the roasting pan. This creates a steam bath that helps to keep the meat moist and tender.
4. The Oven Thermometer: Ensuring Perfection
An oven thermometer is a must-have for any serious cook. It helps to ensure that your oven is heating to the correct temperature, preventing overcooked or undercooked pork belly.
5. The Residual Heat Trick: Bringing It All Together
After you’ve removed the pork belly from the oven, don’t be too quick to carve it. Let it rest on a cutting board for about 10 minutes, allowing the residual heat to continue cooking the meat and ensure that it’s cooked through.
(Part 8) FAQs: Your Burning Questions Answered
Now, I’m sure you’ve got some questions. Let’s dive into some common queries and get you all the answers you need to become a crispy pork belly pro.
1. Can I freeze pork belly before cooking?
Absolutely! Freezing pork belly is a great way to store it for later use. Just wrap it tightly in cling film or freezer paper to prevent freezer burn. Thaw it in the refrigerator overnight before cooking.
2. What if the crackling doesn't get crispy?
Don’t worry! If the crackling isn’t as crispy as you’d like, you can try crisping it up further under a hot grill. Just be careful not to burn it.
3. What can I do with leftover pork belly?
Leftover pork belly is a culinary treasure! You can use it to make delicious sandwiches, salads, stir-fries, or even pizza toppings.
4. How do I know when the pork belly is cooked?
The best way to check if pork belly is cooked through is to use a meat thermometer. Insert it into the thickest part of the meat, avoiding the bone. The internal temperature should reach 145°F (63°C).
5. What are the best tools for cooking pork belly?
You’ll need a roasting pan, a sharp knife for scoring the skin, a meat thermometer, and a baking sheet. If you want to take it to the next level, consider getting a kitchen torch for crisping up the crackling.
(Part 9) Conclusion: The Journey of Crispy Pork Belly
And there you have it, my fellow foodies – a comprehensive guide to cooking crispy pork belly to perfection. It’s a journey that takes a bit of time and effort, but the rewards are truly divine. So next time you’re looking for a show-stopping meal, try this recipe, and prepare to impress your family and friends.
Remember, the key to success is understanding the fat. Embrace the slow rendering, the crackling, and the flavour that only pork belly can deliver. And most importantly, have fun with it! Experiment with different flavours and techniques, and you’ll be surprised at how many delicious ways you can enjoy this versatile cut of meat. Happy cooking!
Everyone is watching

Prime Rib Roast Cooking Time Chart: Per Pound Guide
Cooking TipsPrime rib roast. Just the name conjures images of lavish dinners, crackling fires, and hearty laughter. It’s ...

How Long to Bake Potatoes in the Oven (Perfect Every Time)
Cooking TipsBaked potatoes are a staple in my kitchen. They're incredibly versatile, delicious, and surprisingly easy to m...

Perfect Rice Every Time: The Ultimate Guide to Cooking Rice
Cooking TipsAs a self-proclaimed foodie, I've always been a bit obsessed with rice. It's the foundation of countless cuisi...

The Ultimate Guide to Cooking Asparagus: Tips, Techniques, and Recipes
Cooking TipsAsparagus. The mere mention of this spring delicacy conjures up images of vibrant green spears, crisp and burs...

Ultimate Guide to Cooking the Perfect Thanksgiving Turkey
Cooking TipsThanksgiving. Just the word conjures up images of overflowing tables laden with delicious food, the scent of r...