Ah, crème br??lée. The name itself evokes images of rich, creamy custard topped with a gloriously crunchy, caramelized sugar shell. It’s a dessert that demands attention, a symphony of textures and flavours that explodes in your mouth with each delightful bite. I confess, I used to think crème br??lée was an intimidating dessert, one reserved for culinary wizards and pastry chefs. The thought of getting the custard just right, and then achieving that perfect caramelized sugar topping, felt daunting, bordering on impossible. But, believe me, I'm here to tell you that crème br??lée is a lot more approachable than you might think.
This article is my personal journey to conquering crème br??lée, from my early fumbles and culinary mishaps to the eventual triumph of creating that perfect crispy top. I'll share my tips, tricks, and even some hilarious anecdotes about my crème br??lée adventures. So, grab your apron, gather your ingredients, and let’s embark on this delicious journey together.
(Part 1) My Crème Br??lée Journey: A Confession of Early Struggles
It all began with a recipe tucked away in a vintage cookbook my grandmother gifted me. The instructions were filled with culinary jargon that sounded more like a foreign language than a recipe. Terms like “bain-marie” and “cook until it coats the back of a spoon” left me feeling a bit lost in the world of pastry. My initial attempts, fueled by a mixture of enthusiasm and naiveté, were… well, let's just say less than stellar.
My First Fiasco: The Soggy Saga
My first crème br??lée was a sad, watery affair, closer to a runny custard than the decadent dessert I envisioned. The sugar topping, instead of being crisp and caramelized, resembled a sticky, melted mess that wouldn’t even break with a gentle tap of the spoon. It was a culinary disaster, and to say I was disheartened would be an understatement.
After that experience, I was ready to give up on crème br??lée altogether. But a tiny voice inside me (perhaps the same voice that encourages me to eat that extra biscuit) whispered, “Don't give up, you can do this!” So, I decided to try again, armed with a new recipe and a healthy dose of determination.
(Part 2) The Perfect Recipe: My Secret Weapon
Over the years, I've tried countless crème br??lée recipes, but the one I finally settled on is a true winner. It's straightforward, reliable, and consistently produces delicious results. And I'm happy to share it with you!
Ingredients:
Here's what you'll need to create a classic crème br??lée:
- 1 cup heavy cream (or double cream)
- ?? cup milk
- ?? cup granulated sugar
- 4 large egg yolks
- 1 teaspoon vanilla extract
- Pinch of salt
- Granulated sugar for the topping (about 1 tablespoon per ramekin)
Equipment:
You'll need a few essential tools for this culinary adventure:
- A saucepan
- A whisk
- A measuring cup
- 4 ramekins (individual dessert dishes)
- A baking dish (large enough to hold the ramekins)
- A kitchen torch or broiler
The kitchen torch is a must-have for achieving that perfect crispy sugar topping. However, if you don't have one, you can use a broiler. Just be extra careful and keep a close eye on the sugar.
(Part 3) The Art of the Custard: Avoiding the Soggy Trap
The custard is the heart and soul of crème br??lée. The key to a perfect custard lies in ensuring it sets properly, without becoming runny or watery. It's all about balancing heat, time, and the right ingredients.
Step 1: Simmering the Cream and Milk
Begin by heating the cream and milk in a saucepan over medium heat. Bring the mixture just to a simmer, making sure it doesn't boil. The goal is to warm the cream and milk without scalding them, creating a smooth and creamy custard.
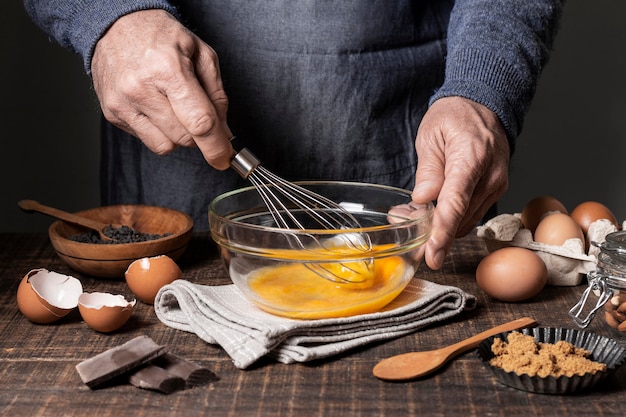
Step 2: Whisking the Egg Yolks and Sugar
While the cream and milk are simmering, whisk the egg yolks and sugar together in a separate bowl. The mixture should be pale yellow and smooth. Whisking the egg yolks and sugar before adding them to the hot cream helps prevent the yolks from scrambling, leading to a smoother, silkier custard. Trust me, this step is worth the extra time!
Step 3: Tempering the Egg Yolks
This is where things get a little tricky, but don't worry, I'm here to guide you! Tempering the egg yolk mixture means slowly incorporating the hot cream into the egg yolks, preventing them from cooking and becoming grainy. To do this, slowly pour about a cup of the hot cream into the egg yolk mixture, whisking constantly. Then, pour the tempered egg yolk mixture back into the saucepan with the remaining cream and milk.
Step 4: Cooking the Custard
Now, cook the mixture over low heat, stirring constantly, until the custard thickens enough to coat the back of a spoon. Cook slowly and gently to prevent curdling. Be patient, you'll know it's done when it coats the back of a spoon smoothly.
Step 5: Strain and Cool the Custard
Once the custard is cooked, remove it from the heat and strain it through a fine-mesh sieve into a bowl. This removes any lumps or bits of cooked egg. Then, cover the bowl with plastic wrap, pressing it directly onto the surface of the custard to prevent a skin from forming. Refrigerate for at least 4 hours or overnight.
(Part 4) The Sugar Shell: Achieving That Crunch
This is where the magic truly happens! Creating that delicious caramelized sugar shell is the moment you truly become a crème br??lée maestro. Don't be intimidated, it's actually quite simple once you get the hang of it.
Step 1: Prepare the Ramekins
First, pour the chilled custard into individual ramekins. If you want to ensure even layers of sugar, use a measuring cup to distribute equal amounts into each ramekin. Then, place the ramekins in a baking dish and fill the dish with hot water until the water comes halfway up the sides of the ramekins. This creates a bain-marie, ensuring even cooking.
Step 2: Caramelizing the Sugar
Now comes the fun part! Sprinkle about 1 tablespoon of granulated sugar over the top of each custard, making sure to spread it evenly. Using a kitchen torch, carefully caramelize the sugar until it is golden brown and bubbly. If you're using a broiler, place the ramekins under the broiler for a few minutes, watching closely, until the sugar melts and turns golden brown. Be careful not to let the sugar burn.
Step 3: The Crunch Test
The best way to know if the sugar is caramelized enough is to perform the famous "crunch test." Gently tap the sugar with a spoon. If it makes a crisp, satisfying crackle, you're good to go!
(Part 5) Serving and Storing Crème Br??lée
Congratulations! You've officially achieved crème br??lée greatness. To serve, simply let the ramekins cool slightly before enjoying. For a truly luxurious presentation, dust the caramelized sugar with a sprinkle of cinnamon or nutmeg. It adds a beautiful warmth and aroma to the dish.
Tips for Storing:
If you have any leftovers (although I doubt you will!), store the crème br??lée in the refrigerator for up to 3 days. However, don't try to caramelize the sugar again. The sugar will become soggy and won't have the same delightful crunch.
Instead, if you want a bit of that caramelized sweetness, sprinkle a bit of sugar over the top of each custard before serving and warm it slightly under a broiler to melt the sugar. This will give you a hint of that caramelized flavour without the crunchy topping.
(Part 6) My Top Tips for Crème Br??lée Success
Based on my own crème br??lée journey, here are a few crucial tips to help you avoid pitfalls and achieve crème br??lée perfection. These are the lessons I've learned through trial and error, so you don't have to!
Tips for the Custard:
- Use high-quality heavy cream (or double cream) for a richer, more luxurious custard. It makes a noticeable difference in the final flavour.
- Don't overcook the custard. It should be thick enough to coat the back of a spoon but not too thick or it will be rubbery. This takes practice, but you'll get the hang of it.
- Strain the custard before refrigerating to remove any lumps or cooked egg bits. This ensures a smooth and silky texture.
- Don't rush the chilling process. Let the custard cool in the refrigerator for at least 4 hours or overnight for the best results. The longer it chills, the more set it will become.
Tips for the Sugar Shell:
- Use a kitchen torch for the best control over the caramelization process. If you don't have a torch, you can use a broiler, but be extra careful and watch the sugar closely.
- Spread the sugar evenly over the top of the custard. This will help ensure that the sugar caramelizes evenly, creating a beautiful and consistent shell.
- Be patient with the caramelization process. Don't rush it. The sugar will melt and bubble, and then it will turn a golden brown color. If you overcook it, it will burn, so watch it closely.
- Let the sugar cool slightly before serving. The caramelized sugar will be very hot, so let it cool for a few minutes before digging in. You don't want to burn your tongue!
(Part 7) Variations on Crème Br??lée: Beyond the Classic
While the classic crème br??lée is a true delight, there's a whole world of delicious variations just waiting to be explored. Get creative and add your own personal touch!
1. Flavored Crème Br??lée:
Add different flavors to your crème br??lée by adding a teaspoon or two of your favourite extracts or liqueurs. Here are a few ideas to get you started:
- Chocolate Crème Br??lée: Add 1 teaspoon of vanilla extract and 1 tablespoon of cocoa powder to the custard. This combination creates a rich and decadent treat.
- Lemon Crème Br??lée: Add 1 teaspoon of lemon zest and 1 tablespoon of lemon juice to the custard. It adds a bright and refreshing twist to the classic dessert.
- Coffee Crème Br??lée: Add 1 teaspoon of coffee extract and 1 tablespoon of strong brewed coffee to the custard. Perfect for coffee lovers, it adds a hint of caffeine to the dessert.
- Lavender Crème Br??lée: Add 1 teaspoon of lavender extract to the custard. (This one is surprisingly delicious! The floral notes of lavender complement the creaminess of the custard beautifully.)
2. Seasonal Crème Br??lée:
Incorporate seasonal flavors to create a truly unique crème br??lée experience. The possibilities are endless!
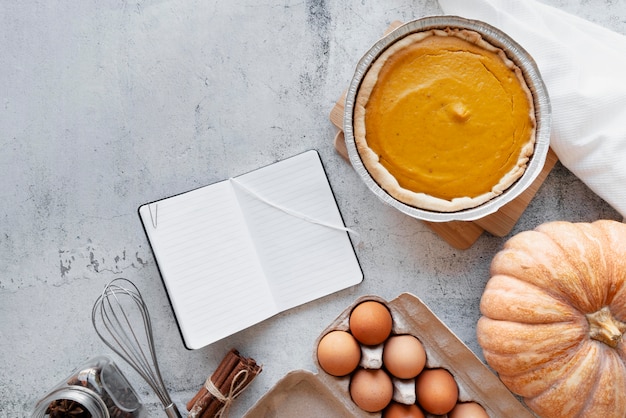
- Pumpkin Crème Br??lée (Fall): Add 1 teaspoon of pumpkin pie spice and ?? cup of pumpkin purée to the custard. Top with a sprinkle of cinnamon sugar for an extra touch. It's a perfect dessert for those chilly autumn days.
- Berry Crème Br??lée (Summer): Add 1 teaspoon of vanilla extract and ?? cup of your favorite berries to the custard. Top with fresh berries for a beautiful presentation. It's a refreshing dessert for warm summer evenings.
- Gingerbread Crème Br??lée (Winter): Add 1 teaspoon of gingerbread spice and ?? cup of molasses to the custard. It's a cozy and comforting dessert for those cold winter nights.
3. Decadent Crème Br??lée:
For those who love an extra touch of indulgence, try these decadent twists on the classic recipe.
- Salted Caramel Crème Br??lée: Add a pinch of sea salt to the custard and top with a dollop of salted caramel sauce. The salty-sweet combination is a taste sensation.
- White Chocolate Crème Br??lée: Use white chocolate chips instead of granulated sugar for the topping. This will create a luxuriously smooth and creamy topping.
(Part 8) Crème Br??lée: Beyond the Kitchen
Beyond its deliciousness, crème br??lée holds a special place in my heart. It's more than just a dessert; it's a symbol of warmth, comfort, and a touch of indulgence. It's a reminder to slow down, savor the moment, and appreciate the simple pleasures in life.
Crème Br??lée: The Art of Patience
The process of making crème br??lée is a metaphor for life. Just like the custard, life requires patience, attention to detail, and a willingness to embrace the unexpected. It’s not always smooth sailing, but with a bit of effort and a sprinkle of love, we can create something truly special.
Crème Br??lée: The Symbol of Shared Joy
Crème br??lée is also a dessert that's meant to be shared. It’s a dessert that sparks conversation, laughter, and a sense of connection. I've enjoyed countless moments of shared laughter and joy over a plate of crème br??lée, and I'm certain it will continue to be a staple in my life for years to come. It's a dessert that brings people together and creates lasting memories.
(Part 9) FAQs: Your Crème Br??lée Questions Answered
Now that you've delved into the world of crème br??lée, you're probably bursting with questions. Fear not, I've compiled a list of frequently asked questions to help guide you on your crème br??lée journey.
1. Can I substitute heavy cream with milk?
While you can use milk instead of heavy cream, the custard won't be as rich or luxurious. I recommend sticking to heavy cream for the best results.
2. What if my custard doesn’t set properly?
This could happen if you haven't cooked the custard long enough or if you haven't chilled it for long enough. You can try recooking the custard for a few more minutes, but it's best to start over with a fresh batch. To prevent this in the future, make sure to cook the custard until it coats the back of a spoon smoothly, and chill it for at least 4 hours or overnight.
3. What happens if I burn the sugar?
If you burn the sugar, it will have a bitter taste and won’t be as appealing. You can try to scrape off the burned sugar, but it's best to start over with a fresh batch. To prevent burning, watch the sugar closely while caramelizing it and don't overheat it.
4. Can I use a broiler instead of a torch?
Yes, you can use a broiler to caramelize the sugar. Just be extra careful and watch the sugar closely, as it will caramelize much faster under the broiler.
5. What are some other ways to caramelize the sugar?
There are several ways to caramelize sugar for crème br??lée. Beyond the traditional torch or broiler, you can use a kitchen blowtorch, a heat gun, or even a hot iron skillet.
But remember, no matter which method you choose, the key is to create that beautiful, crunchy, caramelized sugar shell. It’s the crowning glory of this delightful dessert.
So, there you have it! My journey to mastering the art of crème br??lée, from initial struggles to finding the perfect recipe, and everything in between. I hope this article has inspired you to give crème br??lée a try. You’ll be surprised how easy it is to create this delicious dessert at home.
Now, go forth, experiment, and enjoy the sweet rewards of your culinary adventure. Happy crème br??lée-making!
Everyone is watching

Perfect Rice Every Time: The Ultimate Guide to Cooking Rice
Cooking TipsAs a self-proclaimed foodie, I've always been a bit obsessed with rice. It's the foundation of countless cuisi...

Prime Rib Roast Cooking Time Chart: Per Pound Guide
Cooking TipsPrime rib roast. Just the name conjures images of lavish dinners, crackling fires, and hearty laughter. It’s ...

How Long to Bake Potatoes in the Oven (Perfect Every Time)
Cooking TipsBaked potatoes are a staple in my kitchen. They're incredibly versatile, delicious, and surprisingly easy to m...

The Ultimate Guide to Cooking Asparagus: Tips, Techniques, and Recipes
Cooking TipsAsparagus. The mere mention of this spring delicacy conjures up images of vibrant green spears, crisp and burs...

Ultimate Guide to Cooking the Perfect Thanksgiving Turkey
Cooking TipsThanksgiving. Just the word conjures up images of overflowing tables laden with delicious food, the scent of r...