Ah, the majestic turkey! A centerpiece of countless festive gatherings, it’s a dish that requires both skill and a dash of bravery, especially when tackling a behemoth like a 14 lb stuffed bird. Let me tell you, my friends, a turkey of that size is no walk in the park! It's a commitment, a marathon in the kitchen, and a testament to your dedication to good food and good company. But fear not, fellow turkey enthusiasts, for I'm here to guide you through the process, from thawing to carving, with tips, tricks, and a healthy dose of personal experience to ensure your turkey turns out a triumph.
Part 1: The Big Picture
A 14 lb turkey is a significant undertaking. It's not just a matter of popping it in the oven and hoping for the best. This bad boy needs time, attention, and a plan. We're talking a solid few hours of roasting, not to mention the time it takes to thaw the turkey and allow it to rest after cooking. So, grab your favorite apron, clear your schedule, and get ready to embark on this culinary adventure.
Part 2: The Stuffing Conundrum
Let's address the elephant in the room (or should I say, the stuffing in the turkey): the age-old debate about stuffed versus unstuffed turkeys. While the traditional stuffed turkey holds a special place in our hearts, it presents a bit of a safety hurdle. You see, the stuffing needs to reach a safe internal temperature, and that can be trickier than you might think, especially in the confines of a large turkey. So, let's explore our options:
Option 1: Stuffing on the Side
This is the safest and arguably the easiest option. Cook your stuffing separately in a casserole dish. This way, you can ensure it reaches the recommended internal temperature without affecting the turkey's roasting time. Think of it as a side dish that complements the turkey, rather than a built-in component. And honestly, it makes for a more manageable cooking process.
Option 2: Loose Stuffing
If you're set on the traditional stuffed turkey experience, go for loose stuffing. Don't pack the cavity tightly; leave some space for air to circulate, allowing the stuffing to cook faster. This option does require extra care and vigilance to ensure the stuffing reaches the correct temperature. I recommend using a meat thermometer to check the internal temperature of the stuffing in several spots.
Option 3: Pre-Cooked Stuffing
For those who value simplicity and convenience, pre-cooked stuffing is a real lifesaver! You can find a variety of pre-cooked stuffing options at most supermarkets, saving you precious time and effort. Just make sure to heat it through thoroughly before serving.
Part 3: Getting Ready for the Big Roast
Alright, let's get our hands dirty! Before the oven even dreams of reaching the right temperature, a few essential steps need to be taken:
1. Thaw the Turkey
Thawing a 14 lb turkey is an undertaking in itself. It's not something you can do overnight. I highly recommend thawing it in the refrigerator, which can take anywhere from 3 to 4 days. For a 14 lb turkey, you're looking at a minimum of 3 days. The fridge is the safest option, as it ensures a slow, even thaw.
If you're in a pinch, you can thaw it in a cold water bath, but be very cautious. Make sure the water is very cold (not just cool, but actually cold), and change the water every 30 minutes or so to ensure the temperature stays below 40°F. The cold water bath method is faster, but it’s more risky, and I personally wouldn’t recommend it for a turkey this size.
2. Prepare the Turkey
Once the turkey is thawed, it's time to get it ready for its grand entrance into the oven. Remove any giblets and neck from the cavity, and rinse the turkey thoroughly inside and out. Pat it dry with paper towels, and you’re ready to move on to the next step.
3. Brine the Turkey (Optional)
This is where the magic happens. Brining is a technique that involves soaking the turkey in a salt water solution, which helps to retain moisture and enhance flavor. Now, I'm not saying it’s essential, but it's like the secret ingredient that transforms a good turkey into a truly spectacular one. Brining can make a significant difference in the texture and flavor of the turkey, especially when dealing with a larger bird.
If you choose to brine, I recommend a simple brine made with water, salt, and a touch of sugar. You can add herbs and spices to the brine for additional flavor, but keep it simple and avoid too much sugar, as it can make the turkey too sweet. Place the turkey in a large container, pour the brine over it, and let it sit in the refrigerator for 12-24 hours. Just make sure the turkey is completely submerged in the brine. The results are worth the effort! You'll be amazed at the difference.
Part 4: The Roasting Ritual
Alright, the time has come! It's showtime! Let's get this turkey roasted to perfection.
1. Pre-Heat the Oven
Preheat your oven to 325 degrees Fahrenheit (160 degrees Celsius). This is the standard roasting temperature for turkey, and it ensures even cooking. Let your oven reach the desired temperature before placing the turkey inside.
2. Season the Turkey
Now, it’s time to awaken the flavor! Rub the turkey generously with salt, pepper, and any other herbs and spices that tickle your fancy. I'm a big fan of a classic blend of sage, thyme, and rosemary, but feel free to experiment. Get creative! Use paprika for a smoky kick, a pinch of garlic powder for a savory aroma, or even a sprinkle of cinnamon for a hint of warmth. The possibilities are endless.
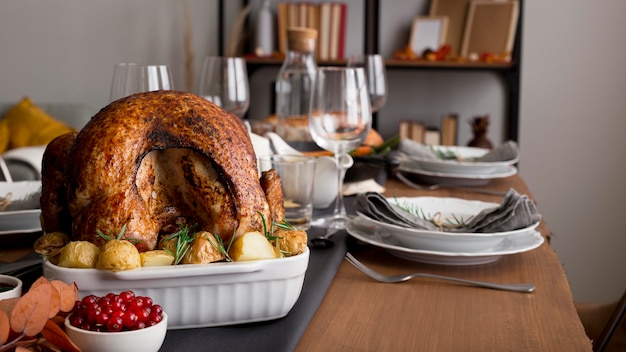
3. Place the Turkey in the roasting pan
Select a roasting pan that's large enough to comfortably hold your 14 lb turkey. Avoid overcrowding, and give the bird some breathing room. Place the turkey in the pan breast side up. For extra support and even cooking, use a roasting rack, which will elevate the turkey off the bottom of the pan.
Now, add about 1 cup of water to the bottom of the pan. This will help to keep the turkey moist and create flavorful steam as it cooks. You can also add a few vegetables, like onions, carrots, or celery, to the pan for additional flavor. These vegetables will contribute to the pan juices, creating a delicious gravy base.
4. Roast the Turkey
Here comes the real test of patience! The cooking time for a 14 lb stuffed turkey will be around 4-5 hours. Remember, it’s better to err on the side of caution with a larger turkey. Check the turkey's internal temperature regularly, using a meat thermometer. You want the internal temperature to reach 165 degrees Fahrenheit (74 degrees Celsius) for the breast and 180 degrees Fahrenheit (82 degrees Celsius) for the thigh.
To ensure even cooking, you can cover the turkey with foil for the first part of the cooking time. This helps to prevent the turkey from drying out. Remove the foil for the last hour of cooking to allow the skin to crisp up and brown beautifully.
As the turkey roasts, you can baste it periodically with the pan juices. This will help to keep the turkey moist and flavorful. Use a basting spoon to pour the pan juices over the turkey every 30 minutes or so. This simple step makes a huge difference.
5. Rest the Turkey
Once the turkey has reached the desired internal temperature, resist the urge to carve it immediately. Let the turkey rest for at least 30 minutes, covered with foil. This allows the juices to redistribute throughout the meat, resulting in a juicy and flavorful turkey. Think of it as a crucial cool-down period for the star of the show.
Part 5: Helpful Hints and Kitchen Wisdom
Now, let's talk about those little tips and tricks that can make a big difference in your turkey roasting experience.
- Use a Roasting Rack: I've mentioned this before, but it's worth repeating. A roasting rack lifts the turkey off the bottom of the pan, allowing for better heat circulation and a crispier skin. You'll thank me later!
- Baste the Turkey: Basting the turkey with pan juices every 30 minutes or so will help to keep it moist and flavorful. It's a bit of a labor of love, but the results are worth it.
- Cover the Turkey: Covering the turkey with foil for the first part of the cooking time prevents it from drying out. Then, remove the foil for the last hour of cooking to allow the skin to brown and crisp up. Think of it as a two-stage process for a perfect finish.
- Don't Overstuff: This is especially important for larger turkeys. Stuffing the turkey too tightly can prevent it from cooking properly, and the stuffing itself may not reach a safe internal temperature. Leave some room for the stuffing to expand as it cooks. Think of it as giving the stuffing a little breathing room.
- Check the Temperature Regularly: Use a meat thermometer to check the internal temperature of the turkey every hour. This helps to ensure that it's cooking properly and prevents any unpleasant surprises. It’s better to be safe than sorry!
- roast vegetables: While the turkey is roasting, take advantage of the oven's heat and roast some vegetables. This is a great way to add variety and flavor to your meal, and it saves you time and effort. Some classic roasting vegetables include carrots, potatoes, onions, Brussels sprouts, and butternut squash.
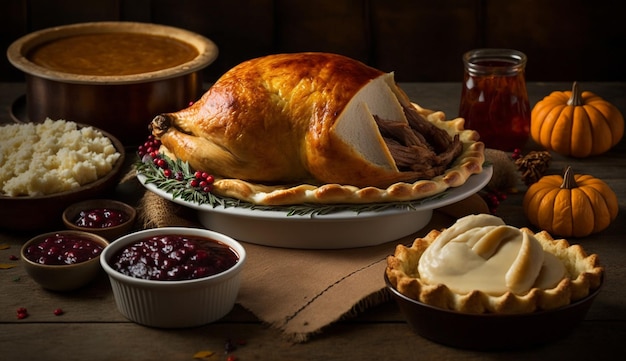
Part 6: The Big Reveal: Carving and Serving
After all that hard work, the moment of truth has arrived! It's time to reveal the beautiful roasted turkey, but remember, there's still one crucial step before we get to the carving.
1. Let the Turkey Rest
Patience, young Padawan. Let the turkey rest for at least 30 minutes, covered with foil, before you attempt to carve it. This allows the juices to redistribute throughout the meat, ensuring a juicy and flavorful turkey. Think of it as a final act of kindness to your hard-working turkey.
2. Carve the Turkey
Once the turkey has rested, you can start carving. If you're a novice carver, don't be afraid to ask for help or watch some videos online. Start by removing the legs and thighs. Then, carve the breast into slices. You can arrange the carved turkey on a platter, surrounded by roasted vegetables and stuffing.
When carving, try to keep the slices even and thin. Don't carve through the skin if you can avoid it, as this will make the slices look messy. Use a sharp carving knife, and take your time.
Part 7: Feast Time!
Now, it's time to gather your loved ones and enjoy the fruits of your labor! Serve the roasted turkey with all the trimmings: stuffing, gravy, mashed potatoes, cranberry sauce, and roasted vegetables. The possibilities are endless! Let your imagination run wild and create a feast that will leave everyone happy and satisfied.
Remember, turkey leftovers are a delicious bonus! Use them to make sandwiches, salads, or soups. And don't forget to save some turkey broth for later!
Part 8: FAQs
You may have some burning questions about this turkey adventure. Let's address some of the most common ones:
Q: How long does it take to cook a 14 lb stuffed turkey?
A: The cooking time for a 14 lb stuffed turkey will be around 4-5 hours. However, it’s crucial to monitor the internal temperature using a meat thermometer to ensure it’s cooked thoroughly.
Q: What temperature should the turkey be cooked to?
A: The turkey needs to reach an internal temperature of 165 degrees Fahrenheit (74 degrees Celsius) for the breast and 180 degrees Fahrenheit (82 degrees Celsius) for the thigh.
Q: What happens if the stuffing isn't cooked properly?
A: This is a serious food safety concern. Undercooked stuffing can harbor harmful bacteria. Use a meat thermometer to check the temperature of the stuffing. It should reach an internal temperature of 165 degrees Fahrenheit (74 degrees Celsius).
Q: Can I freeze the leftover turkey?
A: Absolutely! Leftover turkey can be safely frozen for up to 2-3 months. Wrap it tightly in freezer paper or plastic wrap before freezing.
Q: What are some good side dishes for a turkey dinner?
A: The possibilities are endless! Some classic side dishes include stuffing, gravy, mashed potatoes, cranberry sauce, and roasted vegetables. You can also get creative with other dishes like sweet potato casserole, green bean casserole, or cornbread.
Part 9: Final Thoughts
Well, there you have it! My comprehensive guide to conquering the 14 lb stuffed turkey. It's a journey, not a sprint, but the rewards are worth the effort. With a bit of planning, patience, and a dash of culinary confidence, you'll be able to create a delicious turkey dinner that everyone will adore. Happy roasting!
Remember, if you're feeling overwhelmed, don't be afraid to seek help. There are plenty of resources available online and in cookbooks to guide you through the process. And most importantly, enjoy the experience! cooking a turkey is a wonderful tradition that brings people together, and it's a reminder of the simple joys of good food and good company.
Everyone is watching

Perfect Rice Every Time: The Ultimate Guide to Cooking Rice
Cooking TipsAs a self-proclaimed foodie, I've always been a bit obsessed with rice. It's the foundation of countless cuisi...

Ultimate Guide to Cooking the Perfect Thanksgiving Turkey
Cooking TipsThanksgiving. Just the word conjures up images of overflowing tables laden with delicious food, the scent of r...

The Ultimate Guide to Cooking Asparagus: Tips, Techniques, and Recipes
Cooking TipsAsparagus. The mere mention of this spring delicacy conjures up images of vibrant green spears, crisp and burs...

Can You Cook Spaghetti with Gasoline? (The Shocking Truth)
Cooking TipsWe've all seen those crazy internet trends. You know, the ones that make you wonder, "Did someone actually try...

Chorizo and Eggs Recipe: The Ultimate Guide
Cooking TipsRight, let’s talk about chorizo and eggs. You know, that classic Spanish dish that's always a winner. It's th...