There's a certain magic in a perfectly cooked steak. That juicy, flavorful bite, the satisfying sear marks, and the melt-in-your-mouth tenderness – it's a culinary experience that's hard to beat. But achieving those restaurant-quality results at home can feel like an insurmountable challenge. Fear not, fellow steak enthusiasts! The Blackstone steak masterclass is here to guide you through the process, unlocking the secrets to crafting those perfect steaks you've always dreamed of.I'll admit, I wasn't always a grill master. My attempts often ended with dry, tough meat or a burnt exterior hiding a raw center. But thanks to this masterclass, my steak-grilling game transformed. It's not just about techniques; it's about understanding the science behind a great steak, and that's what made all the difference. So grab a cold drink, get comfy, and let's embark on this culinary journey together. I'll share my experiences, tips, and tricks for mastering the Blackstone grill and turning out mouthwatering steaks that will impress your friends and family.
(Part 1) The Blackstone Grill: Your New Culinary BFF

Before we dive into the steak masterclass, let's introduce the star of the show – the Blackstone grill. Now, I know what you're thinking: "Another grill? Do I really need it?" Trust me, this isn't just any grill; it's a game-changer. It's versatile, easy to use, and delivers those beautiful sear marks and even heat distribution that are crucial for a perfect steak.
The Magic of Flat Top Grilling
The Blackstone grill's flat top design is its secret weapon. It's like a culinary chameleon, effortlessly transitioning from searing steaks to whipping up pancakes, stir-fries, and even pizzas. The flat surface ensures even heat distribution, which is key for achieving those delicious sear marks and consistently cooked meat. And let's not forget the cleaning part – it's a breeze! A major plus for anyone who dreads post-grilling clean-up.
My Blackstone Setup: A Culinary Haven
I opted for the 36-inch blackstone griddle, which is perfect for our family gatherings. There's plenty of space to grill up a feast without feeling crowded. I also invested in a sturdy cover to protect it from the elements and a few essential accessories that make life easier. My go-to kit includes a quality spatula set, a trusty grill brush, and a reliable temperature gauge.
Essential Blackstone Tools: Beyond the Grill
The Blackstone grill is a fantastic tool, but it needs some partners in crime to really shine. Here's a list of essential tools that every Blackstone user should have in their arsenal:
- meat thermometer: This is non-negotiable. A meat thermometer is the key to ensuring your steaks are cooked to your preferred doneness, eliminating guesswork and ensuring delicious results.
- Tongs: Essential for flipping steaks, safely moving them around the grill, and generally handling hot meat with ease.
- Spatula: Perfect for flipping burgers, lifting flatbreads, and scraping up those tasty bits that inevitably get stuck on the grill.
- Grill brush: Keep your grill clean and free from burnt-on food, extending its lifespan and ensuring optimal performance.
- Griddle oil: This is crucial for preventing food from sticking to the grill. I prefer a neutral oil like canola or grapeseed.
- Seasonings: Experiment with different seasonings to enhance your steaks. Salt, pepper, garlic powder, paprika, and a touch of cayenne are my go-tos, but feel free to explore a world of flavors.
(Part 2) The Steak Masterclass: Unveiling the Secrets of Perfect Cooking
Now, let's get down to the meaty part – the Blackstone Steak Masterclass! It's not just about throwing a steak on the grill and hoping for the best. It's about understanding the science behind cooking steak, mastering the techniques that elevate your grilling game, and turning out those incredible steaks that will make everyone rave.
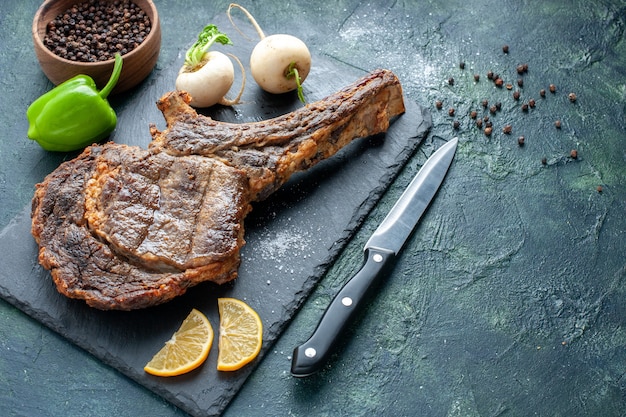
The steak selection: choosing the right cut
The journey to a perfect steak begins with selecting the right cut. We're looking for cuts that are known for their tenderness, juiciness, and great marbling (those little flecks of fat that infuse the meat with flavor).
My personal favorites for Blackstone grilling are:
- new york strip: A classic for a reason. It offers a fantastic balance of flavor and tenderness, making it a crowd-pleaser.
- Ribeye: The king of steaks! It's renowned for its rich, buttery flavor and beautiful marbling. Be prepared to pay a little more for this luxurious choice.
- filet mignon: Tender and delicate, perfect for those who prefer a leaner steak. It's known for its melt-in-your-mouth texture.
- Top Sirloin: A budget-friendly option that delivers fantastic flavor. Just make sure to get a steak that's at least 1 inch thick to prevent it from drying out.
Meat Temperature: Getting to Know Your Steak
The key to a perfect steak is understanding the internal temperature. You want to cook your steak to the exact temperature that corresponds to your desired level of doneness. Here's a guide to different doneness levels, but remember, these are just guidelines. Always use a meat thermometer to ensure your steak is cooked precisely to your liking.
Let's break it down in a table for clarity:
| Doneness | Internal Temperature (°F) | Internal Temperature (°C) |
|---|---|---|
| Rare | 125-130 | 52-54 |
| Medium Rare | 130-135 | 54-57 |
| Medium | 135-140 | 57-60 |
| Medium Well | 140-145 | 60-63 |
| Well Done | 145-150 | 63-66 |
(Part 3) Prepping the Steak: Getting Ready for the Griddle
You've got your grill ready, you've chosen the perfect steak, and now it's time to prep your steak for grilling. This crucial step will significantly impact the final flavor and tenderness of your masterpiece.
Patting Dry, Salting, and Seasoning: Essential Prep Steps
Let's walk through these essential prep steps:
- Patting Dry: First, pat your steak dry with paper towels. This ensures a dry surface, which helps create a beautiful, crispy sear. We want to avoid those soggy, steamed results and achieve that delicious crusty exterior.
- Salting: This is a critical step. Salt draws out moisture from the steak, which helps tenderize it and enhance its flavor. Season the steak liberally and evenly on all sides, and then let it rest at room temperature for about 30 minutes. This gives the salt time to penetrate the meat and work its magic.
- Seasoning: Now, let's add some spice! Use your favorite seasonings. I enjoy a simple blend of salt, pepper, garlic powder, and onion powder. But feel free to experiment with a world of herbs and spices. Get creative and add a touch of your own personal flair.
(Part 4) Grilling the Steak: A Step-by-Step Guide
Finally, it's time to grill your steak! This is the moment we've been waiting for. Let's do this right!
Preheating the Grill: Setting the Stage for Success
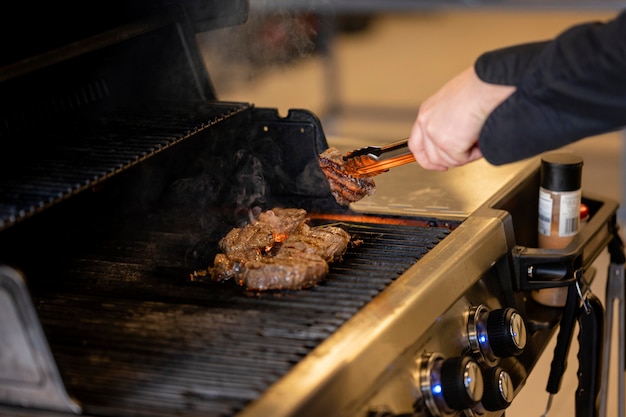
Start by preheating your Blackstone grill to medium-high heat. You want the grill to be hot enough to create a beautiful sear on your steak. A meat thermometer is your best friend here. Aim for a temperature of around 400°F (204°C). A hot grill is crucial for achieving those coveted sear marks and perfectly cooked steaks.
Oil Up and Grill: The Magic Begins
Once your grill is preheated, brush the cooking surface with a thin layer of oil. This prevents the steak from sticking to the grill and ensures a smooth cooking experience. Now, it's time to add the steak.
Place your steak on the hot grill and let it cook undisturbed for about 3-4 minutes per side. Don't move it around or poke at it. Let it sear properly and develop that beautiful crust. Patience is key here!
Flipping and the "Rest" of the Story: Perfecting the Technique
After 3-4 minutes, carefully flip the steak. The first side should have a nice, even crust with those gorgeous sear marks, a sign of perfect grilling. Let the steak cook for another 3-4 minutes on the second side.
If you want your steak cooked more thoroughly, continue cooking it for another 2-3 minutes per side. Just make sure to keep a close eye on it with your meat thermometer to ensure you don't overcook it. We want that juicy, tender steak, not a dry, tough one!
Now, for the final touch – resting. Remove the steak from the grill and let it rest on a cutting board for 5-10 minutes before slicing and serving. This allows the juices to redistribute throughout the steak, resulting in a more tender and flavorful bite.
(Part 5) Blackstone Steak Masterclass: Beyond the Basics
We've covered the fundamentals of grilling a perfect steak on your Blackstone. But let's take it to the next level! Here are some additional tips and techniques to help you create truly unforgettable steaks.
reverse searing: Mastering Gentle Cooking
Reverse searing is a technique that involves cooking the steak at a lower temperature for a longer period, followed by a quick sear over high heat. This method ensures that the steak is cooked evenly throughout and has a juicy, tender texture. It's a great option for achieving perfectly cooked steaks, especially for thicker cuts.
Here's how to do it:
- Slow and Low: Preheat your Blackstone grill to medium heat (about 300°F/150°C). The lower heat will cook the steak evenly without overcooking the outside.
- Gentle Cook: Place the steak on the grill and cook for about 30-45 minutes, or until the internal temperature reaches about 10 degrees less than your desired doneness. Think of this as a gentle cook, allowing the heat to penetrate the meat gradually.
- The Final Touch: Once the steak is cooked to your liking, crank up the heat on your grill to high. Now, sear the steak for 1-2 minutes per side to create a beautiful, crispy crust. The high heat will create that signature sear and lock in those delicious juices.
Smoking the Steak: Adding Depth of Flavor
For those who love a hint of smoky flavor, a smoker box is your secret weapon. Fill the smoker box with wood chips (hickory, apple, or cherry work well), and place it on your Blackstone grill. Let the chips smoke for a few minutes before adding your steaks. The wood chips will impart a delicious smoky flavor to your meat, adding another dimension to your culinary masterpiece.
Adding Flavor with Rubs and Marinades: Elevating the Steak
Don't be afraid to experiment with different rubs and marinades to elevate your steak game. A good rub can add a burst of flavor, while a marinade can help tenderize the meat and make it extra juicy.
Here's a simple steak rub recipe you can try:
- 1/2 cup kosher salt
- 1/4 cup black pepper
- 1 tablespoon garlic powder
- 1 tablespoon onion powder
- 1 tablespoon paprika
- 1 teaspoon cayenne pepper (optional)
To create a marinade, you can combine ingredients like soy sauce, olive oil, garlic, ginger, lemon juice, and herbs. Let your creativity run wild and experiment with different flavor combinations.
Apply the rub or marinade to the steak at least 30 minutes before grilling. This will give the flavors time to penetrate the meat, ensuring that every bite is infused with deliciousness.
(Part 6) The Blackstone Steak Masterclass: Beyond the Steak
The Blackstone grill is much more than a steak-only machine. It's a versatile culinary powerhouse that can handle all sorts of dishes, expanding your culinary horizons.
Burgers: Juicy and Delicious
Forget the greasy burgers from fast food joints. Create your own juicy, flavorful burgers on the Blackstone. Use high-quality ground beef, and season it generously with salt, pepper, and your favorite spices. Form the patties into your desired shapes and cook them on the Blackstone until they are cooked through and have a nice crust.
Don't overcook the burgers! They should be juicy and flavorful, not dry and crumbly. Use a meat thermometer to ensure they are cooked to an internal temperature of 160°F (71°C).
grilled vegetables: Seasonal Goodness
The Blackstone is perfect for grilling vegetables. Try grilling bell peppers, zucchini, eggplant, onions, and mushrooms. Drizzle them with olive oil, season them with salt and pepper, and grill them until they are tender and slightly charred.
Grilled vegetables are delicious on their own, but they also make a fantastic side dish for steak, adding a touch of sweetness and freshness to the meal.
Breakfast Delights: Pancakes, French Toast, and More
Who says the Blackstone is just for dinner? It's also perfect for breakfast! Cook up fluffy pancakes, crispy French toast, or even savory breakfast burritos. The even heat distribution of the Blackstone makes it a dream for breakfast cooking.
Get creative and experiment with different toppings. You can add fruit, chocolate chips, nuts, or even savory ingredients like cheese, sausage, and bacon. The possibilities are endless!
(Part 7) Blackstone Steak Masterclass: Maintaining Your Griddle
Your Blackstone grill is an investment, and you want to keep it in tip-top shape. Proper maintenance will ensure that your grill lasts for years to come, providing you with countless delicious meals. Here are some tips for keeping your Blackstone clean and in good working order.
Cleaning the Blackstone: Keeping It Shiny
After each use, clean your Blackstone grill. It's easier to clean the grill when it's still warm. Use a grill brush or a scraper to remove any food debris. Wipe down the cooking surface with a damp cloth. Once it's clean, dry the surface thoroughly.
Storing the Blackstone: Protecting Your Investment
When you're not using your Blackstone grill, cover it with a protective cover to shield it from the elements. This will help to keep your grill clean and prevent rust from forming. A little protection goes a long way!
Troubleshooting: Addressing Common Issues
Here are some common Blackstone grilling issues and how to solve them:
- Food Sticking: If your food is sticking to the Blackstone grill, make sure that you are preheating it properly. Also, ensure that you are oiling the grill surface before cooking. Use a high-quality oil with a high smoke point, such as canola oil or grapeseed oil.
- Uneven Heat Distribution: If you are experiencing uneven heat distribution, you may need to adjust the burner settings. You may also want to check the Blackstone grill's burner tubes for any blockages. Make sure the gas connections are secure.
- Rust Formation: To prevent rust, always cover your Blackstone grill when not in use. If you see rust forming, try cleaning it with a mild abrasive cleaner or a wire brush. You can also use a rust converter to help prevent it from spreading.
(Part 8) FAQs: Answering Your Blackstone Grill Questions
Let's tackle some common questions about the Blackstone grill.
1. What is the Blackstone grill made of?
The Blackstone grill is made of steel. It's a durable material that can withstand high temperatures. The cooking surface is usually made of steel, and it's often coated with a non-stick material to help prevent food from sticking. The sturdy construction ensures long-lasting performance.
2. How long does the Blackstone grill last?
With proper care and maintenance, a Blackstone grill can last for many years. The lifespan of your Blackstone grill will depend on how often you use it and how well you maintain it. Just like any appliance, it requires regular cleaning and care to ensure it lasts a long time.
3. How do I clean a Blackstone grill?
Cleaning your Blackstone grill is pretty simple. After each use, wipe down the cooking surface with a damp cloth. You can also use a grill brush or scraper to remove any food debris. If there are any stubborn stains, you can use a mild abrasive cleaner or a wire brush.
For a deeper clean, you can remove the griddle surface and wash it in warm, soapy water. Just make sure to dry it thoroughly before putting it back on the grill.
4. How do I season a Blackstone grill?
You don't need to season a Blackstone grill like you would a cast iron skillet. The cooking surface is usually coated with a non-stick material, so there's no need to create a protective layer.
However, if you want to create a non-stick surface, you can lightly oil the grill and heat it to high heat. This will help to create a thin layer of oil on the surface, which can help prevent food from sticking. Just make sure to wipe off any excess oil before cooking.
5. Can I use the Blackstone grill for other things besides grilling?
Yes, the Blackstone grill is a versatile appliance that can be used for a variety of cooking tasks. You can use it to cook pancakes, French toast, omelets, vegetables, stir-fries, and even pizzas. The possibilities are endless!
So, there you have it. My Blackstone Steak Masterclass is your guide to turning out those perfect steaks that will have everyone begging for more. It's not just about the grill; it's about the passion, the exploration, and the joy of crafting a culinary masterpiece in your own kitchen. Go forth, grill masters, and conquer the world of perfect steaks!
Everyone is watching

Prime Rib Roast Cooking Time Chart: Per Pound Guide
Cooking TipsPrime rib roast. Just the name conjures images of lavish dinners, crackling fires, and hearty laughter. It’s ...

How Long to Bake Potatoes in the Oven (Perfect Every Time)
Cooking TipsBaked potatoes are a staple in my kitchen. They're incredibly versatile, delicious, and surprisingly easy to m...

Perfect Rice Every Time: The Ultimate Guide to Cooking Rice
Cooking TipsAs a self-proclaimed foodie, I've always been a bit obsessed with rice. It's the foundation of countless cuisi...

The Ultimate Guide to Cooking Asparagus: Tips, Techniques, and Recipes
Cooking TipsAsparagus. The mere mention of this spring delicacy conjures up images of vibrant green spears, crisp and burs...

Ultimate Guide to Cooking the Perfect Thanksgiving Turkey
Cooking TipsThanksgiving. Just the word conjures up images of overflowing tables laden with delicious food, the scent of r...