Alright, let's talk ribs. Now, I know you're thinking, "Ribs? That's easy! Just throw 'em on the grill and let them go." But trust me, mate, ribs, like any good meat, deserve a bit of TLC to truly shine. And that TLC starts with getting the grill temperature just right.
This article is your guide to mastering the art of rib cookery. We'll be digging into the nitty-gritty of grill temperatures, exploring different methods and techniques, and sharing some of my personal tips and tricks I've picked up over the years. After reading this, your ribs will be fall-off-the-bone tender and bursting with flavour. So, grab a beer, settle in, and let's get grilling!
Part 1: Setting the Scene
The Science of rib cooking: It's All About the Collagen
Ribs are a bit of a culinary puzzle. They're tough, but they're also packed with flavour. The magic of achieving that melt-in-your-mouth tenderness lies in breaking down the collagen, a tough protein that gives ribs their structure. And the best way to do that? Low and slow.
Imagine you're not just cooking the ribs, you're gently persuading them to surrender their toughness. At low temperatures, the collagen slowly melts away, transforming into gelatin. This gelatin is the secret ingredient that makes those ribs so wonderfully tender and juicy.
Choosing Your Weapon: Gas or Charcoal?
Now, this might spark some debate, but I'm a charcoal guy, through and through. That smoky flavour you get from charcoal just can't be replicated with gas. Plus, there's something about the ritual of tending the coals that just feels right. However, I wouldn't tell you to ditch your gas grill if that's what you've got. Both methods work well for ribs, and ultimately, it's about finding what you enjoy most.
The Power of Temperature Control: Keeping It Steady
The key to achieving the perfect rib is all about temperature control. We're aiming for a steady, low heat that won't dry out the meat. And while we'll get into specific temperature ranges later, let's talk about how to maintain that consistency.
For charcoal grills, focus on keeping a good bed of coals. You can adjust the heat by adding or removing coals, and using a chimney starter ensures a steady supply of hot embers. If you're a gas grill devotee, invest in a good thermometer and try to maintain a steady heat throughout the cooking process.
Part 2: The Temperature Sweet Spot

The Magic Number: 225°F (107°C)
For me, 225°F (107°C) is the holy grail of rib cooking. It's low enough to break down the collagen without burning the meat, and high enough to keep things moving along at a decent pace. Remember, we're not trying to rush this process. We're aiming for slow, steady, and delicious.
Beyond the Basics: Temperature Variations
While 225°F (107°C) is the gold standard, you can experiment with different temperatures to find your personal sweet spot. Some folks prefer a slightly higher temperature, around 250°F (121°C), for a crispier bark. Others might opt for a lower temperature, like 200°F (93°C), for a more gentle cook. It really boils down to your own preferences and the type of ribs you're using.
Temperature Considerations for Different Rib Types
Baby back ribs: These ribs are generally considered the most tender and flavorful. They cook quickly and benefit from a slightly higher temperature, around 250°F (121°C).
spare ribs: These ribs are larger and meatier than baby back ribs. They require a longer cooking time and benefit from a lower temperature, around 225°F (107°C).
Country Ribs: These ribs are cut from the chuck or shoulder and are often quite thick. They require an even longer cooking time and a lower temperature, around 200°F (93°C).
Part 3: Rib Preparation: Getting Ready for the Grill
The Three Rs: Rub, Ribs, Ready
Before we get to the grilling, we need to prepare our ribs. This is where the fun really begins! You've got your grill prepped, your chosen temperature locked in, and now it's time to get those ribs ready.
rib rub: The Spice of Life
A good rib rub is like a hug for your meat. It adds flavour, moisture, and a beautiful, smoky crust. There are countless rib rub recipes out there, but here’s a simple one I love to use:
- 2 tablespoons paprika
- 2 tablespoons brown sugar
- 1 tablespoon salt
- 1 tablespoon black pepper
- 1 tablespoon garlic powder
- 1 tablespoon onion powder
- 1 teaspoon cayenne pepper (optional, for a little kick)
Mix it all together and rub it generously all over your ribs. Be sure to get it into all the nooks and crannies!
The Importance of Trimming: Cleaning Up the Act
Once you've rubbed your ribs, it's time to give them a quick trim. Remove any excess fat or membrane, especially from the underside of the rack. You don't want to remove all the fat, mind you, as that'll help keep the ribs moist during cooking.
Using a meat tenderizer: An Extra Step for Tenderness
If you're looking for extra tender ribs, consider using a meat tenderizer. This will help to break down the muscle fibers and make the ribs even more tender. You can use a mallet, a fork, or a specialized meat tenderizer tool.
Part 4: Grilling Time: The Main Event
Setting the Stage: Grill Setup
Right, let's get those ribs onto the grill! You've chosen your grill, charcoal or gas, and you've got the temperature dialled in. But before you toss those ribs on, a little prep work goes a long way.
Indirect Heat: The Secret to Tenderness
The key to cooking ribs to perfection is indirect heat. This means that the ribs aren't placed directly over the heat source. Instead, we'll be using the grill's indirect heat to cook them slowly and evenly.
If you're using a charcoal grill, create an indirect heat zone by building a mound of coals on one side of the grill. Then, place the ribs on the opposite side, away from the direct heat.
For gas grills, simply turn on only the outer burners, leaving the center burner off. This will create a zone of indirect heat where you can safely cook your ribs.
The Art of Wrapping: The Moisture Lock
Now, there's a bit of a debate about whether or not to wrap ribs during cooking. Some folks swear by it, while others prefer to leave them unwrapped. I say, it depends on your personal preference.
Wrapping your ribs in foil helps to retain moisture and speed up the cooking process. It also helps to create a more tender, melt-in-your-mouth texture. If you choose to wrap, do so during the second half of the cooking time.
The Importance of Monitoring: Keep a Close Eye
Once the ribs are on the grill, it's time to put your monitoring hat on. Keep a close eye on the temperature, checking it every 30 minutes or so. You want to maintain that steady, low heat throughout the entire cook.
Ribs Need Time: Be Patient
Patience, my friend, is key to a perfect rib cook. Ribs aren't a quick meal, they need time to break down and become gloriously tender. Expect to spend at least 4-5 hours on the grill.
Using a Water Pan: The Moisture Boost
For an extra layer of moisture, you can add a water pan to the bottom of your grill. The steam from the water pan will help keep the ribs moist and prevent them from drying out.
Part 5: The Telltale Signs of Rib Perfection
The bone test: A Reliable Indicator
Now, you're diligently watching those ribs, but how do you know when they're done? There's a tried and true method: the bone test. Simply pick up a rib and gently tug on the bone. If it pulls away easily, with little resistance, your ribs are ready!
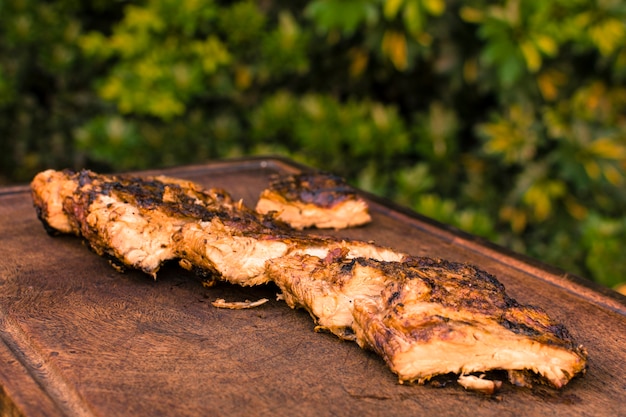
Rib Appearance: The Visual Clue
Another way to gauge whether your ribs are ready is to look at their appearance. The meat should be tender and pull back from the bone easily. The bark should be a beautiful, deep mahogany color, with a slightly crisp texture.
rib temperature: The Scientific Approach
If you're feeling adventurous, you can also use a meat thermometer to check the internal temperature of the ribs. The ideal internal temperature for ribs is 190°F (88°C).
Part 6: Finishing Touches: That Last Bit of Magic
The Glaze: A Sweet and Smoky Finish
Your ribs are nearly ready, but we can't leave them plain, can we? It's time to add a final flourish, a touch of magic to take them over the top. This is where the glaze comes in.
Glazing Techniques: A Touch of Creativity
There are countless glaze recipes out there, but I like to keep it simple. I usually use a combination of barbecue sauce, honey, and a touch of mustard.
- Simple Glaze: Combine equal parts barbecue sauce and honey. Add a pinch of salt and pepper to taste.
- Spicy Glaze: Add a tablespoon of hot sauce to the simple glaze for a kick.
- Sweet and Smoky Glaze: Combine barbecue sauce, brown sugar, and a tablespoon of smoked paprika.
Applying the Glaze: The Art of the Brush
Once your ribs have reached the desired internal temperature, brush them liberally with your glaze. You can add glaze during the last 30-45 minutes of cooking, or even more often. The more you glaze, the sweeter and shinier your ribs will be.
Using a Mop: Maintaining Moisture
Instead of just brushing on the glaze, you can use a mop to keep the ribs moist throughout the cooking process. A mop is simply a brush with a long handle that you can use to apply glaze or sauce to the ribs without lifting the lid of the grill.
Part 7: Resting: The Importance of Letting Go
The Art of Patience: Give Your Ribs a Break
The moment of truth is approaching, but don't be hasty! Before you dive into those ribs, give them a well-deserved rest. Cover the ribs loosely with foil and let them sit for at least 15-20 minutes. This will allow the juices to redistribute, creating even more tender and flavorful ribs.
The Benefits of Resting: Flavor and Texture
Resting the ribs helps the meat to relax and become more tender. It also allows the juices to redistribute evenly throughout the meat, creating a more flavorful and succulent experience.
Part 8: Serving: A Culinary Celebration
The Presentation: A Feast for the Eyes
Now, you've got your perfect ribs, glistening with glaze and bursting with flavor. It's time to present them in a way that's as pleasing to the eye as it is to the palate.
side dishes: Complementary Flavors
Ribs are a feast in themselves, but they also pair beautifully with a variety of side dishes. I like to serve mine with a creamy coleslaw, smoky baked beans, or a fresh and tangy corn salad.
Enjoying the Moment: Savor the Flavor
Finally, the moment has arrived. Dig in, my friend, and savor every delicious bite. You've put in the time, the effort, and the patience to create a truly memorable meal. Enjoy!
FAQs
What happens if the grill temperature is too high?
If the grill temperature is too high, the ribs will cook too quickly and the outside will burn before the inside has a chance to cook through. You may also end up with dry, tough ribs, which is definitely not what we're aiming for.
What happens if the grill temperature is too low?
If the grill temperature is too low, the ribs will cook too slowly and may not achieve the desired tenderness. It can also make the cooking process quite long, potentially extending your time on the grill by several hours.
How can I tell if my ribs are done?
As mentioned, you can tell if your ribs are done by performing the bone test, checking the appearance of the meat, or using a meat thermometer. The best way to gauge if your ribs are done is to use a combination of these techniques.
Should I wrap my ribs in foil?
Wrapping your ribs in foil is a matter of personal preference. Some people prefer the extra moisture and tenderness that foil wrapping provides. Others prefer the crispy bark that is achieved by leaving the ribs unwrapped. It depends on your taste and what you're looking for in a rib.
What are some good side dishes to serve with ribs?
Ribs pair well with a wide variety of side dishes. Some popular options include coleslaw, baked beans, cornbread, potato salad, macaroni and cheese, and fruit salad. Choose side dishes that complement the flavors of the ribs and create a balanced meal.
What are some tips for making the best barbecue sauce for ribs?
Use high-quality ingredients.
Start with a base of ketchup, brown sugar, and vinegar.
Add your favorite spices, such as paprika, garlic powder, onion powder, and black pepper.
Adjust the sweetness and acidity to your liking.
Let the sauce simmer on low heat for at least 30 minutes to allow the flavors to meld.
Can I use a smoker for ribs?
Absolutely! Smokers are a fantastic option for ribs, as they provide a constant, low and slow heat, perfect for breaking down collagen and creating a delicious smoky flavour. Keep the smoker temperature around 225°F (107°C) and use wood chips like hickory or apple for a classic smoky flavour.
Everyone is watching

Prime Rib Roast Cooking Time Chart: Per Pound Guide
Cooking TipsPrime rib roast. Just the name conjures images of lavish dinners, crackling fires, and hearty laughter. It’s ...

How Long to Bake Potatoes in the Oven (Perfect Every Time)
Cooking TipsBaked potatoes are a staple in my kitchen. They're incredibly versatile, delicious, and surprisingly easy to m...

Perfect Rice Every Time: The Ultimate Guide to Cooking Rice
Cooking TipsAs a self-proclaimed foodie, I've always been a bit obsessed with rice. It's the foundation of countless cuisi...

The Ultimate Guide to Cooking Asparagus: Tips, Techniques, and Recipes
Cooking TipsAsparagus. The mere mention of this spring delicacy conjures up images of vibrant green spears, crisp and burs...

Ultimate Guide to Cooking the Perfect Thanksgiving Turkey
Cooking TipsThanksgiving. Just the word conjures up images of overflowing tables laden with delicious food, the scent of r...