Let's talk beef tenderloin, that exquisite cut of meat that makes any dinner party feel special. It's the kind of dish that demands attention, and rightfully so. But here's the thing: mastering the beef tenderloin doesn't have to be a culinary mystery. It's about understanding the nuances of this beautiful cut, from choosing the right piece to mastering the art of roasting and all the flavor-boosting techniques in between. I've been there, standing in the kitchen, afraid of overcooking it, leaving it dry and disappointing. But after countless attempts and trial and error, I've finally figured it out, and I'm going to share my secrets with you.
This isn't just a simple recipe. We're diving deep into the world of the beef tenderloin, exploring the key factors that contribute to a truly unforgettable roast. We'll learn about selecting the perfect cut, prepping it like a pro, and mastering the art of roasting to ensure perfect results every time. We'll also explore different flavor profiles, from classic herbs and spices to more adventurous combinations. And of course, we'll tackle your burning questions, from how to cook a tenderloin for a crowd to what to do with those delicious leftovers.
(Part 1) Choosing Your Weapon: The perfect tenderloin
Picking the Right Cut: A Guide for the Discerning Butcher
The journey to a perfect tenderloin begins with selecting the right cut. Picture this: a beautifully marbled, thick piece of tenderloin, just waiting to be transformed into a culinary masterpiece. When you're at the butcher counter, don't be shy, ask for help! They are the experts, after all. You'll usually find tenderloins in two sizes, "small" and "large". I personally favor the large, because it offers more meat for your money and can be easily carved into smaller portions. Plus, it just looks impressive on the table.
Understanding Grading: Prime, Choice, and Select
You'll often see tenderloins graded, typically with USDA Select, Choice, and Prime. Prime is the top dog, boasting the most marbling, which translates to rich, intense flavor. But here's the truth: if you're working with a reliable butcher who knows their meat, you don't have to stress too much about the grade. They'll guide you towards a tenderloin that fits your needs and budget. However, if you spot a Prime tenderloin, grab it! You won't regret it.
(Part 2) Preparing for Battle: Trimming and Seasoning
Now that you have your prized tenderloin, it's time to prepare it for its grand entrance into the oven. This involves a bit of trimming and seasoning, but don't worry, it's easier than you think.
The Art of Trimming: Removing the Silver Skin
First, you need to conquer the silver skin. This thin, tough membrane runs along the outside of the tenderloin and won't become tender even after cooking. It needs to go. Grab a sharp knife and make a small cut in the silver skin. Then, using your fingers, gently pull it away from the meat. Be careful not to tear the tenderloin. Once the silver skin is gone, you can trim any excess fat. I like to leave a thin layer of fat on the tenderloin, as it adds flavor and helps keep the meat moist. But if you prefer leaner meat, feel free to trim it all off.
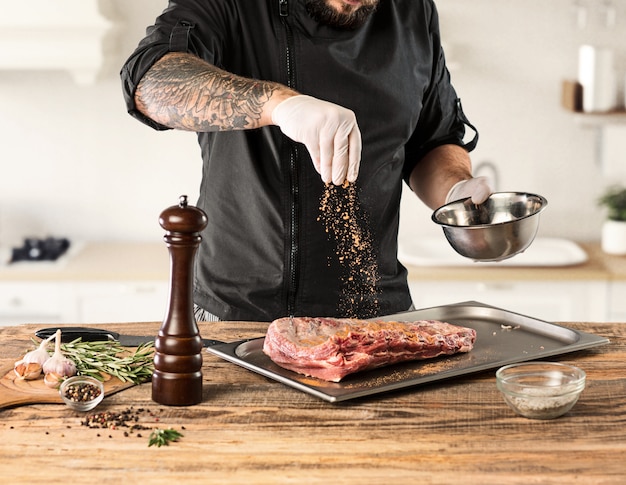
Seasoning: Unlocking Flavor
Now, the fun part: seasoning. The possibilities are endless, but I have a few tried-and-true favorites. A simple salt and pepper rub is a classic, allowing the natural flavor of the beef to shine through. I use coarse sea salt and freshly ground black pepper for a bit of texture. For a more adventurous twist, try a blend of garlic powder, onion powder, paprika, and a touch of cayenne pepper. Don't be afraid to experiment! But remember, less is more when it comes to seasoning a tenderloin. You want to enhance the flavor, not overpower it.
(Part 3) The Grand Roast: Mastering the Technique
Now, the moment of truth – the roasting. This is where your tenderloin transforms into a culinary masterpiece. It's about precision, timing, and understanding the delicate dance between heat and time.
Preheating and Placement: Creating the Perfect Oven Environment
Begin by preheating your oven to 400°F (200°C). This is crucial for getting that beautiful, crispy sear on the outside while ensuring even cooking throughout the roast. Next, select your roasting pan. I prefer a heavy-duty roasting pan with a rack, as it helps the tenderloin cook evenly and prevents it from sitting in its own juices. Once your oven is preheated, place the pan inside.
Searing: The First Kiss of Flavor
Here's where things get exciting: searing. This gives your tenderloin a crispy, golden crust that seals in flavor and creates an irresistible texture. Before you pop the tenderloin into the oven, heat a tablespoon or two of olive oil in a large skillet over medium-high heat. Once the oil is shimmering, carefully sear the tenderloin on all sides, about 2-3 minutes per side. This will create a beautiful, even brown crust.
Time for the Roast: The Patience Game
After searing, transfer the tenderloin to the preheated roasting pan and place it in the oven. Now, the patience game begins. The cooking time depends on the size of your tenderloin, but generally, you'll want to cook it for about 15-20 minutes per pound for a medium-rare roast. For medium, add a few minutes, and for medium-well, add even more time. Remember, you can always cook it for a bit longer, but you can't undo overcooking. A meat thermometer is your secret weapon here. Invest in one if you don’t already have one. It's the only way to guarantee perfect results.
(Part 4) The Resting Game: Let It Relax
Once your tenderloin has reached your desired internal temperature, it's time to give it a well-deserved rest. This is a critical step that allows the juices to redistribute throughout the meat, resulting in a tender, succulent roast.
How Long?
The resting time depends on the size of your tenderloin. For a small tenderloin, 10-15 minutes is enough. For a larger tenderloin, you'll want to give it 20-30 minutes to relax.
The Technique
To rest your tenderloin, remove it from the oven and place it on a cutting board. Cover it loosely with aluminum foil to retain heat and moisture. It's tempting to dive right in, but trust me, this step is worth the wait. While the tenderloin is resting, you can whip up your sides and enjoy a glass of wine.
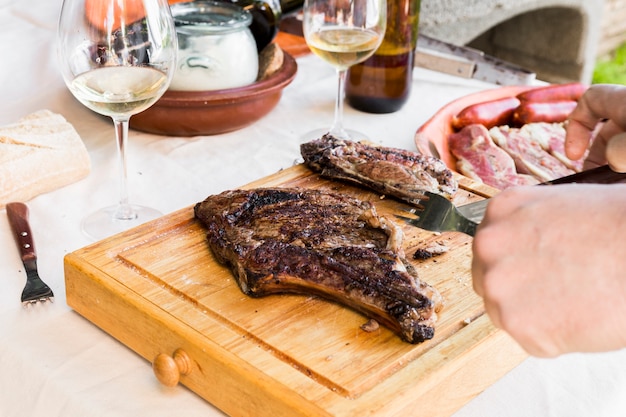
(Part 5) The Art of the Carve: Making a Statement
Finally, the moment of truth: carving the tenderloin. This is your chance to shine! It's a bit of a performance, so own it.
Tools of the Trade: A Sharpened Weapon
You'll need a sharp carving knife, a kitchen essential for any serious home cook. A good quality carving knife makes all the difference. It's also a good idea to have a carving fork to help you hold the tenderloin in place while you carve it.
The Carving Technique: A Symphony of Slices
Begin by cutting the tenderloin in half lengthwise. Then, slice the tenderloin into thin, even slices, about half an inch thick. Don't slice all the way through; you want to keep the slices connected. This creates a beautiful presentation and makes it easier to serve. Once the tenderloin is carved, arrange it on a platter and garnish it with fresh herbs or a sprinkle of salt and pepper. Serve it with your favorite sides, and enjoy the fruits of your labor!
(Part 6) Temperature Check: Don't Overcook Your Beef
We've covered resting, but let's talk about the most critical aspect of cooking a tenderloin to perfection: temperature. A meat thermometer is your best friend here. It's the only way to truly know when your tenderloin is cooked to your liking.
Internal Temperature Chart: A Guide to Doneness
Here's a handy chart that shows the recommended internal temperatures for different levels of doneness:
| Doneness | Internal Temperature (°F) |
|---|---|
| Rare | 120-125°F |
| Medium-rare | 130-135°F |
| Medium | 140-145°F |
| Medium-well | 150-155°F |
| Well-done | 160°F and above |
(Part 7) Flavor Adventures: Going Beyond the Basics
We've covered the fundamentals, but let's talk about flavor! There's so much more you can do with a beef tenderloin than just salt and pepper. Don't be afraid to explore and experiment.
Herbs and Spices: Adding Depth and Complexity
Here are some of my favorite herb and spice combinations for beef tenderloin:
- Classic French Herb Blend: Thyme, rosemary, parsley, garlic powder, and a pinch of salt and pepper. Simple yet effective. It evokes the essence of classic french cuisine.
- Italian Herb Blend: Oregano, basil, thyme, garlic powder, and a pinch of red pepper flakes. This blend adds a lovely savory warmth, reminiscent of Italian cooking.
- Spicy Chipotle Rub: Smoked paprika, chipotle powder, cumin, garlic powder, and a pinch of cayenne pepper. This creates a smoky, spicy kick, perfect for those who enjoy a bit of heat.
Marinades: Infusing Flavor From Within
Marinades are a fantastic way to add depth and complexity to the flavor of your tenderloin. You can use store-bought marinades, or create your own. Here are a few ideas:
- Soy Ginger Marinade: Soy sauce, ginger, garlic, and a touch of honey. It adds a wonderful savory-sweet flavor, perfect for those who love Asian-inspired cuisine.
- Red Wine Marinade: Red wine, balsamic vinegar, garlic, rosemary, and a pinch of black pepper. This marinade will give your tenderloin a rich, complex flavor, a perfect pairing for red wine lovers.
Glazes: The Finishing Touch
Once your tenderloin is cooked, you can brush it with a glaze to add a beautiful sheen and an extra burst of flavor. Here are a few glaze options that will elevate your tenderloin:
- Honey-Soy Glaze: Honey, soy sauce, and a pinch of ginger. This glaze is sweet and savory with a hint of spice, perfect for those who enjoy Asian-inspired flavors.
- Red Wine Glaze: Red wine, balsamic vinegar, brown sugar, and a pinch of thyme. This glaze is rich and complex with a lovely tang, ideal for red wine enthusiasts.
- Bourbon Glaze: Bourbon, brown sugar, Dijon mustard, and a pinch of black pepper. This glaze is sweet and smoky with a hint of spice, a perfect complement to the rich flavor of the beef.
(Part 8) Leftover Love: Making the Most of Your Roast
Leftovers? Don't worry! This is where the fun really begins. Think of all the creative and delicious ways you can repurpose those tender, flavorful leftovers.
Delicious Leftover Ideas: Transforming Tenderloin into New Dishes
- Beef Sandwiches: Slice the leftover beef tenderloin thin and use it to make mouthwatering sandwiches. Use toasted bread or rolls and add your favorite toppings, like cheese, lettuce, tomato, onion, and mayonnaise. It's a classic for a reason.
- Beef Salad: Dice the leftover beef tenderloin and add it to a salad for a boost of protein and flavor. You can use a mixed green salad or get creative with a salad featuring arugula, roasted vegetables, or even fruit.
- Beef and Vegetable Stir-Fry: A great way to use up leftover tenderloin and veggies. Stir-fry the beef with your favorite vegetables, like broccoli, carrots, and peppers. Add a sauce of your choice, like soy sauce, ginger, or honey. Serve it over rice or noodles.
- Beef Soup: Chop up the leftover beef tenderloin and add it to a hearty soup. Use beef broth or vegetable broth and add your favorite vegetables, such as potatoes, carrots, celery, and onions. It's warm, comforting, and perfect for a cold day.
- Beef Tacos: Use the leftover beef tenderloin as a filling for tacos. Dice the beef and warm it up with your favorite taco seasonings. Top it with your favorite taco fixings, such as salsa, guacamole, sour cream, and cheese.
FAQs
1. How do I know if my tenderloin is cooked to the right temperature?
The most reliable way to determine if your tenderloin is cooked to the right temperature is to use a meat thermometer. Insert the thermometer into the thickest part of the tenderloin, ensuring it doesn't touch the bone. The thermometer should read the correct temperature for your desired level of doneness.
2. What if my tenderloin is a bit dry?
Don't fret if your tenderloin is a bit dry. You can add moisture back by adding a bit of sauce or gravy. It's also a good idea to let the tenderloin rest for a longer period of time, allowing the juices to redistribute throughout the meat.
3. Can I cook my tenderloin in a slow cooker?
You can cook a tenderloin in a slow cooker, but it's not ideal. The slow cooker tends to make the tenderloin tough. It's best to cook a tenderloin in the oven, where it can achieve a perfect balance of tenderness and flavor.
4. Can I freeze my tenderloin?
Yes, you can freeze your tenderloin. Wrap it tightly in plastic wrap or aluminum foil and then place it in a freezer-safe bag. You can freeze it for up to 3 months. When you're ready to cook it, thaw it in the refrigerator overnight.
5. What are some good sides to serve with a beef tenderloin?
Here are some delicious sides that complement the richness of a beef tenderloin:
- Roasted vegetables, like asparagus, Brussels sprouts, or potatoes, bring a contrasting texture and vibrant flavor.
- mashed potatoes offer a comforting and creamy counterpoint to the meat.
- rice pilaf, with its subtle aroma and fluffy texture, is a classic side dish.
- green beans, with their crispness and subtle bitterness, provide a refreshing contrast.
- Salad, with its lightness and freshness, adds a vibrant touch and balances the richness of the tenderloin.
Everyone is watching

Prime Rib Roast Cooking Time Chart: Per Pound Guide
Cooking TipsPrime rib roast. Just the name conjures images of lavish dinners, crackling fires, and hearty laughter. It’s ...

How Long to Bake Potatoes in the Oven (Perfect Every Time)
Cooking TipsBaked potatoes are a staple in my kitchen. They're incredibly versatile, delicious, and surprisingly easy to m...

Perfect Rice Every Time: The Ultimate Guide to Cooking Rice
Cooking TipsAs a self-proclaimed foodie, I've always been a bit obsessed with rice. It's the foundation of countless cuisi...

The Ultimate Guide to Cooking Asparagus: Tips, Techniques, and Recipes
Cooking TipsAsparagus. The mere mention of this spring delicacy conjures up images of vibrant green spears, crisp and burs...

Ultimate Guide to Cooking the Perfect Thanksgiving Turkey
Cooking TipsThanksgiving. Just the word conjures up images of overflowing tables laden with delicious food, the scent of r...