Ah, beef tenderloin. Just the name conjures up images of a special occasion, a celebratory dinner, a meal that feels luxurious and decadent. But getting it right can be tricky, especially if you're not a seasoned chef. You want that beautiful pink centre, the melt-in-your-mouth tenderness, the juicy flavour – all without ending up with a dry, tough disappointment. Over the years, I've had my fair share of kitchen triumphs and disasters, but I've learned a thing or two about roasting beef tenderloin. So, grab a comfy chair, because I'm sharing all my secrets to achieving that perfect roast, the kind that will have your guests swooning.
(Part 1) Understanding the Cut: The Key to a Perfect Roast
Let's start with the basics. The beef tenderloin, also known as the psoas major muscle, is a long, narrow cut that runs along the backbone of the cow. It's a real delicacy, prized for its leanness and exceptional tenderness, which is why it's a favourite for special occasions. But, its leanness also means it can dry out easily if you're not careful. Knowing the different parts of the tenderloin will help you choose the best cut for your needs and make sure you cook it just right.
The Different Parts of the Tenderloin: Tail vs. Head
The tenderloin is usually sold in two parts: the "head" and the "tail." The head, which is thicker and wider, is often referred to as the "center cut" and is considered the most tender part. This is the most popular choice for a show-stopping roast.
The tail, on the other hand, is thinner and tapers off, and it's often called the "small end." While the tail is less tender than the head, it's still a delicious cut. Just bear in mind that it might need a bit more cooking time to achieve the same level of tenderness. I love using the tail for steak or for slicing into medallions for a quick and easy meal.
The Importance of the Tie
When you're buying your tenderloin, you'll probably see it tied with twine. This isn't just for show. The tie helps maintain its shape during cooking and prevents it from "spreading" too much. This ensures even cooking and a more aesthetically pleasing result. Don't worry, you can untie it once it's cooked!
(Part 2) Preparing the Tenderloin: Setting the Stage for Success
Alright, so you've got your beautiful tenderloin, now what? It's all about prepping it properly. Think of it as getting ready for a big night out – you need to make sure you look your best! Here's a step-by-step guide:
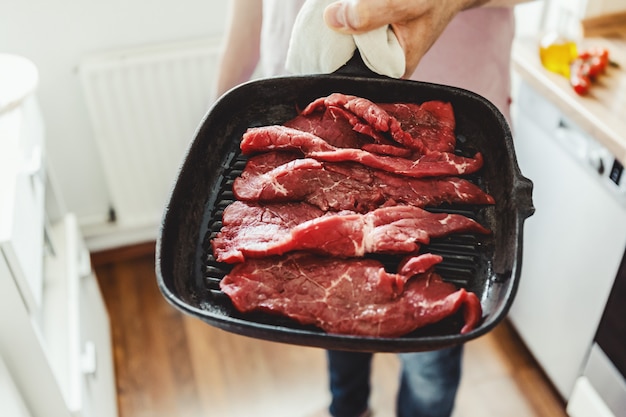
1. Trimming the Fat and Silver Skin: A Clean Slate
First things first, you'll want to remove any excess fat or silver skin. These can make the roast tough and detract from the flavour of the tenderloin. Use a sharp knife, carefully trimming away any bits that are not needed. Leave a thin layer of fat on the outside, though, as this will help keep the tenderloin moist during cooking.
2. Seasoning the Tenderloin: Unlocking the Flavour
Now, here's where things get interesting. The way you season your tenderloin can make a real difference. I'm a big fan of a simple salt and pepper rub. Just season liberally with salt and freshly ground black pepper. You can get fancy with herbs and spices, but I find that the classic combo really lets the flavour of the beef shine through. Oh, and don't forget to season the inside of the tenderloin too! You can even stuff it with some herbs or garlic for extra flavour. I love using a mixture of rosemary, thyme, and garlic for a classic flavour profile.
3. Patting Dry: Ensuring a Crisp Finish
Once you're happy with your seasoning, give the tenderloin a quick pat with kitchen paper to remove any excess moisture. This helps to prevent the meat from steaming in the oven, which can result in a less crisp surface. You want that lovely, golden brown crust, and this step will help you achieve it.
(Part 3) roasting time: Bringing the Heat
Now, the moment you've all been waiting for – the roasting! Get that oven nice and hot to sear the outside of the tenderloin and lock in the juices.
1. Preheat the Oven: Creating the Perfect Environment
Preheat your oven to 400°F (200°C). You want that oven nice and hot to sear the outside of the tenderloin and lock in the juices. It's like creating the perfect environment for your beef to cook beautifully.
2. Searing the Tenderloin: A Crispy, Flavorful Start
You want to sear the tenderloin on all sides before putting it in the oven. This creates a beautiful crust and helps to keep the moisture locked in. You can do this in a large skillet over medium-high heat, or even in the oven itself. For the most consistent browning, I prefer to do the initial searing in the oven. Just place the tenderloin in the preheated oven for about 10-15 minutes, flipping it every few minutes to ensure even browning.
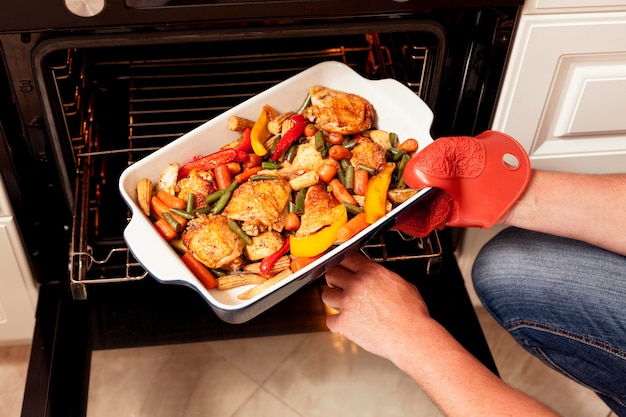
3. Roasting to Perfection: The Magic Happens Here
Once the tenderloin is nicely seared, it's time to pop it in the oven. But how long should you roast it for? This depends on the size of the tenderloin and your desired level of doneness. Here's a handy guide:
Roasting Time Guide: A Quick Reference
| Size (lbs) | Rare (125-130°F) | Medium-Rare (130-135°F) | Medium (140-145°F) | Well-Done (150°F) |
|---|---|---|---|---|
| 3-4 lbs | 20-25 minutes | 25-30 minutes | 30-35 minutes | 35-40 minutes |
| 4-5 lbs | 25-30 minutes | 30-35 minutes | 35-40 minutes | 40-45 minutes |
| 5-6 lbs | 30-35 minutes | 35-40 minutes | 40-45 minutes | 45-50 minutes |
Remember, these are just guidelines. You should always use a meat thermometer to check the internal temperature of the tenderloin. It's the most accurate way to ensure it's cooked to your liking. Once the tenderloin reaches your desired temperature, it's time to take it out of the oven.
(Part 4) Resting the Tenderloin: The Crucial Step for Juicy Perfection
You see, you can't just jump straight into carving the tenderloin. You need to let it rest for at least 15 minutes. This allows the juices to redistribute throughout the meat, resulting in a more tender and juicy roast. Cover the tenderloin loosely with foil to keep it warm while it rests. Trust me, this step is crucial. I've learned this the hard way – carving into a hot tenderloin right away can lead to a dry and disappointing result. The resting process is like giving the tenderloin a chance to relax and recover from the heat, and it's worth the wait!
(Part 5) Carving and Serving: Presenting Your Culinary Masterpiece
After resting, you're finally ready to carve the tenderloin. You can use a sharp knife to slice the tenderloin into thin, even pieces. I find it's easier to carve the tenderloin against the grain, which means slicing across the muscle fibres. This will result in more tender slices. Now, what to serve it with? The possibilities are endless, but here are a few of my favourites:
side dishes That Elevate the Experience
Roasted vegetables like carrots, potatoes, and asparagus are a classic pairing. You can also try a creamy sauce, such as a béarnaise or a red wine sauce. And of course, don't forget the sides – mashed potatoes, Yorkshire pudding, or even a simple green salad are all great options. I love a vibrant green salad with a bright vinaigrette to cut through the richness of the tenderloin.
Presentation is Key: Making it Look as Good as it Tastes
Presentation is key. Arrange the sliced tenderloin on a beautiful platter with your chosen sides. And don't forget to drizzle some of that delicious pan juices over the top for extra flavour. When you see the smiles on your guests' faces, you'll know you've done a good job.
(Part 6) Don't Be Afraid to Experiment: Unlocking Your Culinary Creativity
Now, remember, cooking is about having fun and experimenting. Don't be afraid to add your own personal touch to your beef tenderloin. You can try different seasonings, stuffings, and sauces. For example, you could stuff the tenderloin with a mixture of herbs, garlic, and pancetta for a more flavourful roast. Or, you could try making a horseradish cream sauce for a kick. I've discovered some incredible flavour combinations by just being adventurous in the kitchen.
A Few Creative Ideas to Inspire You
- Citrus and Herb Rub: Mix lemon zest, orange zest, fresh thyme, and rosemary with olive oil and salt for a bright and refreshing flavour.
- Mushroom and Garlic Stuffing: Sauté mushrooms, onions, and garlic with herbs and breadcrumbs for a rich and savory stuffing.
- Spiced Cranberry Sauce: Combine cranberries, orange zest, cinnamon, cloves, and a touch of red wine vinegar for a tangy and festive sauce.
(Part 7) Mistakes to Avoid: Learning from Experience
Let's face it, we all make mistakes in the kitchen from time to time. I've definitely had my fair share of mishaps. Here are some common mistakes to avoid when roasting beef tenderloin:
1. Overcrowding the Oven: Giving Your Tenderloin Space to Breathe
If you're roasting multiple items at the same time, make sure they have enough space to circulate air around them. Otherwise, the temperature will drop, and your tenderloin might not cook evenly. You want to avoid a situation where the heat is unevenly distributed, which can lead to inconsistent cooking.
2. Not Using a Meat Thermometer: The Only Way to Know for Sure
I can't stress this enough – a meat thermometer is your best friend when it comes to roasting beef. It's the only way to know for sure if the tenderloin is cooked to your liking. Don't rely on guesswork or visual cues. A meat thermometer will provide an accurate reading and ensure your tenderloin is cooked to perfection.
3. Overcooking: A Recipe for Dryness
As you know, beef tenderloin is lean, and it can dry out easily if you overcook it. Make sure you check the internal temperature frequently to prevent this. The goal is to cook the tenderloin to the desired level of doneness without overcooking it. A little pink is perfectly fine!
4. Not Letting it Rest: The Key to Juicy Tenderness
This is a mistake I've made in the past, and it's a real shame to ruin a perfectly good roast by cutting into it too soon. Let it rest, trust me, you'll be rewarded with a juicy, tender roast. The resting time allows the juices to redistribute, resulting in a more flavorful and tender cut of meat.
5. Not Using a Sharp Knife: Making Carving a Breeze
You don't want to be wrestling with a blunt knife when you're carving your tenderloin. Invest in a good quality knife that will make the job easy. A sharp knife will make slicing through the tenderloin a breeze and ensure that the slices are even and beautiful.
(Part 8) Serving Up Your Masterpiece: The Final Touch
You've prepped, roasted, rested, and carved your beef tenderloin, now it's time to serve it up with pride! You've created a culinary masterpiece that's bound to impress your guests. Presentation is key. Arrange the sliced tenderloin on a beautiful platter with your chosen sides. And don't forget to drizzle some of that delicious pan juices over the top for extra flavour. When you see the smiles on your guests' faces, you'll know you've done a good job.
(Part 9) Tips for perfect beef tenderloin: Extra Secrets for Success
Here are a few extra tips to help you roast the perfect beef tenderloin:
1. Braising for Added Tenderness: A Slow and Steady Approach
If you want a more tender and flavorful tenderloin, try braising it instead of roasting it. Braising involves searing the tenderloin, then cooking it slowly in a liquid like red wine or beef broth. This creates a more tender and flavorful result.
2. Marinating for Enhanced Flavour: Adding a Depth of Taste
Marinating the tenderloin for a few hours in advance can add extra flavor and moisture. You can use a simple marinade of olive oil, lemon juice, and herbs, or get creative with your own recipe. Marinating allows the flavors to penetrate the meat, resulting in a more flavorful and tender roast.
3. Using a digital meat thermometer: For Precise Temperature Control
I find that a digital meat thermometer is more accurate than a traditional probe thermometer. It also has a handy alert that lets you know when the tenderloin has reached your desired temperature. A digital thermometer provides greater accuracy and allows you to monitor the temperature throughout the cooking process.
(Part 10) Leftovers: Delicious and Versatile: Don't Let Them Go to Waste
You've got leftover tenderloin? Good news, there's so much you can do with it. Leftovers can be repurposed into a variety of delicious dishes. Here are a few ideas:
1. Beef Sandwiches: A Classic comfort food
Slice the leftover tenderloin and pile it high on crusty bread with your favourite toppings, such as cheese, mustard, and pickles. This is a great way to use up leftover tenderloin for a quick and easy lunch or dinner.
2. Beef Salad: A Light and Refreshing Option
Dice the leftover tenderloin and add it to a green salad with other ingredients like avocado, tomatoes, and cucumber. A simple vinaigrette dressing is all you need. This is a light and refreshing option that is perfect for a warm day.
3. Beef Soup: A Hearty and Satisfying Meal
Leftover tenderloin is the perfect base for a hearty beef soup. Just add it to a pot with vegetables, broth, and your favorite seasonings. You can even add some leftover pan juices for extra flavour.
4. Beef Tacos: A Fun and Festive Dinner
Shred the leftover tenderloin and use it to make delicious tacos. Add your favorite taco toppings, like cheese, salsa, and sour cream. These tacos are perfect for a casual weeknight dinner or a fun get-together with friends.
FAQs:
- What is the best temperature to cook beef tenderloin? The ideal internal temperature for beef tenderloin depends on your preferred level of doneness. Rare is 125-130°F, medium-rare is 130-135°F, medium is 140-145°F, and well-done is 150°F.
- How long does it take to cook a beef tenderloin? The cooking time for a beef tenderloin depends on its size and the desired level of doneness. For a 3-4 pound tenderloin, expect to cook it for 20-40 minutes, depending on the doneness. Use a meat thermometer to check the internal temperature.
- What happens if I overcook beef tenderloin? Overcooked beef tenderloin will be dry and tough. The meat will lose moisture and become chewy. To avoid this, use a meat thermometer and cook the tenderloin to the desired internal temperature.
- Can I cook a beef tenderloin in a slow cooker? Yes, you can cook a beef tenderloin in a slow cooker. However, it might not be the best option for achieving a crispy sear. For a more tender and flavorful result, braising the tenderloin in the slow cooker might be a better option. This method will ensure that the tenderloin is cooked through and tender, but it won't give you the same crispy sear as roasting.
- What is the best way to keep a cooked beef tenderloin moist? The key to keeping a cooked beef tenderloin moist is to let it rest for 15 minutes before carving. This allows the juices to redistribute throughout the meat, resulting in a more tender and juicy roast. This is a crucial step that should not be skipped!
There you have it! My secrets to roasting the perfect beef tenderloin. Remember, it's all about understanding the cut, prepping it right, and having a little fun in the kitchen. So, go forth and create a culinary masterpiece that will impress everyone. With a little practice and these helpful tips, you'll be a beef tenderloin master in no time!
Everyone is watching

Perfect Rice Every Time: The Ultimate Guide to Cooking Rice
Cooking TipsAs a self-proclaimed foodie, I've always been a bit obsessed with rice. It's the foundation of countless cuisi...

Ultimate Guide to Cooking the Perfect Thanksgiving Turkey
Cooking TipsThanksgiving. Just the word conjures up images of overflowing tables laden with delicious food, the scent of r...

The Ultimate Guide to Cooking Asparagus: Tips, Techniques, and Recipes
Cooking TipsAsparagus. The mere mention of this spring delicacy conjures up images of vibrant green spears, crisp and burs...

Can You Cook Spaghetti with Gasoline? (The Shocking Truth)
Cooking TipsWe've all seen those crazy internet trends. You know, the ones that make you wonder, "Did someone actually try...

Chorizo and Eggs Recipe: The Ultimate Guide
Cooking TipsRight, let’s talk about chorizo and eggs. You know, that classic Spanish dish that's always a winner. It's th...