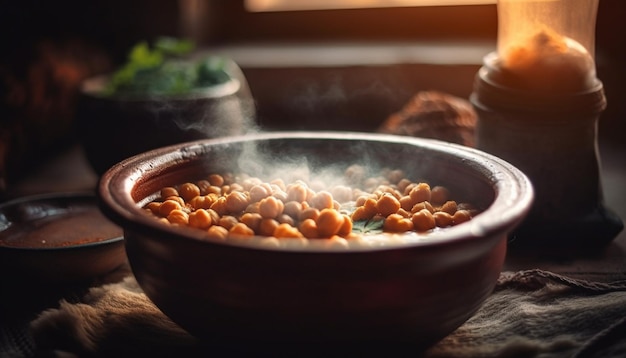
The air fryer has become a culinary hero, and crispy chickpeas are a star in its repertoire. But when it comes to prepping these tiny nutritional powerhouses, there’s a debate brewing: should you boil them first, or can you air fry them straight from the can?
I’m a bit of a chickpea addict myself, and I’ve experimented with both methods, so I’m here to share my insights. I’ll break down the pros and cons of each approach, delve into the science behind the crispy magic, and offer a step-by-step guide to achieving air fryer chickpea perfection. We'll even explore some creative ways to use these crunchy delights beyond a simple snack. Ready to dive in?
(Part 1) The Great Chickpea Debate: Boiling vs. No Boiling
Let's face it, when you're eager for a crunchy snack, the last thing you want to do is boil chickpeas. But is it really a necessary step? The answer, as with many culinary dilemmas, is a resounding...it depends.
1. The Boiling Argument: A Crunchy Champion?
Proponents of boiling chickpeas before air frying cite several reasons:
- Softening for Crispness: Boiling pre-cooks the chickpeas, making them more receptive to the hot air in the air fryer. Imagine it like a sponge – once it's damp, it absorbs more easily. This helps them reach that glorious crispy texture.
- Taming the "Beany" Taste: Some folks find that raw chickpeas have a slightly "beany" flavour that can linger even after air frying. Boiling is said to soften this taste, leaving a more neutral canvas for your chosen spices.
- Time Saver: Because the chickpeas are already partially cooked, they'll spend less time in the air fryer, reaching that desirable crunch faster.
2. The No-Boiling Argument: A Crunchy Shortcut?
But the other side of the debate argues that boiling is unnecessary and even detrimental:
- Modern Air Fryers are Powerhouses: With today's advanced air fryers, proponents say they can handle chickpeas straight from the can. It's a time-saver, and it eliminates the extra step of boiling.
- Mushy Mishap: Over-boiling can lead to a mushy mess. The chickpeas might become too soft, losing their ability to crisp up properly.
- Flavour Dilution: Some believe boiling can dilute the natural, earthy flavour of chickpeas, leading to a less vibrant taste.
So, who wins the debate? It's a toss-up, really. Both sides have valid points, and ultimately, it depends on your preference and your air fryer's capabilities.
(Part 2) My Personal Experiment: A Tale of Two Chickpea Batches
As a seasoned air fryer enthusiast, I've been on both sides of the chickpea fence. I’ve boiled, I’ve skipped boiling, and I've even experimented with different air fryer models. The results were, shall we say, interesting.
1. The Boiled Batch: A Crispy Triumph
My first foray into air-fried chickpeas involved the tried-and-true method: boiling. I simmered them for about 15 minutes, drained them well, and then tossed them in olive oil and spices. Into the air fryer they went, and the result? Crispy perfection! They were just like those addictive, roasted chickpeas you find at the supermarket, but way better (and way more budget-friendly).
2. The Raw Batch: A Mixed Bag
Next, I decided to go bold and air fry straight from the can. It seemed like a shortcut, but the results were a bit of a roller coaster. Some chickpeas were wonderfully crisp, while others remained a bit soft. The results weren't as consistent as the boiled batch.
3. The Verdict: A Matter of Preference (and Consistency)
What did I learn? Boiling definitely delivered more consistent, perfectly crispy results. The flavour was also more even. However, air frying raw chickpeas wasn’t a total disaster. It can work, but requires a bit more attention and finesse. It also depends on your air fryer model and the size of the chickpeas. Sometimes, it's a success story; other times, you'll have a few soft ones.
(Part 3) The Science of Crispness: Why Boiling Makes a Difference
Let’s get down to the science of it all. It’s all about moisture and heat transfer.
1. Moisture: The Key to Crunchy Transformation
Chickpeas, like many other foods, need a specific moisture level to achieve that delightful crunch. Boiling them pre-hydrates them, allowing them to absorb the hot air more effectively during air frying. This leads to a crispier exterior. Think of it like a sponge; it absorbs more when it's already slightly damp.
2. Heat Transfer: Even Cooking for Consistent Crunch
Boiling also helps with heat transfer. The water inside the chickpeas conducts heat more efficiently than the air in the air fryer. This ensures the chickpeas cook evenly, both inside and out, leading to that satisfyingly consistent crunch.
(Part 4) How to Boil Chickpeas for Air Frying: A Simple Guide
Okay, so you're convinced that boiling is the way to go. No problem, it’s a simple process. Follow these steps:
1. Gather Your Supplies
You'll need:
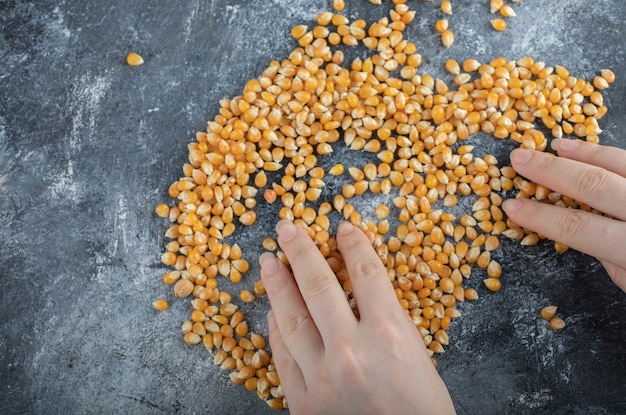
- 1 can (or 1 cup) of chickpeas, drained and rinsed
- A medium-sized saucepan
- Water
- Salt (optional)
2. Boiling Time: Get That Simmer Going
Fill the saucepan with enough water to cover the chickpeas. Bring the water to a rolling boil over high heat.
3. Adding the Chickpeas and Simmering
Carefully add the chickpeas to the boiling water. Reduce the heat to a gentle simmer and cook for 15-20 minutes.
4. Draining and Drying for Perfect Prep
After simmering, drain the chickpeas in a colander. Pat them dry with a clean kitchen towel to remove any excess moisture. You're now ready to create air fryer magic!
(Part 5) Air Frying Chickpeas: The Ultimate Guide to Crispy Perfection
Now for the fun part: air frying!
1. Prepping for Crispy Bliss
Start by:
- Preheating Your Air Fryer: Preheat your air fryer to 400°F (200°C) for 5 minutes. This ensures even cooking and quick results.
- Tossing in Oil and Spices: In a large bowl, toss your chickpeas with 1-2 tablespoons of olive oil or your preferred oil. Season with your favourite spices. Experiment with paprika, cumin, garlic powder, turmeric, or a blend of your choice.
2. Air Frying Time: Achieving that Crunchy Nirvana
Now, it's time to get those chickpeas crispy:
- Spread Them Out: Avoid overcrowding the air fryer basket. This ensures even cooking and prevents them from steaming instead of crisping.
- Air Frying Duration: Air fry for 15-20 minutes, shaking the basket every 5-7 minutes to ensure even browning.
- Doneness Check: The chickpeas should be golden brown and crispy. If they're not quite done, air fry for a few more minutes.
3. Cooling Time: Patience for Ultimate Crunch
Let the chickpeas cool slightly before serving. This will help them become even crispier.
(Part 6) Tips for Air Fryer Mastery: Elevating Your Chickpea Game
Here are a few more tips to help you achieve air fryer chickpea perfection:
1. Avoid Overcrowding: Space for Crispness
Give those chickpeas plenty of room to breathe in the air fryer basket. Overcrowding can lead to uneven cooking and soggy chickpeas.
2. Regular Shaking: Even Browning
Shake the air fryer basket every 5-7 minutes to ensure that the chickpeas cook evenly on all sides.
3. Spice Exploration: Flavour Adventures
Don't be afraid to experiment with spices! Use pre-made seasoning blends or create your own custom blend using your favourite herbs and spices.
4. The Right Oil: Maximizing Crispness
Olive oil is a popular choice for air frying chickpeas, but avocado oil, coconut oil, or other oils with a high smoke point can also work well.
5. Storage Secrets: Preserving that Crunchy Goodness
If you have leftovers, store them in an airtight container at room temperature. They'll stay crispy for a few days.
(Part 7) Beyond Snacking: Creative Ways to Use Air Fryer Chickpeas
Now that you've mastered the art of air frying, it's time to explore the versatility of these crunchy delights. They're not just a snack!
1. Salad Boost: Crunchy Texture and Protein Power
Add a satisfying crunch to your salads with air-fried chickpeas. They're a great source of protein and fiber and complement all sorts of dressings.
2. Bowls of Goodness: A Textural and Nutritional Delight
They're a perfect addition to grain bowls! Toss them with quinoa, rice, or couscous and top with your favourite veggies and sauce.
3. Soup Toppings: Elevating Flavor and Texture
Give your soup a textural upgrade with a sprinkle of air-fried chickpeas. They're a delicious and nutritious addition to any soup, from creamy tomato to hearty lentil.
4. Dip Delights: Crunchy Additions
Crush them up and add them to your favourite dip recipes, like hummus or baba ghanoush.
5. Roasted Veggie Companions: A Crunchy Partner in Crime
Mix them in with your roasted veggies for extra crunch and flavour.
(Part 8) A Nutritious Treat: The Health Benefits of Air Fryer Chickpeas
Air-fried chickpeas aren't just tasty, they're also packed with nutrients! They're a good source of protein, fiber, iron, and folate, making them a healthy snack or meal addition.
1. Protein Power: A Plant-Based protein source
Chickpeas are a great source of plant-based protein. A cup of chickpeas contains about 15 grams of protein, making them a good choice for vegetarians and vegans.
2. Fiber Fantastic: Supporting Digestive Health
Chickpeas are high in fiber, which is essential for good digestion. A cup of chickpeas contains about 12 grams of fiber.
3. Iron Rich: Essential for Red Blood Cell Production
Chickpeas are a good source of iron, a mineral that is essential for red blood cell production.
4. Folate Power: Supporting Cell Growth and Development
Chickpeas are also a good source of folate, a B vitamin that is important for cell growth and development.
(Part 9) FAQs: Your Air Fryer Chickpea Questions Answered
Have questions? I've got answers! Here are some frequently asked questions about air frying chickpeas:
1. Can I Air Fry Chickpeas Straight from the Can?
Yes, you can. However, it's important to rinse them thoroughly and pat them dry before tossing them in oil and spices. Air frying them directly from the can might result in slightly less crispy chickpeas, as they might contain more moisture.
2. How Long Should I Air Fry Chickpeas?
The cooking time will depend on your air fryer model, the size of the chickpeas, and how crispy you want them. As a general rule, air fry for 15-20 minutes at 400°F (200°C), shaking the basket every 5-7 minutes to ensure even browning.
3. What Happens If I Overcrowd the Air Fryer Basket?
Overcrowding the air fryer basket can lead to uneven cooking and soggy chickpeas, as the chickpeas won't have enough space to crisp up properly.
4. Can I Store Air-Fried Chickpeas?
Yes, you can store air-fried chickpeas in an airtight container at room temperature. They'll stay crispy for a few days.
5. What Are Some Good Spice Combinations for Air-Fried Chickpeas?
There are endless possibilities! Experiment with your favourite spices. Some popular combinations include:
| Spice Combination | Flavour Profile |
|---|---|
| Paprika, cumin, garlic powder | Smoky, earthy |
| Turmeric, ginger, garam masala | Warm, spicy |
| Rosemary, thyme, oregano | Herbaceous, aromatic |
| Chili powder, cayenne pepper, paprika | Spicy, kicky |
Get creative and try different flavour profiles!
(Part 10) Final Thoughts: Embrace the Crunchy Chickpea
You're now ready to confidently air fry chickpeas, whether you choose to boil them first or go straight from the can. Whether you're a seasoned air fryer enthusiast or a curious newbie, I encourage you to experiment and discover your perfect method.
So, grab a can of chickpeas, turn up the music, and get ready to create a crispy, flavourful snack or meal addition. The best way to discover your perfect air-fried chickpea method is to experiment! Enjoy!
Everyone is watching

Prime Rib Roast Cooking Time Chart: Per Pound Guide
Cooking TipsPrime rib roast. Just the name conjures images of lavish dinners, crackling fires, and hearty laughter. It’s ...

How Long to Bake Potatoes in the Oven (Perfect Every Time)
Cooking TipsBaked potatoes are a staple in my kitchen. They're incredibly versatile, delicious, and surprisingly easy to m...

Perfect Rice Every Time: The Ultimate Guide to Cooking Rice
Cooking TipsAs a self-proclaimed foodie, I've always been a bit obsessed with rice. It's the foundation of countless cuisi...

The Ultimate Guide to Cooking Asparagus: Tips, Techniques, and Recipes
Cooking TipsAsparagus. The mere mention of this spring delicacy conjures up images of vibrant green spears, crisp and burs...

Ultimate Guide to Cooking the Perfect Thanksgiving Turkey
Cooking TipsThanksgiving. Just the word conjures up images of overflowing tables laden with delicious food, the scent of r...