As a seasoned foodie, I've always been drawn to the allure of seafood, especially the delicate and rich flavor of ahi tuna. There's something truly special about that buttery texture, the way it melts in your mouth, and the subtle sweetness that dances on your palate. But let's face it, getting that perfect sear and preserving the tuna's succulent interior can be a bit of a culinary tightrope walk. I've had my fair share of dry, overcooked tuna, and trust me, it's a culinary tragedy. So, I decided to dedicate myself to mastering the art of cooking ahi tuna, and after countless experiments and a few burnt offerings, I've finally cracked the code. This is the ultimate guide to achieving the perfect seared ahi tuna, one that will leave your taste buds singing and your guests begging for seconds.
(Part 1) The Star of the Show: Ahi Tuna
The Ahi Tuna: A Culinary Treasure
Ahi tuna, also known as yellowfin tuna, is a prized catch for its rich, buttery flavor and firm texture. It's a versatile ingredient that can be enjoyed in a variety of ways, from simple sashimi to elaborate sushi rolls and grilled steaks. But what makes ahi tuna truly special is its ability to hold up well under heat, making it perfect for searing, grilling, and pan-frying.
Choosing the Right Ahi
When choosing ahi tuna, freshness is paramount. You want to look for a fish that is vibrant, firm, and smells clean. Here's what I look for when picking my ahi:
- Color: fresh ahi tuna has a deep, vibrant red hue, almost a purplish-red, that's evenly distributed across the entire piece. Avoid any patches of brown or gray, as this indicates that the fish may not be as fresh as you'd like.
- Smell: A fresh tuna should have a slightly sweet, ocean-like aroma. If it has a strong, fishy smell, or even a hint of ammonia, then it's best to steer clear. Trust me, you don't want to risk ruining your masterpiece.
- Texture: The flesh should be firm and springy to the touch, not mushy or slimy. You want it to feel like a good piece of meat, not a limp dishrag.
- Eyes: This might sound a bit morbid, but if you can, check the eyes of the fish. They should be clear, bright, and slightly bulging. If they're cloudy or sunken, that's a sign that the fish has been sitting around for a while.
Sourcing Your Ahi
Now, where to buy it? You have a few options. If you're lucky enough to live near a reputable fishmonger, that's always your best bet. They'll have a fresh supply, and they can often tell you exactly where the fish was caught and how it was handled, which is really important. If a fishmonger isn't easily accessible, try to find a well-stocked supermarket with a good fish counter. Look for a shop that has a high turnover of fish and makes sure it's displayed in a refrigerated case. If you can't find a fishmonger or supermarket, online seafood retailers are a great option. Just make sure to check their reviews and shipping policies before you place your order.
Preparing the Ahi
Once you've got your beautiful piece of ahi, it's time to get it ready for cooking. First, give it a good rinse under cold running water to remove any lingering impurities. Then, pat it dry with paper towels. Next, trim any excess fat or skin. You want a nice, clean surface for searing.
(Part 2) mastering the sear
The Crucial First Step: Searing
Now, here's where things get exciting. The sear is the cornerstone of a perfect ahi tuna dish. It's the key to creating that irresistible crispy exterior while keeping the inside perfectly tender and juicy. And believe me, it's a dance that takes some practice.
The Science of the Sear
The sear, essentially a quick, intense cooking method, is what creates the iconic crust on ahi tuna. It's achieved by cooking the tuna over extremely high heat, allowing the surface proteins to quickly brown and caramelize. This not only develops flavor but also forms a barrier that helps to retain the tuna's moisture and delicate texture.
Equipment Essentials
Let's start with the equipment. You need a cast iron pan, my personal favorite for searing, or a heavy-bottomed skillet that can withstand high heat. A good quality pan is essential for achieving that beautiful sear without the risk of sticking. I also recommend using a meat thermometer, as it takes the guesswork out of knowing when your tuna is cooked to your liking. The thermometer will ensure that you're achieving your desired level of doneness, preventing overcooking and preserving that succulent interior.
The Technique: Heat and Time
Alright, let's talk technique. The key is to heat your pan over high heat, preferably on a gas stove, until it's incredibly hot. You want to hear that sizzle when you drop a drop of water on the pan. Once it's blazing hot, add a tablespoon or two of your preferred oil. I usually go with olive oil or avocado oil for their high smoke point.
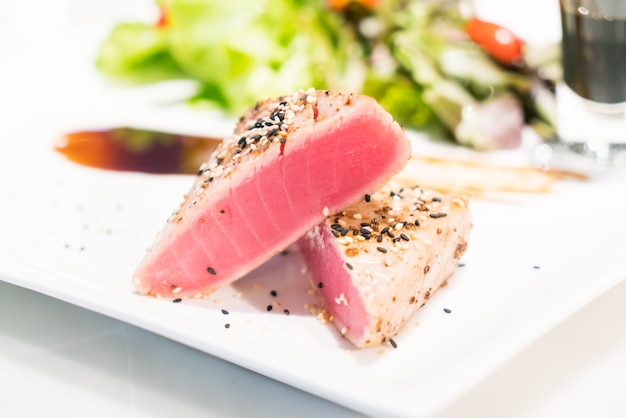
Now, here's the tricky part: time. You don't want to overcook the tuna. Aim for about 30 seconds per side for a medium-rare sear. You'll know it's ready when the surface is nicely caramelized and the inside is still rosy red. If you're aiming for medium or well-done, add another 30 seconds to each side. But remember, the goal is to achieve that perfect balance between a crispy exterior and a succulent interior.
The Secret Weapon: High Heat and No Flipping
Here's a little tip I've learned: resist the urge to flip the tuna more than once. A single flip is all you need. Flipping multiple times can lead to uneven cooking and a dry tuna. Just let it sizzle away on that hot pan, allowing the intense heat to do its magic.
Seasoning the Sear
Now, when it comes to seasoning, less is more. Salt and pepper are your best friends. Season your tuna liberally with kosher salt and freshly ground black pepper right before you put it in the pan. And remember, a little bit of seasoning goes a long way. You can also add a pinch of other spices like smoked paprika or chili powder, but keep it subtle. You don't want to overwhelm the natural flavor of the tuna.
(Part 3) Beyond the Sear: cooking techniques
Searing is Just the Beginning
While searing is undeniably the star of the show, it's just the first step in achieving a truly delicious ahi tuna dish. There are other cooking techniques that can elevate your tuna game to a whole new level.
Grilling: A Smoky Delight
For a smoky, char-grilled flavor, grilling is a fantastic option. The intense heat of the grill creates a beautiful sear and imparts a smoky aroma that will make your mouth water. Make sure your grill is nice and hot, and use a high heat setting. You can grill the tuna over direct or indirect heat, depending on your preference. For a more evenly cooked tuna, I prefer indirect heat. Just place the tuna over the unlit portion of the grill and close the lid. This allows the heat to circulate evenly and prevents the tuna from getting overcooked on the outside.
Pan-Frying: Simple and Versatile
If you're looking for a quick and easy way to cook your tuna, pan-frying is a great option. It's similar to searing, but with a slightly lower heat. Heat your pan over medium-high heat and add your oil. Once the pan is hot, add your tuna and cook for 2-3 minutes per side. You can use a spatula to gently press down on the tuna as it cooks, to ensure that it's evenly seared.
Baking: Gentle and Even Cooking
Baking is a gentler approach to cooking ahi tuna. It's perfect if you want to avoid the intense heat of searing and grilling. Preheat your oven to 400°F (200°C). Place the tuna on a baking sheet lined with parchment paper and bake for 5-7 minutes for medium-rare. The key to baking tuna is to make sure it's cooked evenly. You can use a meat thermometer to ensure that the tuna is cooked to your liking.
(Part 4) Enhancing the Flavor: Sauces and Marinades
Adding Layers of Flavor
Now, let's talk about adding layers of flavor to your ahi tuna masterpiece. The right sauce or marinade can take your dish from ordinary to extraordinary.
Sweet and Savory: Teriyaki Sauce
Teriyaki sauce is a classic pairing for ahi tuna. It's sweet, savory, and slightly salty, providing a perfect balance of flavors. You can use store-bought teriyaki sauce or make your own. If you're feeling ambitious, try making a homemade teriyaki sauce with soy sauce, mirin, sugar, and ginger.
Tangy and Zingy: Ponzu Sauce
Ponzu sauce, a citrusy and tangy Japanese sauce made from soy sauce, rice vinegar, and citrus juice, is another fantastic option. It adds a refreshing zest to the rich flavor of the tuna. You can find ready-made ponzu sauce at most Asian grocery stores.
Spicy Kick: Sriracha Mayo
For those who enjoy a little heat, a sriracha mayo is an excellent choice. It's a simple combination of mayonnaise and sriracha sauce, but it packs a powerful punch. You can adjust the amount of sriracha to your liking, starting with a small amount and adding more if you want it spicier.
Fruity Fusion: Mango Salsa
To add a touch of sweetness and a tropical twist, try a mango salsa. It's a refreshing combination of diced mango, red onion, cilantro, jalapeno peppers, and lime juice. The acidity of the lime juice cuts through the richness of the tuna, while the mango adds a touch of sweetness.
Marinades for Deeper Flavor
For a more intense flavor infusion, marinating your ahi tuna before cooking is a great option. A simple marinade can be made with soy sauce, olive oil, lemon juice, garlic, and ginger. For a more complex marinade, you can add additional ingredients like honey, sesame oil, or chili flakes.
(Part 5) Serving Up Your Masterpiece
Presentation is Key
Now that you've created a perfectly seared ahi tuna steak, it's time to present your masterpiece. After all, we eat with our eyes first!
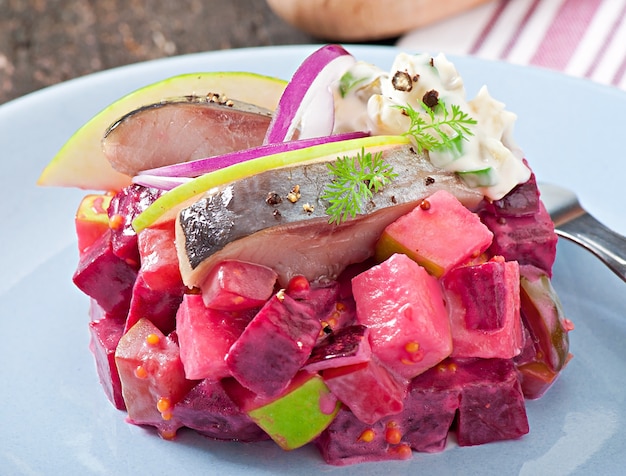
Simple Elegance: Ahi Tuna Salad
For a light and refreshing meal, slice your seared tuna into thin strips and serve it over a bed of mixed greens. You can toss the salad with a light vinaigrette, or use a more flavorful dressing like a balsamic glaze. Add some fresh herbs like basil or cilantro for a pop of color and aroma.
Elevated Plates: Tuna Steak with Roasted Vegetables
For a more substantial dish, serve your tuna steak with a side of roasted vegetables. roasted asparagus, bell peppers, zucchini, or eggplant are all delicious options. You can use a simple seasoning of salt, pepper, and olive oil, or get creative with herbs and spices like rosemary, thyme, or garlic powder.
Warm and Cozy: Ahi Tuna with Noodles
For a cozy and comforting meal, serve your seared tuna over a bed of noodles. You can use soba noodles, rice noodles, or even spaghetti. Toss the noodles with a flavorful sauce like teriyaki sauce, peanut sauce, or a simple stir-fry sauce. Top with your tuna steak and some chopped green onions for a finishing touch.
Global Inspiration: Tuna Bowls
Tuna bowls are a trendy and versatile way to serve your seared ahi tuna. You can customize your bowl with your favorite ingredients. Start with a bed of rice or quinoa, then add your seared tuna, a variety of vegetables like avocado, cucumber, or edamame, and a drizzle of your favorite sauce. Top it off with some chopped nuts or seeds for crunch and a sprinkle of sesame seeds for a touch of umami.
(Part 6) Cooking Ahi Tuna: Temperature and Doneness
internal temperature is Crucial
When it comes to cooking ahi tuna, it's all about the internal temperature. You want to make sure that the tuna is cooked through, but not overcooked. Overcooked tuna becomes dry and rubbery, which is a culinary crime. A meat thermometer is your best friend in achieving the perfect doneness.
Temperature Chart for Ahi Tuna
Here's a handy guide to the internal temperatures for ahi tuna, based on your desired level of doneness:
| Doneness | Internal Temperature (°F) | Internal Temperature (°C) |
|---|---|---|
| Rare | 115-120°F | 46-49°C |
| Medium-rare | 125-130°F | 52-54°C |
| Medium | 135-140°F | 57-60°C |
| Well-done | 145-150°F | 63-66°C |
Tips for Checking Temperature
Here are a few tips for using a meat thermometer to ensure your ahi tuna is cooked perfectly:
- Insert the thermometer into the thickest part of the tuna. Avoid touching the bone or any fat.
- Make sure the thermometer is inserted deep enough to reach the center of the tuna. The tip of the thermometer should be completely submerged in the flesh.
- Wait for the temperature to stabilize before reading it. It may take a few seconds for the thermometer to register the correct temperature.
Visual Clues for Doneness
While a meat thermometer is the most accurate way to gauge the doneness of your tuna, there are some visual clues that can help you determine if it's cooked to your liking.
- Rare: The center of the tuna will be a bright, vibrant red. The flesh will be soft and slightly translucent.
- Medium-rare: The center of the tuna will be a deep, rosy pink. The flesh will be firm but still slightly springy.
- Medium: The center of the tuna will be a light pink. The flesh will be firm and opaque.
- Well-done: The center of the tuna will be a pale, almost white color. The flesh will be firm and opaque.
Resting the Tuna
After you've cooked your tuna, it's important to let it rest for a few minutes before slicing and serving. This allows the juices to redistribute, resulting in a more tender and flavorful tuna. Rest the tuna for about 5-10 minutes, depending on the thickness of the steak.
(Part 7) Leftovers: Storing and Reheating
Saving Your Tuna for Later
Let's face it, sometimes you cook more than you can eat in one sitting. Don't worry, your delicious ahi tuna can be enjoyed the next day.
Storing Leftover Tuna
To store leftover ahi tuna, let it cool to room temperature, then transfer it to an airtight container. Refrigerate the tuna for up to 3 days.
Reheating Tuna
If you're reheating leftover ahi tuna, it's best to do so gently. You can reheat the tuna in the microwave on a low setting for a few seconds. You can also reheat the tuna in a skillet over low heat, or in the oven at a low temperature. Avoid overcooking the tuna, as it will become dry and rubbery.
Reheating Tips
Here are a few tips for reheating leftover tuna:
- Avoid reheating the tuna for too long. Overheating can lead to dry and rubbery tuna.
- Reheat the tuna in small increments, checking the temperature frequently. This will help ensure that the tuna is reheated evenly.
- Add a little bit of moisture to the tuna while it's reheating. This will help keep the tuna moist and prevent it from drying out.
(Part 8) FAQs: Your Burning Questions Answered
1. Can I Freeze Ahi Tuna?
Yes, you can freeze ahi tuna, but it's best to freeze it raw. To freeze ahi tuna, wrap it tightly in plastic wrap or aluminum foil, then place it in a freezer-safe bag. Frozen ahi tuna will last for up to 3 months. When you're ready to use it, thaw the tuna in the refrigerator overnight.
2. How Do I Know If Ahi Tuna is Spoiled?
Fresh ahi tuna should have a slightly sweet, ocean-like aroma. If it has a strong, fishy smell, or even a hint of ammonia, then it's spoiled. The flesh should also be firm and springy to the touch, not mushy or slimy. If the flesh is discolored or has any patches of brown or gray, it's also a sign that the tuna is spoiled.
3. What Can I Substitute for Ahi Tuna?
If you can't find ahi tuna, there are several other types of tuna that you can use as a substitute. Yellowfin tuna, albacore tuna, and skipjack tuna are all good options. You can also use other types of fish, like salmon or swordfish, but keep in mind that they may have a different flavor and texture.
4. What Are Some Other Ways to Cook Tuna?
There are many other ways to cook tuna besides searing, grilling, and pan-frying. You can also poach tuna, bake tuna, or even make tuna tartare. Experiment with different cooking methods to find your favorite way to enjoy tuna.
5. Is Ahi Tuna Good for You?
Ahi tuna is a good source of protein, omega-3 fatty acids, and selenium. It's also low in calories and fat. However, it's important to consume tuna in moderation, as it can contain mercury. Choose tuna that's labeled as "dolphin-safe" and "sustainable" to ensure that you're making a responsible choice.
I hope this comprehensive guide has inspired you to take on the challenge of cooking ahi tuna. It's a truly rewarding experience that will leave your taste buds singing and your guests impressed. Remember, the key to success is choosing fresh, high-quality tuna, mastering the sear, and experimenting with different flavors and techniques. So, gather your ingredients, fire up your pan, and let's create some culinary magic together. Enjoy!
Everyone is watching

Prime Rib Roast Cooking Time Chart: Per Pound Guide
Cooking TipsPrime rib roast. Just the name conjures images of lavish dinners, crackling fires, and hearty laughter. It’s ...

How Long to Bake Potatoes in the Oven (Perfect Every Time)
Cooking TipsBaked potatoes are a staple in my kitchen. They're incredibly versatile, delicious, and surprisingly easy to m...

Perfect Rice Every Time: The Ultimate Guide to Cooking Rice
Cooking TipsAs a self-proclaimed foodie, I've always been a bit obsessed with rice. It's the foundation of countless cuisi...

The Ultimate Guide to Cooking Asparagus: Tips, Techniques, and Recipes
Cooking TipsAsparagus. The mere mention of this spring delicacy conjures up images of vibrant green spears, crisp and burs...

Ultimate Guide to Cooking the Perfect Thanksgiving Turkey
Cooking TipsThanksgiving. Just the word conjures up images of overflowing tables laden with delicious food, the scent of r...